About Me

My photo
Spofford, New Hampshire, United States
Jeff Newcomer had been a physician practicing in New Hampshire and Vermont for over 30 years. Over that time, as a member of the Conservation Commission in his home of Chesterfield New Hampshire, he has used his photography to promote the protection and appreciation of the town's wild lands. In recent years he has been transitioning his focus from medicine to photography, writing and teaching. Jeff enjoys photographing throughout New England, but has concentrated on the Monadnock Region and southern Vermont and has had a long term artistic relationship with Mount Monadnock. He is a featured artist in a number of local galleries and his work is often seen in regional print, web publications and in business installations throughout the country. For years Jeff has published a calendar celebrating the beauty of The New England country-side in all seasons. All of the proceeds from his New England Reflections Calendar have gone to support the Pulmonary Rehabilitation Program at the Cheshire Medical Center. Jeff has a strong commitment to sharing his excitement about the special beauty of our region and publishes a blog about photography in New England.
Showing posts with label high dynamic range. Show all posts

Sunday, July 16, 2017

Using the Lightroom Reference Tool


Adobe regularly sends out updates to their Lightroom CC.  As the Creative Clouds “drift” by, these updates are often filled with new camera support and, hopefully, performance upgrades, but occasionally they slip in a new Tool to make things interesting.  These new gizmos are usually fun to play with, but it often takes a while to figure out what practical value they offer and how they might fit into my day-to-day workflow.  This was true for the new Reference Tool.

Enter the Reference Tool
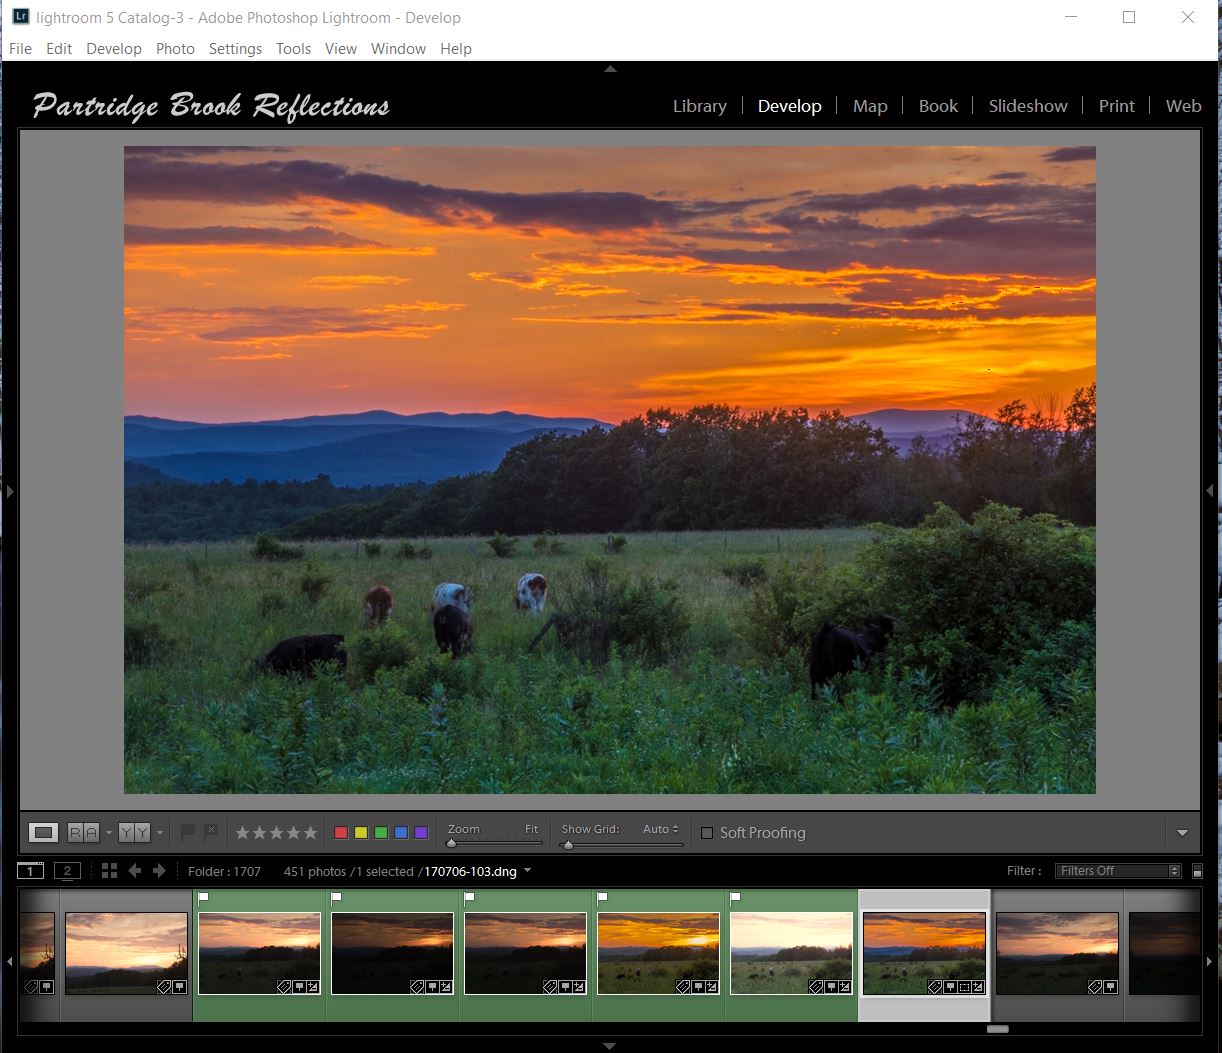
Back a few months ago, the version 2015.8 (Catchy) included the addition of the Reference Tool in the Develop Module.  We are familiar with the Compare Tool in the Library Module, that allows a side-by-side comparison of two images. The Reference Tool appears in the same location in the Develop module as the Compare button, but exchanges the “X/Y” label for an “R/A” Label, standing for Reference and Active windows

The Reference tool allows you to compare two photos, with one a “Reference” image, which stays static, and the other a comparison image which can be edited (i.e. Active).  The usual goal is to match the Active image to the tone and color balance of the Reference.  

The Reference window can most quickly be opened by clicking on the R/A button or by using the short-cut “shift R”.  It is simple to set a reference image by dragging it onto the left window of the tool.  A single image or a series can then be moved to the right window and visually adjusted to the reference.

Easy, but when should you use the tool? 
Adobe suggests:

“This is helpful when making a group of images from a single event look similar or setting the white balance appropriately in mixed lighting conditions,”

Sunrise Challenge

Gradient Neutral Density and Flair

Nifty, but, until recently, I hadn’t found any situations in which this capability was helpful for my landscape photography.  Last week I was shooting a sunset from one of my favorite spots along Route 63 in Chesterfield New Hampshire.  The clouds were a bit too dense, and the sun peeking through them created excessively high contrast.  I tried using a graduated neutral density filter without much success and as usual adding an additional layer of glass just accentuate the flair coming from the brilliant solar disk..

  I tried a few shots, but then settled down to wait until after the sun dropped below the horizon.  In the meantime I studied the long shadow of my tripod and me, reaching back to the Chesterfield Firehouse.  Then the real show began.  As the sun set, the clouds lite up nicely.  Although the sky remained quit bright, the contrasts was easier to manage.  The problem then was to try to find a foreground with enough interest to balance the brilliant sunset glow.   From my location, the lovely pasture spread out toward the distant Vermont hills.  Classic, but rather bland, especially while mired in the shadows.  


Sunset Song

The sky was dramatic but I wanted to find something interesting to put in my foreground.  My first choice was a rather scraggly tree off to one side.  I was attracted by the flock of birds filing the branches, and ecstatically chirping at the fading gold.  It was a charming sunset sonata, but then I noticed cows grazing my way.   I had to scramble to get down to the herd’s level, but then I had my “foreground element”.   I was ready to go.   Again I tried to reduce the contrast with my Neutral density filter, but I got my best results by combining the graduated ND with a five exposure High Dynamic Range image.

Active Grazing


After processing, the sky came out beautifully and the foreground was reasonably exposed.  The problem was that the cows appeared blurred as they methodically grazed there way through the multiple exposures.

HDR Image


My Foreground Image, Exposed to the Right
Looking through the individual images, I found that all had some blurring, but some were less noticeable than in the HD image.  I decided to blend the foreground from one of the single images with the HDR sky.

To get better tonal quality and less noise, I selected my foreground picture from one of the brighter images.  Remember exposing to the right?  To make the blending easier, I wanted to darken the foreground image to closely approximate the tone and color balance of the HDR sky.  This is where the Reference Tool entered my workflow.


Reference Tool

Matched Images
I dragged my HDR image onto the reference window of the tool and then added the foreground to the comparison.  It was then a relatively easy matter to adjust the tone and color of my foreground image.  It wasn’t perfect, but after exporting it to Photoshop, the modified foreground image was close enough to easily to blend with HDR sky.  The final image showed the placid cows munching contentedly, totally oblivious to the spectacular fireworks hovering above their heads.  

Matching the Reference HDR Image, Step by Step


Final Composite Image
I could have roughly matched my two images without a dedicated side-by-side comparison, but the Reference Tool made this chore much easier and more precise.  I had to apply only a few minor adjustments to the masked foreground to reach a perfect the blend. The ability of the Reference Tool to match image layers for compositing is a great use for this new Lightroom feature, and allows me to comfortable position this new “gizmo” within my landscape workflow.

Check out more articles on Lightroom and Photoshop on my Blog at:
Photographic Editing (Photoshop & Lightroom) 

And watch here for information about my next Lightroom course, coming this winter. 
YES, winter is coming!


Jeffrey Newcomer

Sunday, July 10, 2016

The Magic in a Bright and Sunny Day


Beautiful Bright Sunny Day


Ask any photographer and he will tell you, the worse time for landscape photography is in the bright midday light.  The rest of the world will insist that a bright and sunny day is a glorious time to enjoy the beauty of the outdoors, and they assume that it is also a great time to shoot.  We photographers must scoff and patiently explain that the bright sun creates stark contrasts, with both deep, fathomless shadows and brilliant highlights, which are impossible, given the limited dynamic range of both film and digital sensors, to capture completely.  


The human eye has a dynamic range which is probably only slightly broader than current DSLRs but, by virtue of the ability of our eyes to seamlessly transition from dark to light and our brains capacity to assemble an image from this input, we perceive a far greater dynamic range.    A single DSLR image may capture a dynamic range of 8-10 f stops, but, by constantly adjusting to the brightness of the area of our attention, our eyes can appear to record more than 24 stops.  The camera works like an eye whose pupil has been fixed, which is why you are given sun glasses after your eyes have been dilated at the ophthalmologist.  


Exposed for the Highlights

Enough physiology.  The point is that eyes can fully appreciate the lovely contrast between the brilliant light and the cool inviting shadow, but the same conditions have always posed a challenge for photographers. 


Exposed for the Shadows

 I remember, from my film days, a constant frustration with the inability to capture scenes such as when dappled sunlight illuminated a lovely trail in the woods. I always had to choose between exposing for the shadows and, as a result, blowing out all detail in the highlights or exposing for the highlights and losing the shadows.


Full Dynamic Range - Single Image


  If we call the warm light of sunrises and sunset the “Golden Hours”, for us the midday sun is the “Lead Hours”, but the fault isn’t in the light.   The real difficulty comes from the limitations of our photographic tools and techniques to capture what the eye can see and interpret.


I have discussed all of this in greater detail in my article this week in the New England Photography GuildBlog.  As I said there; The good news is that, with the expanded capabilities of modern digital cameras and powerful image editing tools, we can better capture the magic of the bright sunny day. Our job as photographers is to stop whining about the "terrible light" and start finding ways to push beyond the limitations of our medium, and capture the midday glory that is so apparent to everyone else.


Within the Guild article I discuss how the combination of a properly exposed digital image or images can be rendered in editing software such as Lightroom or Photoshop, to capture the full dynamic that range that we can perceive.  Something I never could accomplish in my beloved film days. 


Shade

 I also reviewed other methods that can bring the “bright sunny day” within the range of our limited digital sensors.  I discussed the use of  shade, fill flash, reflectors and diffusers. Of course, I couldn’t leave out the value of a polarizing filter to cut through glaring reflection to allow the rich colors to shine through.


Polarizer


I refer you to my Guild article for this discussion.  In this blog, I wanted to present a Gallery of images that that try to capture the true beauty of the “beautiful sunny day”.  Every kind of light offers its own attractions and challenges and I encourage you not to hide from the Lead Hour.  Accept the challenge and glory in the brilliant sunlight!

Broad Dynamic Range


Trans-Illumination 


 In the Shade


Soft Shade Light


Check out my New England Photography Guild article
"Photography in the Lead Hours"
for more on shooting in the bright sunlight.

Jeff Newcomer
partridgebrookreflections.com


Monday, March 14, 2016

HDR in Lightroom

Hubner Farm Sunset, Lightroom HDR


A couple of weeks ago I reviewed the Lightroom's new panorama tool which works with ease and precision. I have been impressed with this feature and, after trying it on new and reworked panoramas, Lightroom is now my location for rendering these dramatic images. This week I turn to the other function under Lightroom’s Photo Merge option and I believe the HDR tool will also become my preferred approach to natural appearing High Dynamic Range images. 


Dappled Light Tamed with HDR
Catsbane Brook, Chesterfield, NH
For some time, the ability to create High Dynamic Range images, with and without Tone Mapping, has been a unique advantage of digital editing. It started with a number of excellent stand-alone HDR programs. There were a number of choices, but my early favorite was Photomatix. They all provided the opportunity to blend multiple, variably exposed, images to display a broad, and sometimes unreal, range of brightness. It was easy to let things get out of hand, with bizarrely cartoonish results, but that fad seems to have mellowed. Like many I have tried to stick to creating HDR images that are designed to reproduce the natural range of brightness apparent to the human eye.

Photoshop’s early attempts at HDR were a bit awkward, but the tools have greatly improved in terms of both control and results, and now Lightroom has been added as a powerful option.

Start with the Images

Spofford Lake Sunset

HDR images start with capturing a set of images that cover a range of exposures. I most often grab three images, a standard balanced exposure and one about two stops above and below. I've always thought that more images, covering a wider range with smaller differences in exposure, would be better, but apparently three work fine and are recommended by Adobe. A tripod is helpful, but, given Lightroom's ability to align hand held shots, this is not required.

To Lightroom

The images can be placed in a collection or accessed directly from the source directory. After highlighting the series of images, the HDR Tool can be opened from "Photo Merge" in the Photo drop down menu or can be found by right clicking on the series. The menu is surprisingly simple. Immediately upon opening the tool, Lightroom creates a quick preview of the HDR image.


Lightroom HDR Tool
 If the images were hand held, the auto align box should be checked. Auto toning works on the final image by adjusting the sliders in the Toning section of the Develop module. It generally yields a preview closer to the appearance of the final merged image. Without Auto Toning the image can appear very dark, but all the adjustments can be easily modified.
Auto Tone Off


Deghosting

Auto Tone On, Medium Deghosting
Deghosting helps to correct areas in the image that may have moved between exposures. People walking by, or moving foliage can affect the final image and this is a major challenge for all HDR programs. By adjusting the amount of Deghosting Lightroom does a pretty good job reducing the problem. I only wish the program allowed a better assessment of the correction by permitting a closer zoom into the image. The Deghosting overlay shows what areas of the image have been affected by the corrections.

Merged HDR, Edited in Lightroom and Photoshop

 The Merge

Lightroom HDR Catsbane Falls

Each time a change is made in the settings, the preview must be remade, but this usually is not a long process. The final merge takes a bit longer, and when complete, the HDR image is placed in the same directory or Collection as the original series. For those familiar with the dramatic results of HDR/tone Mapped images the end-point of Lightroom's HDR may seem underwhelming. Lightroom creates a more natural appearing image which is a 32 bit RAW file. They contain greatly expanded dynamic range which can be used to dramatic effect as they are editing either in Lightroom or Photoshop. You don't get cartoons, but rather a natural appearing image with greatly expanded dynamic range.


Hubner Farm Sunset, Photoshop HDR and Tone Mapped


Hubner Farm Sunset, Lightroom HDR
I have been experimenting with Lightroom's HDR Tool on new, images as well as remaking some old High Dynamic Range favorites. I have been impressed with the results and the simplicity and speed of the process is refreshing. For most of my HDR this is fast becoming my first choice. Give it a try.


Jeffrey Newcomer
Partridgebrookreflections.com