
 |
| Dawn at Portland Head Lighthouse, Cape Elizabeth Maine, Plumb |
This week some mandatory
whining, and then a discussion of a great new tool in Lightroom's perspective
control options.
 |
| Full House, On my front proch |
 |
| Sympathetic Deer in the Orchard |
What does a landscape
photographer do when he can't get out to the landscape? I can spend time
enhancing old images, but I can only edit in short bursts since I have found
that sitting at the computer is the quickest way to stiffen my hip. About the
only things I have left is to write whinny blogs and to struggle with updates
to my software.
Windows 10
I spent the last week back
and forth with Microsoft Support to try to get my computer upgraded from
Windows 7 to 10. As seen on my wife's laptop, Windows 10 seems to be a
significant improvement over version 8, but it took several long tries to get
the upgrade to work on my desktop. Turns out I had to install 127 updates to
Windows 7 before 10 would install. Now the new operating system seems to be
humming quietly along and hasn't (Yet) caused any problems. On to more updates!
Lightroom and Photoshop CC Updates
 I have been keeping up with
the periodic updates for my Creative Cloud versions of Lightroom and Photoshop.
Some updates contain mostly bug fixes and additional camera support, but
occasionally they include some nifty new toys. An update just came out for
Photoshop with some significant new features, including refinements in the
masking tools, and the introduction of content aware cropping. Today, however,
I want to quickly discuss the refinement in the Upright Tools in the new
version of Lightroom CC, specifically the Improvement in perspective control
with the Guided Upright option.
I have been keeping up with
the periodic updates for my Creative Cloud versions of Lightroom and Photoshop.
Some updates contain mostly bug fixes and additional camera support, but
occasionally they include some nifty new toys. An update just came out for
Photoshop with some significant new features, including refinements in the
masking tools, and the introduction of content aware cropping. Today, however,
I want to quickly discuss the refinement in the Upright Tools in the new
version of Lightroom CC, specifically the Improvement in perspective control
with the Guided Upright option. The ability to adjust perspective has been a powerful tool in Photoshop for some time. Most often this has to do with correcting
 the key-stoning effect that occurs when the
camera is angled upward. With key-stomping, subjects such as buildings appear
to be leaning away from the camera. I discussed the use of Photoshop’s Skew Tool in a previous article, but more recently I have been doing most of my
perspective correction with Lightroom’s Upright controls. This is another
example of Lightroom capturing some of the editing power of Photoshop, but as
is true in other areas, the Lightroom tools lacked some of Photoshop’s ability
to fine tune the changes. At least until now.
the key-stoning effect that occurs when the
camera is angled upward. With key-stomping, subjects such as buildings appear
to be leaning away from the camera. I discussed the use of Photoshop’s Skew Tool in a previous article, but more recently I have been doing most of my
perspective correction with Lightroom’s Upright controls. This is another
example of Lightroom capturing some of the editing power of Photoshop, but as
is true in other areas, the Lightroom tools lacked some of Photoshop’s ability
to fine tune the changes. At least until now. 
Upright
 Within Lightroom’s’ Upright
panel there are a number of automatic adjustments which often do a surprisingly
good job correcting problems with perspective. The tools include an Auto
adjustment, which tries to find a balanced solution, while Vertical and Level
adjustments focus on one axis. The Full adjustment tries to get everything
perfect, often with bizarre results. These automatic, control often work well
but, as is true of most “automatic” solutions, they don’t always come up with
the best result.
Within Lightroom’s’ Upright
panel there are a number of automatic adjustments which often do a surprisingly
good job correcting problems with perspective. The tools include an Auto
adjustment, which tries to find a balanced solution, while Vertical and Level
adjustments focus on one axis. The Full adjustment tries to get everything
perfect, often with bizarre results. These automatic, control often work well
but, as is true of most “automatic” solutions, they don’t always come up with
the best result.  The problem with the Upright controls in older versions of
Lightroom is that there was no easy way to make manual adjustments when the
automatic controls failed. That is until the new Transformation panel in the
latest version of Lightroom CC, which adds the “Guided” adjustment option.
Sadly, this new control is found in the latest update of Lightroom CC and is
not available as yet in the non-subscription version.
The problem with the Upright controls in older versions of
Lightroom is that there was no easy way to make manual adjustments when the
automatic controls failed. That is until the new Transformation panel in the
latest version of Lightroom CC, which adds the “Guided” adjustment option.
Sadly, this new control is found in the latest update of Lightroom CC and is
not available as yet in the non-subscription version. First Do Your Best in the Camera
Perspective corrections in
Lightroom and Photoshop can be remarkably effective, but, especially when the
corrections must be drastic, they can introduce obvious unnatural distortions.
The best way to avoid problems is to minimize how much adjustment we must apply
to the image. Of course shooting with an adjustable view camera or with a
tilt-shift lens can reduce or eliminate the key-stoning effect but these can be
cumbersome and expensive options. Key-stoning can be minimized by raising the camera
and thus reducing the need to angle up to the subject. Climbing a tree or using
a leader or chair can make a difference, but I often find that merely holding
the camera above my head can be a significant help. Once you’ve done everything
to reduce distortion within the camera, it is time to use the magic in
Lightroom or Photoshop.
 |
| Lens Corrections Panel |
My first step is to select
the Lens Profile and Chromatic Aberration corrections in the Lens Adjustment
Panel. Chromatic Aberration is the color banding that occurs along edges with
sharp contrast, especially in the periphery of images. If left uncorrected this
banding can become more noticeable as perspective controls are applied.
| Transform Panel |
The Transformation Panel is
next in Lightroom’s workflow and it is here that the real magic occurs. When I
am dealing with an image that contains the converging lines of “key-stoning”, I
typically start by trying the various automatic settings. In situations such as
my image of Michigan Avenue in Chicago, the Auto or Vertical adjustments often
work best, but when I need better control I will go to the Guided adjustment.
Guided Upright
 |
| Leaning Portland Head Light |
 |
| Level Guided Upright |
The Second City
 |
| Michigan Avenue Chicago |
 Key-stoning can also occur in
landscape shots especially when shooting at tall trees. The sense of the forest
malevolently leaning in can create an ominous mood, but when desired this can
be corrected easily with the Upright tools.
Key-stoning can also occur in
landscape shots especially when shooting at tall trees. The sense of the forest
malevolently leaning in can create an ominous mood, but when desired this can
be corrected easily with the Upright tools. 
Vertical & Level Guides
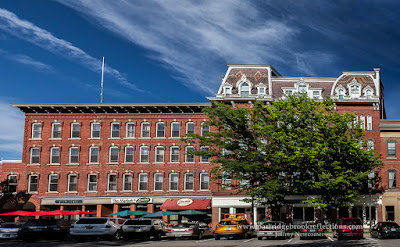
 |
| Original Image |
Using the Guided Upright tool
to correct both Vertical and Horizontal distortion scan be effective, but
trying to control two axis’s at once can stretch the image in ways that appear
unnatural. I shot an image of an old business block in Keene New Hampshire with
the intention of creating a challenge for the upright tools. I framed the
picture from the side and looking up. I got as low as my bionic hip would
allow.
Using Guided Upright, I applied vertical and horizontal guides, I and
was able to get the structure to square up reasonably well, but it was
accomplished with considerable stretching a squishing of pixels. Just notice
the difference in the sizes of the cars parked from right to left. I think that
by stopping at the vertical correction, the building appeared more natural,
balanced.
 |
| Vertical & Level Guides |

 Often lesser amounts of
perspective control are best, but at least with Lightroom’s Transformation
options, experimentation is easy, quick and, as always, nondestructive. Take a
look at all of the upright adjustments applied to my shot looking up at the
spire of Keene’s United Church of Christ Church. The two axis guided adjustment
may be the closest to fully square, but I may prefer the original image with
its dramatic angles.
Often lesser amounts of
perspective control are best, but at least with Lightroom’s Transformation
options, experimentation is easy, quick and, as always, nondestructive. Take a
look at all of the upright adjustments applied to my shot looking up at the
spire of Keene’s United Church of Christ Church. The two axis guided adjustment
may be the closest to fully square, but I may prefer the original image with
its dramatic angles. 
As is true of all the new
tools in Lightroom and Photoshop, the Guided Upright option will find its
proper place in your workflow, but only after much enjoyable experimentation
and many, fortunately reversible, mistakes. So upgrade your Lightroom CC and
start making those glorious disasters.
Jeffrey Newcomer
partridgebrookreflections.com
603-363-8338
partridgebrookreflections.com
603-363-8338


