About Me

My photo
Spofford, New Hampshire, United States
Jeff Newcomer has been a physician practicing in New Hampshire and Vermont for over 30 years. Over that time, as a member of the Conservation Commission in his home of Chesterfield New Hampshire, he has used his photography to promote the protection and appreciation of the town's wild lands. In recent years he has been transitioning his focus from medicine to photography, writing and teaching. Jeff enjoys photographing throughout New England, but has concentrated on the Monadnock Region and southern Vermont and has had a long term artistic relationship with Mount Monadnock. He is a featured artist in a number of local galleries and his work is often seen in regional print, web publications and in business installations throughout the country. For years Jeff has published a calendar celebrating the beauty of The New England country-side in all seasons. All of the proceeds from his New England Reflections Calendar have gone to support the Pulmonary Rehabilitation Program at the Cheshire Medical Center. Jeff has a strong commitment to sharing his excitement about the special beauty of our region and publishes a weekly blog about photography in New England.

Sunday, August 27, 2017

The Evolution of Milky Way Noise


My Yard, Window on the Galaxy

The idea for his week’s blog was triggered by a simple desire to assess how the amount of digital noise has changed from my original Canon 5D to my current beloved 5D Mark IV.  Published reviews all testify to the greatly improved low light capabilities of the newer cameras, but I thought that it would be interesting to test this myself, specifically with the high ISO, long exposure images required for Milky Way photography.  That was my simple goal, but I can never keep articles short and simple.  So, since it is the season, I couldn’t resist discussing a few basic points about capturing the unique beauty of the Milky Way.


 Milky Way Season


Connecticut River, Walpole NH

In New England, summer is a good time to shoot the Milky Way.  Of course, the most spectacular portion of the galactic disk is highest in the Northern Hemisphere sky in late spring, but summer has the advantage of warmer nights.  As we get later in autumn, the galactic core drifts below the horizon and, although a segment of the Milky Way is always visible in the night sky, we have to endure a long cold winter before the most spectacular portions are again visible.  


All About the Foreground


This time of year, I’m always watching for the combination of clear skies and a dark moon for my best Milky Way images.  Then it becomes a matter of finding something interesting to put in the foreground.  A couple of weeks ago I went again to Chesterfield’s iconic town hall.  The angle which incorporated the galaxy had some foreground lights, but I was able to de-emphasize them in post.  


Maximum Shutter

Milky Way photography is actually very easy.  The beauty and detail of the galaxy becomes progressively apparent with larger apertures, high sensor sensitivity (ISO),  and longer exposures, but with longer shutter times, the stars will blur and begin to show star trails.  This can be an interesting effect with especially long exposures, but it is not what you want with Milky Way images.  


Wide angle lenses are key to minimizing star movement with long exposures and I always shoot with my 16mm lens.  The standard equation to calculate the maximum exposure for any particular focal length is the “Rule of 600”


Exposure (sec) = 600 / focal length


For my 16mm lens, 600 / 16 = 37.5 seconds


Many photographers, including myself, suggest that 600 is too high.  They recommend a “Rule of 500”.  I always keep my exposures between 20 – 30 seconds.


Hot Tub View, 20 Seconds

  At 30 seconds, the numerator would be just 480.  Increasingly I am using a 20 second exposure, which make me a “Rule of 320” person.  You can compare various exposures for yourself.  The best shutter speed will depend on how far you plan to enlarge the image.  You can get away with a lot for a small web shot, but be sure you won’t, at some point, want to blow up the image to a large fine art print. Just remember that, as exposure becomes shorter, a higher ISO will be required to get adequate exposure.  That means more digital noise.  Photography is always about finding the best compromise.

Shutter Speed Comparison, !6mm, Full Frame
 
Check out the comparison images from 10 seconds to 5 minutes all zoomed to 100% in Lightroom.  For me the 20 second exposure, with a 16mm lens, seems the best compromise.


Ok. Now aim your standard 50mm lens at the stars and you can, at best, get away with a 12 second exposure.  Up goes the ISO.


Remember the Crop

Martha's Vineyard


Finally, it is important to understand that these calculations are based on shooting with a full frame sensor.  If you are using a crop sensor camera, you will need to apply the crop factor to the calculation to match the effective focal length.  On a Canon Rebel, the crop factor is 1.6, so my 16mm lens becomes an effective, 16 x 1.6= 25.6mm and using my rule of 320 the maximum exposure becomes 12.5 seconds.


Finding Infinity

It is easy to experiment with different shutter speeds, but try to balance the shortest exposure with an acceptable ISO.  Also with 
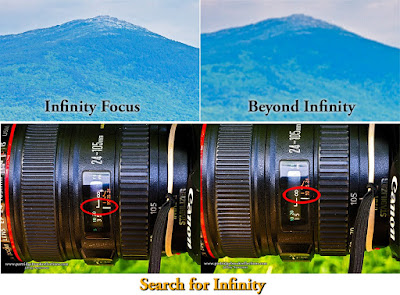
proper infinity focus you can use YOUR LEN’S  widest aperture.  The stars are many light years away, infinity should work just fine.  Just remember that on most lenses, especially zooms, the true infinity point is not at the lenses maximum rotation point. You can find your lenses true infinity by visually focusing on a distant bright light or star.  Many lenses have a check mark next to the infinity icon that should be close to the actual true point.  I know my infinity point on my 16-35mm lens and I tape it to that spot before I go out to shoot the sky.


The Noisy Sky

Dublin Lake
I typically shoot the Milky Way with an ISO ranging between 1600 and 3200 and, even with my lovely Canon 5D Mark IV, that still means digital noise.  I always use my camera’s noise reduction setting.  To reduce camera shake, I select Mirror Lockup and turn off  image stabilization.  The digital noise can still be bothersome, but the newest noise reduction algorithms in Lightroom and Photoshop can make a significant difference.  As always, it is a balancing act, since heavy noise reduction can lead to a loss of crispness in the image.


The good news is that newer sensors are getting better at reducing the high ISO noise.  I have watched this progress as I have move through a series of 5Ds, from 5D to the Mark II and now the Mark IV.  I have always had the sense that the noise was getting better, but I thought this might be a good time to check this in the context of Milky Way images.


HENCE this Article

I know that this has been a long way to get to the point, but, for context, I couldn’t resist a quick review of the essentials.


My 32000 ISO Mistake

Chesterfield Town Hall ISO 32000

The idea of comparing high ISO noise was triggered by a mistake.  While shooting the Milky Way beyond the Chesterfield Town Hall, I intended to use an ISO of 3200, but instead, I set the sensitivity to 32000!  I was perplexed by the adjustments that I needed to make for a balanced exposure, but then my mistake finally hit me.  Back home I was struck by the fact that the noise at 32000 was not all that bad.  My wonderful Mark IV ! – Worth every penny – actually, too many pennies.  


My camera is great, but I wondered how much better it was compared to my previous versions of my “wonderful” camera.  Since I am a pack rat and never throw my old stuff onto eBay, I still had all my 5Ds.  So, let’s compare.


I set my tripod and recorded the same sky with all three cameras at the same settings, 16mm, f2.8, 30 seconds and ISO at 1600.  I would have preferred to use a higher ISO, but that is as high as my original 5D will go.  


Results

I was surprised at how little difference I could see between camera, even at 2-1 zoom and I REALLY wanted and expected to see an improvement with my fancy new camera.  Reluctantly, I was forced to conclude that there was much difference in noise at an ISO of 1600.  


Digital Noise at ISO 1600


Maybe I would see a difference at higher ISOs.  I lost my trusty old 5D, but, the next night, I was able to test the noise at my Mark II’s maximum ISO of 6400.  Happily, to my eye, Mark IV has less noise and generally crisper detail.  Ok, the difference is not earth shattering, but leave me alone! - the 5D Mark IV is great for lots of other reasons as well.


Since I didn’t get to see the full solar eclipse, it was fun to play with another remarkable celestial phenomenon and one I don't have to wait another seven years to see again. I hope it gets you excited about using the power of digital photography to deeply gaze into the universe before the galactic core retreats below the horizon.


For more information about shooting the night sky, check out my previous articles:


Jeffrey Newcomer


Saturday, August 19, 2017

Upcoming Courses and Workshop, The Fall and Winter Schedule


More to Learn


It’s been a lovely summer but now it’s time to settle into planning my teaching schedule for the fall and winter. Even when the topic is one that I have presented before, preparing a course requires hours of review and organization of material.   In November, I will be offering my Introduction to Digital Photography course through Keene Community Education for the fourth time, but I am constantly modifying the material to make it more understandable and hopefully at least a little entertaining.  

PowerPoint presentations have the reputation of being dry and pedantic, with a succession of mind numbing lists of information. Lazy presenters are often satisfied with merely transporting their outlines to the screen, but photography is above all a visual topic and I try to tell my stories with pictures and as little text as possible.

Fryes Mill Falls, Wilton NH
So far, I have had no trouble finding people who are enthusiastic to learn about photography and editing.  Digital photography has expanded the availability high quality imaging, and, given the immediate feedback offered on the camera’s LCD, the ease of learning has been much improved.  These days, there is a growing number of people who want to go beyond what they can achieve with their smart phones.  They are acquiring more sophisticated cameras, including Digital SLRs,  with better control of imaging, . Many are excited to learn about what all those buttons actually do.  


  Up-coming programs include a fall foliage workshop, a general introduction to digital photograph and a course covering the image management and editing capabilities in Lightroom, a miraculous program from Adobe.   In October, I'll be starting with the foliage workshop.  I think I enjoy the workshop format best since it allows me to share the beauty that I have discovered in our remarkable corner of New England.

2017 Spring Waterfall Workshop
Next year I plan to repeat my Spring Waterfall Workshop and I will be considering other possibilities including a course covering Photoshop for Photographers and perhaps other workshops.  How about winter or night photography?

There is a lot to consider, but for now, here are the plans for the next few months.   To allow for more personal attention, I like to keep my programs small, so to assure a spot, get your requests in soon .


                             -------------------------------------------------------

Fall Foliage Weekend
October 13-15
Fortuitous Cow
This autumn, I will again be offering my Fall Foliage Weekend Workshop.  Last year we had a great time, and hopefully we will have similarly wonderful weather and color.  I will be following the same format that seemed to work well last year.  Again, I picked the weekend after the Columbus Day weekend craziness.  It is an opportunity to see great color without the same crowds that typically congest our beautiful countryside.  Our base of operations


will be around my dining room table in Spofford, NH.  I will host the participants at my home on Friday evening for snacks and a discussion about photography in general, and the specific opportunities and challenges of foliage photography.  It will also be time to plan the shooting for all day Saturday and Sunday morning.   Saturday, we will head out early to explore as many different locations as possible.  My goal. Will be to place the group in beautiful locations and then help them get the most from the opportunities. Last year, on Saturday morning, we focused on Vermont, including Guilford and the magic village of Green River. 


Later in the day we spent time exploring a classic farm stand in Walpole New Hampshire and ended by finding a spot to watch the full moon rise above Spofford Lake.   There will be no full moon on October 14th, but for any who want to stay late, we might see a little of the Milky Way over the lake. In the evening, we will return to the dining room table for an informal diner of pizza and some gentle critiquing of the day’s shoot

Green River Bridge, Guilford, Vermont


Grazing under Mount Monadnock
We will head out again Sunday morning for more of our exploration of color, and I will finally let people go around noon. Last year everyone seemed to come away exhausted but thrilled with the experience, and I had a great time sharing my love for photography in this special time of year. 


Fall Foliage Workshop 2016

603-363-8338  


                             -------------------------------------------------------

Introduction to Digital Photography
November 2, 9, 16, 30 
It has become an annual tradition to offer my Introduction to Digital Photography Course as part of Keene Community Ed’s fall program.  The course includes 4 classes and two photo shoots. I cover a wide range of topics from understanding the difference in camera types to, image file formats, file management and archiving. Special emphasis is placed on exposure, composition and the use of different types of light.  All these topics are applied to the results of the photo shoots.


The course size is limited and, if the past is any guide it tends to fill quickly.  Registration begins August 22nd can be done over the phone at 357-0088 or on-line at www.keenecommunityed.org.  Please feel free to get in touch with me for any questions.


                             -------------------------------------------------------


Introduction to Adobe Lightroom
I haven’t set the dates yet, but it will be in January and/or February.

I am a dedicated long-term user of Photoshop, but over the last few years I have become increasingly impressed with the power of Lightroom, in terms of both its image management tools and its sophisticated editing capabilities.  I still bring almost all my images into Photoshop for final tweaking, especially when complicated masking is required, but I now use Lightroom for 80-90% of my global editing.  Given its power and ease of use, for the majority of digital photography enthusiasts, Lightroom is likely all they will need to get started with image management and editing.


In response to frequent requests, I developed an introductory course covering all the essential capabilities of Lightroom.  I have offered the course three times and it has been warmly received.  I run the class as a live demonstration.  Students are encouraged to work along on their own laptops, but a computer is not necessary to benefit from the material.   I’ve had a great time and the classes.  Without the use of PowerPoint slides, presentations are much more dynamic, and, as is always true of teaching a course, I have learned a ton. I initially thought that that four, two-hour classes would be enough to cover the program's many features, but because of my tendency to ramble and lots of great questions, I have added a fifth class to cover the Slide Show, Book and Web Modules. I probably could have used more time, but I learned that 2 hours of software complexity at a time is definitely the limit for my mature students – and their teacher. 


I again will be limiting the class to the 8 people who can fit comfortably around my dining room table.  There will be five, two hour, evening sessions, and of course, snacks will be provided. The course is $195.  There are already people on the waiting list from last time, so please get in touch as soon as possible.

603-363-8338  


That is my list for now.  I am excited how, in the last couple of years, teaching has become such an important part of my photographic activities. Of course, the classes and workshops have seemed a natural extension of the teaching I have been doing for years in my weekly Getting It Right in the Digital Camera Blog.  It has been working on the blog that has expanded my knowledge to the point that feel comfortable offering my classes. I hope to get to know many more of my readers as I continue and expand my live programs.

Please get in touch if you have any questions about the up-coming classes and work-shops, or if there other topics you would like to see me cover either in a class or on the blog.  Any interest in a Photoshop Class – or classes.


Jeffrey Newcomer
partridgebrookreflections.com
603-363-8338


Sunday, August 13, 2017

Spray and Pray?


Bug Light, Portland Maine


I just returned from my annual trip to the coast and, as usual, I am drowning in images that require uploading, converting, renaming organizing and editing.  Why do I always come home with so many pictures?


Portland Head Light
Living in the landlocked center of New England I enjoy every opportunity to get back to the coast.  The rocky shores, the beaches, the quaint villages and of course the proud lighthouses all offer photographic choices that are very different from what I enjoy around home.  I love the “Currier and Ives” beauty of my Monadnock regions, but it is refreshing to be surrounded by different opportunities to challenge my eye. 

It isn’t surprising that, returning from 5 days on the coast, I have much work to do on the images.  I will be sharing more of my favorites in future articles, but today I want to ask a simple question that arose as I uploaded my images.  Why do I take so many pictures?


It took me a couple of days to upload my images from my coastal tour.
Floral Shore, Ogunquit, Me
Five Image HDR
 Over five days, I shot over 500 pictures which, at more than 20 megabits each, means that I had more than 10 billion pixels to manage.  I wanted to briefly discuss why it is that I took so many pictures on this, and actually ALL of my shoots.  Is it justified or just a manifestation of the classic “Spray and Pray” approach to photography. I would like to think that there are many good reasons to come home with piles of images.   Given the cheapness of pixels and the availability of inexpensive options for their storage, failure to capture all the images that are necessary is a disservice to the subjects

Spray and Pray

Change to "Spray and Pray"

For many casual photographers, digital imaging has encouraged the tendency to shoot randomly, without careful attention to light or composition. This “Spray and Pray” approach assumes that among the hundreds of images a few will come out ok.  After all, its only pixels and all the trash can just be deleted.   The problem is that this technique removes the photographer from the process and without creative input it is impossible to craft the best images.  If I wish to argue that's I am NOT a spray and prayer, I must suggest a few other reason to shoot mountains of pictures.

----------------------------------------------------------------------------------------

Different Angles and Compositions
Dummerston Covered Bridge
Perhaps the most obvious reason to capture lots of images is the need to “work the scene”, to explore as many different angles as possible.  I never feel that I have done my job until I have gone beyond the pretty picture postcard view and have explored the subject from different angles and perspectives. I typically start wide and then steadily move in on the detail.  Not every angle works, but I keep them all, because you just never know.


                     -------------------------------------------------------------
Nailing the Exposure, Bracketing, HDR
Back in my film days, I routinely bracketed my exposures.  Transparency film is famously unforgiving and I almost always grabbed one image above and one below the metered exposure.  Today, with the instant feedback of the Histogram, it is much easier to nail the exposure.  I still may take several images until I get my “perfect” histo, and I admit that I am not as rigorous as I should be in deleting the trial images – You never know.  


      HDR

This leads to a discussion of the collection of multiple, varyingly exposed, images gathered in anticipation of crafting an HDR picture.  This can require 5, 7 or more images, or just two, one exposed for the shadows and another for the highlights. It is somewhat like my old film bracketing, and on occasion, I will find one among the series that has sufficient dynamic range to be used on its own.  Of course, that doesn’t mean that I will throw the others away – You never know.

Hubner Farm, HDR and Tone-Mapped


                     -------------------------------------------------------------
Focus Stacking
Three Layer Focus Stack
Given the exposure control offered by digital photography, most of my current bracketing is based on obtaining a range of focus points.  I originally referred to this as “Focus Bracketing”, until I discovered that everyone else was calling it “Focus Stacking”.  “Stacking” refers to the ability to achieve impossibly wide depth of field by stacking together image layers with different focus points.  


Perkins Pond to Monadnock - Deep DOF


I often use focus stacking in situations in which extreme DOF is the goal. For almost all of the rest of my Images, I routinely grab at least three pictures, focusing on the foreground, mid-ground and background.  Again, I often find one of the images that captures sufficiently sharp focus throughout, but of course I keep the other images- You never know. 


                     -------------------------------------------------------------


Capturing the Moment
Any time, when the scene is changing, multiple images can be important for catching the perfect moment.  Running animals, flying birds, and racing athletes, are why your camera’s burst mode was created. 


Blue Heron Landing - Just the right moment


Last weekend, I was reminded of another use for bursts of images, the capturing of the waves.  Several years ago, I placed myself on a precarious

Best of the 70

outcropping to shoot the waves crashing on the rocks of Pemaquid Light.  It is never possible to reliably predict the moment of the most dramatic waves. By the time you see the perfect crashing wave, it is already too late to capture the event. The best that can be done is to shoot bursts of what seem to the most promising candidates. Before I was forced to run from the rising tide, I shot more than 70 pictures, to catch just two that were “heroic keepers”.  That is atypical ratio.  I should have thrown the others away, but you never know.


Pemiquid Crash


Bob's Floating Head
Finally, when taking group pictures, I always take multiple images.  There is always at least one person in every group shot who is talking, yawning or picking their nose.  As I click away, I ask the crowd to stay still, and then I can usually find an acceptable picture of the nose picker to clone into the final image. 

                     -------------------------------------------------------------

Getting a Steady Shot
Katy's Almost Perfect Technique
I go through a careful checklist of procedures to try to capture perfectly sharp images.  Equally important to sharp focus, is the requirement to hold the camera steady.  This is especially important when trying to handhold shots with longer shutter speeds.  My hand-holding technique includes the positioning of my body, cradling of the camera and a careful finger roll shutter release but still the pressing of the shutter button can introduce a slight vibration.  


Finger Roll Shutter Release
To help with this I tend to take a burst of at least two images on each shutter press. I’m not sure how much it helps. Sometimes the first image is the sharpest, but it makes me feel better, and I never - ever know. Obviously, this is not an issue with a cable release on a tripod, but I still have to remember to turn off the image stabilization feature.


                     -------------------------------------------------------------

The Picture Glut Equation (With acknowledgement to the Drake Equation)

Bug Light, Portland Maine

Ok, that is just a partial list of my excuses for bringing home so many images.  I am sure there are others.  Of course, many of these excuses can apply to the same scene progressively multiplying the pixel pile.  The Bug Lighthouse picture required about 90 images, including several for focus stacking of the lighthouse and rocks, many to obtain the best waves, and several to capture the ferry in the best location.


My picture glut formula may be loosely expressed as:


Number of Pictures = (Different angles) x (Exposure Searching) x (Focus Stacking) x (Action Bursting) x (Steadying Hand-Holding Bursts)

Of course, not every scene requires all of these factors, but let's put in some conservative, but totally reasonable numbers for an imaginary landscape scene:

(5 angles) x (6 exposures) x (3 focus points) x (0:no action here) x (2 hand steadying) = 180 images for one location 

It is amazing that I came home from the coast with so few images.  The point is that digital photography makes it practical to use as many images as is necessary to render the best representation of the scene.  Although they both involve taking many pictures, this careful, deliberate process could not be further from the careless, random approach of "Spray and Pray". 

Now if I can only force myself to get rid of some of those extra shots!
BUT, You just never know!

Jeffrey Newcomer