
About Me

My photo
Spofford, New Hampshire, United States
Jeff Newcomer had been a physician practicing in New Hampshire and Vermont for over 30 years. Over that time, as a member of the Conservation Commission in his home of Chesterfield New Hampshire, he has used his photography to promote the protection and appreciation of the town's wild lands. In recent years he has been transitioning his focus from medicine to photography, writing and teaching. Jeff enjoys photographing throughout New England, but has concentrated on the Monadnock Region and southern Vermont and has had a long term artistic relationship with Mount Monadnock. He is a featured artist in a number of local galleries and his work is often seen in regional print, web publications and in business installations throughout the country. For years Jeff has published a calendar celebrating the beauty of The New England country-side in all seasons. All of the proceeds from his New England Reflections Calendar have gone to support the Pulmonary Rehabilitation Program at the Cheshire Medical Center. Jeff has a strong commitment to sharing his excitement about the special beauty of our region and publishes a blog about photography in New England.
Showing posts with label night. Show all posts

Sunday, August 27, 2017

The Evolution of Milky Way Noise


My Yard, Window on the Galaxy

The idea for his week’s blog was triggered by a simple desire to assess how the amount of digital noise has changed from my original Canon 5D to my current beloved 5D Mark IV.  Published reviews all testify to the greatly improved low light capabilities of the newer cameras, but I thought that it would be interesting to test this myself, specifically with the high ISO, long exposure images required for Milky Way photography.  That was my simple goal, but I can never keep articles short and simple.  So, since it is the season, I couldn’t resist discussing a few basic points about capturing the unique beauty of the Milky Way.


 Milky Way Season


Connecticut River, Walpole NH

In New England, summer is a good time to shoot the Milky Way.  Of course, the most spectacular portion of the galactic disk is highest in the Northern Hemisphere sky in late spring, but summer has the advantage of warmer nights.  As we get later in autumn, the galactic core drifts below the horizon and, although a segment of the Milky Way is always visible in the night sky, we have to endure a long cold winter before the most spectacular portions are again visible.  


All About the Foreground


This time of year, I’m always watching for the combination of clear skies and a dark moon for my best Milky Way images.  Then it becomes a matter of finding something interesting to put in the foreground.  A couple of weeks ago I went again to Chesterfield’s iconic town hall.  The angle which incorporated the galaxy had some foreground lights, but I was able to de-emphasize them in post.  


Maximum Shutter

Milky Way photography is actually very easy.  The beauty and detail of the galaxy becomes progressively apparent with larger apertures, high sensor sensitivity (ISO),  and longer exposures, but with longer shutter times, the stars will blur and begin to show star trails.  This can be an interesting effect with especially long exposures, but it is not what you want with Milky Way images.  


Wide angle lenses are key to minimizing star movement with long exposures and I always shoot with my 16mm lens.  The standard equation to calculate the maximum exposure for any particular focal length is the “Rule of 600”


Exposure (sec) = 600 / focal length


For my 16mm lens, 600 / 16 = 37.5 seconds


Many photographers, including myself, suggest that 600 is too high.  They recommend a “Rule of 500”.  I always keep my exposures between 20 – 30 seconds.


Hot Tub View, 20 Seconds

  At 30 seconds, the numerator would be just 480.  Increasingly I am using a 20 second exposure, which make me a “Rule of 320” person.  You can compare various exposures for yourself.  The best shutter speed will depend on how far you plan to enlarge the image.  You can get away with a lot for a small web shot, but be sure you won’t, at some point, want to blow up the image to a large fine art print. Just remember that, as exposure becomes shorter, a higher ISO will be required to get adequate exposure.  That means more digital noise.  Photography is always about finding the best compromise.

Shutter Speed Comparison, !6mm, Full Frame
 
Check out the comparison images from 10 seconds to 5 minutes all zoomed to 100% in Lightroom.  For me the 20 second exposure, with a 16mm lens, seems the best compromise.


Ok. Now aim your standard 50mm lens at the stars and you can, at best, get away with a 12 second exposure.  Up goes the ISO.


Remember the Crop

Martha's Vineyard


Finally, it is important to understand that these calculations are based on shooting with a full frame sensor.  If you are using a crop sensor camera, you will need to apply the crop factor to the calculation to match the effective focal length.  On a Canon Rebel, the crop factor is 1.6, so my 16mm lens becomes an effective, 16 x 1.6= 25.6mm and using my rule of 320 the maximum exposure becomes 12.5 seconds.


Finding Infinity

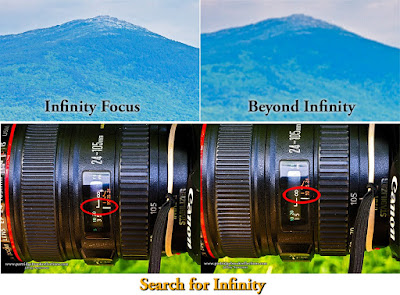
It is easy to experiment with different shutter speeds, but try to balance the shortest exposure with an acceptable ISO.  Also with proper infinity focus you can use YOUR LEN’S  widest aperture.  The stars are many light years away, infinity should work just fine.  Just remember that on most lenses, especially zooms, the true infinity point is not at the lenses maximum rotation point. You can find your lenses true infinity by visually focusing on a distant bright light or star.  Many lenses have a check mark next to the infinity icon that should be close to the actual true point.  I know my infinity point on my 16-35mm lens and I tape it to that spot before I go out to shoot the sky.


The Noisy Sky

Dublin Lake
I typically shoot the Milky Way with an ISO ranging between 1600 and 3200 and, even with my lovely Canon 5D Mark IV, that still means digital noise.  I always use my camera’s noise reduction setting.  To reduce camera shake, I select Mirror Lockup and turn off  image stabilization.  The digital noise can still be bothersome, but the newest noise reduction algorithms in Lightroom and Photoshop can make a significant difference.  As always, it is a balancing act, since heavy noise reduction can lead to a loss of crispness in the image.


The good news is that newer sensors are getting better at reducing the high ISO noise.  I have watched this progress as I have move through a series of 5Ds, from 5D to the Mark II and now the Mark IV.  I have always had the sense that the noise was getting better, but I thought this might be a good time to check this in the context of Milky Way images.


HENCE this Article

I know that this has been a long way to get to the point, but, for context, I couldn’t resist a quick review of the essentials.


My 32000 ISO Mistake

Chesterfield Town Hall ISO 32000

The idea of comparing high ISO noise was triggered by a mistake.  While shooting the Milky Way beyond the Chesterfield Town Hall, I intended to use an ISO of 3200, but instead, I set the sensitivity to 32000!  I was perplexed by the adjustments that I needed to make for a balanced exposure, but then my mistake finally hit me.  Back home I was struck by the fact that the noise at 32000 was not all that bad.  My wonderful Mark IV ! – Worth every penny – actually, too many pennies.  


My camera is great, but I wondered how much better it was compared to my previous versions of my “wonderful” camera.  Since I am a pack rat and never throw my old stuff onto eBay, I still had all my 5Ds.  So, let’s compare.


I set my tripod and recorded the same sky with all three cameras at the same settings, 16mm, f2.8, 30 seconds and ISO at 1600.  I would have preferred to use a higher ISO, but that is as high as my original 5D will go.  


Results

I was surprised at how little difference I could see between camera, even at 2-1 zoom and I REALLY wanted and expected to see an improvement with my fancy new camera.  Reluctantly, I was forced to conclude that there was much difference in noise at an ISO of 1600.  


Digital Noise at ISO 1600


Maybe I would see a difference at higher ISOs.  I lost my trusty old 5D, but, the next night, I was able to test the noise at my Mark II’s maximum ISO of 6400.  Happily, to my eye, Mark IV has less noise and generally crisper detail.  Ok, the difference is not earth shattering, but leave me alone! - the 5D Mark IV is great for lots of other reasons as well.


Since I didn’t get to see the full solar eclipse, it was fun to play with another remarkable celestial phenomenon and one I don't have to wait another seven years to see again. I hope it gets you excited about using the power of digital photography to deeply gaze into the universe before the galactic core retreats below the horizon.


For more information about shooting the night sky, check out my previous articles:


Jeffrey Newcomer


Sunday, August 23, 2015

A NIght Out with The Photographer's Ephemeris


There is a new player in town for locating the Milky Way and it turns out to be an old friend.


My usual approach to night-time photography begins with a determination of the time of the moon's rise and set, its location and phase using the remarkable Photographer's Ephemeris (TPE). The usual hot times for night photography are around the full moon and when the new moon leaves the sky dark for deep space observations. It is great fun to move my pin around the map looking for locations that will place the rising or setting moon behind interesting foregrounds.


Photopills
Recently I have depended on a different application to find the position of the Milky Way. In addition to the moon, our galactic
disk is the other major attraction of the night sky and the Photopills App does a nice job showing the arc of the Milky Way and the position and elevation of the impressive Galactic Center. The location of the Milky Way is portrayed with a series of balls with their position representing the orientation and elevation above the horizon. As the time line is shifted the "galactic Balls" move across the sky. The balls increase in size as they approach the galactic center. It works well to predict the best time and location to shoot the Milky Way, when the galactic Center is in the best position. It is a little awkward to jump between TPE and Photopills, but the new version of the Photographer's Ephemeris brings these two functions together.
The Photographer's Ephemeris 3.4
The Photographer's Ephemeris

The Photographer's Ephemeris' latest version 3.4 is for devices running iOS 8.1 or higher. The App has a new night mode which shows the location of the Milky Way with a user interface essentially identical to Photopills. The Galactic balls are given an attractive 3 dimensional feel and the sky includes a few of the major constellations, but the overall UI seems based on the same concept. I'm happy that I don't have to learn a new system, but seriously, does TPE own Photopills or did they license the UI. Anyway, it's not my problem and I'm thrill that my favorite photo app now makes it easier to plan my night-time shoots all in one place. 


Walpole Sky


Milky Way over the Connecticut


A few days ago I used my upgraded TPE to find a viewing spot in Walpole for this month's optimal Galaxy viewing around the new moon. I found a spot on a bridge crossing the Connecticut River that had a nice view to the south. I was hoping that the trip further north would reduce the light pollution from Brattleboro Vermont and I was pleased that the horizon glow was a bit reduced. 


Don't Try This at Home
At 10:30 pm the shoulder looks smaller
TPE showed me that the Milky Way would be moving across the river between 10 and 11pm. I set up on the bridge and captured some nice views. The only major difficulty was finding 20-30 second time periods when cars and trucks were not speeding across the span with their brilliant headlights. There was precious little room on the side of the bridge and I made sure to flash all my reflective garments as the vehicle came rumbling by. You are welcome to lecture me about safety, but, if needed, I was ready to leap over the side and, since I survived, the pictures were definitely worth the risk.


Two Galaxys For the Price of One

Andromeda in the Northern Sky
The Oval is Mine-Duh
The view of the Galactic Center to the south is the most spectacular portion of the Milky Way.  It is the perspective that dominates the vast majority of published Milky Way images, but, since you're out there,  I would suggest that you grab a few shots in the opposite direction.  This time of year the "tail" of the Galactic arch sits in the Northern sky and, although not as intense as the view around the Center, it has its own attractions.  The northern vista has a softer, less angry appearance with less galactic dust to cloud the stars, but my favorite reason for capturing this view is the chance to see the Andromeda Galaxy.  Andromeda is the nearest major galaxy to the Milky Way and the only galaxy visible to the unaided eye.  Even on a dark moonless nights, it only appears as a vague smudge of soft light, but, through a telescope, Andromeda can be seen to be more the six times the size of the full moon.  With the digital camera's the high ISO and prolonged exposures, this swirling mass of over one trillion stars becomes much more apparent.  The Andromeda Galaxy is more than 2.5 million light years distant from earth, and provides our best chance to look deeply back in time with our own eyes.  The light reaching us now left Andromeda when primitive humans first
Ancient Light  -  Coming at You
walked on the earth.  In our expanding universe, Andromeda is on a collision course with the Milky Way, and is therefore one of the few blue shifted galaxies we can observe.  But you needn't duck yet, the galaxy is approaching at the relatively leisurely pace of 86 miles per second.  It won't get here for about 4 billion years and by that time the earth will have been burned to a cinder by our exploding sun.  Comforting thought!  Although it may make you feel microscopically small, it is still worth a peak to see our future companion in the endless void.   


Andromeda Galaxy - Slightly Better View - A Telescope Still Helps

 Choices
Anyway, I'm excited about the night features in TPE.   Version 3.4 of the Photographer's Ephemeris is available for free download and works for users running iOS 8.1 or greater. I reluctantly had to upgrade my iPad, but it was worth the hassle. For those unwilling to upgrade or who are running Android, Photopills is still a great option and has other features and nifty tools not available in TPE.  For me, The Photographer's Ephemeris' interface is cleaner and easier to use, but perhaps Photopills will come up with new features that will blow TPE out of the water. Don't you just love the free market system?  It's all good, and the software choices are infinitely better than those available just a couple of years ago. 

Jeffrey Newcomer
Partridgebrookreflections.com


Sunday, May 24, 2015

Exploring Night Sky Photography


Pasture Arch, Walpole NH

Rye Beach, NH, July
I'm happy to admit that I am not an expert on astrophotography, but the improved low light capabilities of newer digital cameras have made the process of capturing the night sky so easy and the results so remarkable, that it is hard to avoid giving it a try. There are a number of great photographers who have concentrated on this special photographic niche. They have produced breath-taking star field images, and have generously published detailed descriptions of the special techniques required. I have included links to a couple of the best discussions, but I thought a more personal and less encyclopedic introduction might be helpful.


Milky Way over my Driveway
I remember how amazed I was when I looked at my first night sky photograph. It was just a random piece of unremarkable sky, but I was blown away by the ability of long exposures to see far deeper into the universe than is possible with the unaided eye. I had to do more.' I get out occasionally, but my explorations of the night sky are limited by a persistent laziness that makes it difficult to leave my warm bed for a cold and lonely pasture. I'm always happy when I come back from a night shoot, but it is just a matter of getting out of the door. I succeeded last week in capturing the Milky Way from a spot in Walpole that I had always thought would provide an interesting foreground and perhaps a description of the process from a aspiring amateur may be of value to those who are thinking of exploring this remarkable field of digital photography.


The Galactic Season


Alyson's Orchard Walpole, September
Of course when we talk about night sky photography, the major attraction is the dense band of stars in the Milky Way and for the best show, timing is crucial. Currently, we are in a great time of the year for capturing the Milky Way in the Northern Hemisphere. The Galactic Core season begins in the spring when it is located, at its highest point, in the southwest. The high point moves across until it is found in the southwest during the fall. In the spring, the Milky Way extends in an arc across the horizon, allowing the capture of dramatic panoramic views across a large portion of the sky. As we get into the summer and fall, the band of light moves into a more vertical orientation, making it difficult to capture the full Galactic disk as it arcs across the dome of the sky. Each season provides a variety of opportunities to use our Galaxy in your images, but, happily, the frigid months of winter are not the best time to look for the Milky Way.
Spofford Lake, Spring Arch


The Moon

 Star field observation starts with an understanding of the location of the moon. Each month I note on my calendar the few days around the new moon. Although a little peripheral moonlight can help illuminate foreground elements, the new moon is generally the best time to clearly capture the stars in their full glory. Around the time of the new moon, I start checking the weather for the best chances of clear sky's. It is exciting to find a crystal clear night on just the right day, but I'm embarrassed to admit that I am often equally thrilled to see clouds obscuring the sky, giving me a reasonable excuse to rush off to bed.


The Right Spot

I am always looking for good locations to capture the Milky Way. There are three basic requirements

South Facing View.

The Milky Way moves across the sky from Southeast to Southwest and a prime location must have a clear view to the horizon in that direction. I spend time scanning my favorite locations, looking for those with the proper orientation.

Avoiding Light Pollution.


Brattleboro Light Pollution

Light pollution is persistent problem. Even out in the country, it is amazing how much artificial light will show up when I am shooting with ISOs from 2500-3200 at f2.8 and 20-30 second exposures. 


Martha's Vineyard, Ocean Dark


A faint glow on the horizon,which is barely perceptible to the unaided eye, can look like a blazing sunrise when captured in a long exposure. I try to get away from major centers of civilization, but even a small village like Spofford can throw up a surprising amount of light. I envy my friends who are fortunate to live near the ocean, where views out to sea are relatively clear of artificial light. For those of us who are land-locked all we can do is get as far away from people as possible, minimize the glare in Photoshop and tell everyone that that orange patch is actually the first glow of sunrise.


Foreground

Jaffrey Silos
Finding something of interest in the foreground is key to achieving context and drama in a star field image. I'm always looking for trees, church spires, barns, or farm equipment that I can position before the great arch of stars. Of course the "sea coasters" have an endless array of lighthouses to use for drama, but we can catch the stars reflected in the calm waters of local rivers and lakes. The key to effective use of foreground elements is to get close enough.  Star fields are generally shot
Chesterfield Town Hall
atextreme wide angles. I almost always use my 16mm lens. and with that broad angle of view the foreground must be quite close to be seen to dramatic effect. The foreground elements can be striking in silhouette against the bright sky, but I often play with light painting using my trusty light LED flashlight. Light painting is all about experimentation and using a subtle touch. The foreground may also be captured in the natural light with a separate long exposure that can be blended with the star field image during post-processing.


My Walpole Apples

 For years I have been attracted to a couple of lone apple trees which sit out in the middle of a lovely pasture in Walpole New Hampshire. I have shot the trees in various seasons and conditions of light, but I have always felt that they might serve as interesting foreground subjects for a Milky Way photograph. The trees are isolated in the middle of a large pasture on the crest of a hill looking off to the south. I knew I would have freedom to move around the trees to find the best angle under the arch of the Milky Way. I had shot stars from edge of this location before, but I had never ventured out to get close enough to bring the trees into the foreground. About one week ago I finally got my chance.


The Right Day and Time

Photographer's Ephemeris, Walpole Apples

I used the Photographer's Ephemeris to find the nights in May when the Moon would not be an issue. TPE is THE essential piece of software for anyone wanting to predict the locations of the Sun and Moon from any location and on any day. My current favorite program for predicting the
PhotoPills
location of the Milky Way is Photopills. Although the program's user interface takes a bit of getting used to, it shows the position and elevation of the Milky Way throughout the night from any location. I was able to see that the Galactic Arch would be in the best position over my Walpole Apples between 1 and 3 AM on the days when the Moon would be new or below the horizon.


I knew the what, the where and the when, all that remained was the fourth "W", the weather. 


The forecast was for one clear night before a warm front was predicted to cloud the skies for several days. I took a nap in the
Dublin Lake & Too Distant Monadnock
early evening and then got out to my isolated spot at about 12:30 AM. After fumbling my way through the pasture's irregular ground I was where I wanted to be, next to my Apple tree. For once I prepared myself perfectly. I had clothing that was sufficiently warm, I used my Overshoe Boots to protect my feet from the damp and the ticks and I made sure that my flashlight had fresh batteries. I use a flashlight that is equipped with a red filter to preserve my night vision as I work the controls. Before I left home I had mounted my 16-35mm lens, set it to its max wide angle and adjusted the focus to where long experience has shown me that infinity lies. The stars are definitely at infinity but they come into sharpest focus slightly short of the lens' max position. It takes a bit of experimentation to find the right spot. An especially bright star, the lunar surface or even a distant light can be used to discover the best adjustment. Once set I used gaffer's tape to fix the adjustments in place.


In the Field
Walpole Apple, We'll Call It Sunrise

The night was lovely. With the exception of a few clouds on the southern horizon, the sky was crystal clear and peaceful, although, as always, it was a bit spooky standing alone in the inky dark with nothing but the hooting of owls and the howling of distant (hopefully) coyotes to keep me company. Fortunately I was too busy to spend much time thinking about being stalked by ravenous preditors, or shambling zombies. The Milky Way was beautiful and easily visible to the unaided eye allowing me to position the camera to capture the Apple tree nestled under the arch, but even when maximally dark adjusted my eyes could not remotely appreciate the intensity and depth revealed by the camera sensor. After a few experimental shots, I settled on ISO 2500, f2.8 and a 20
Cosmic Apple, Walpole, Light Painted
second exposure. I made sure that my camera was set for Mirror Lock-Up and Long Exposure Noise Reduction. With the extra time required for noise reduction, each exposure took close to one minute, a duration which seemed much longer when trying to stand perfectly still in the dark. I grabbed a few single shots near the tree, including experimenting a bit with light painting, and then settled into shooting several series of images across the sky for eventual reconstruction into panoramic studies. I shot 6-7 images for each panorama. Without clear references, the greatest challenge was in keeping the camera level through the series of images. It is at this time that keeping my eyes fully dark adjusted was critical to pick up on key landmarks. After expending so much effort to place myself in a special location at the perfect time, I felt reluctant to leave. I wanted to make sure that I had captured all the necessary shots, but the howling seemed to be getting closer, so I stumbled my way back to the car and headed for home and the welcoming arms of Photoshop.
Light Painted Apple, Walpole, NH


Connecticut River, Chesterfield, NH
I reached home at about 3AM and as always, instead of heading immediately to bed, I had to upload my images and apply some preliminary edits to get a sense of what rewards I had received for the my sleep deprivation. I'm still experimenting with post-processing techniques for star field images. My current approach includes preliminary adjustments in Lightroom and final localized tweaking in Photoshop, but it would be best to save that discussion for another blog. Besides, every time I come back from a night under the stars, I seem to take a different approach in the digital darkroom.

I hope this discussion provides a helpful overview of how a relative new-bee might approach star field photography. With just a little care, the technical aspects are actually quite simple. The biggest challenge is to haul yourself out of bed to get to the right place at the right time with the right weather.

And watch out for the Zombies!


Other Articles From My Blog:


Night Time Photography, Searching for the Milky Way 
April 2013


Look to the foreground in Milky Way Photography
June 2014 


Valuable References:
Night Sky Photography, Aaron Priest

Aim for the Stars, Mike Blanchette,
New England Photograhy Guild


Jeffrey Newcomer
Partridgebrookreflections.com