About Me

My photo
Spofford, New Hampshire, United States
Jeff Newcomer had been a physician practicing in New Hampshire and Vermont for over 30 years. Over that time, as a member of the Conservation Commission in his home of Chesterfield New Hampshire, he has used his photography to promote the protection and appreciation of the town's wild lands. In recent years he has been transitioning his focus from medicine to photography, writing and teaching. Jeff enjoys photographing throughout New England, but has concentrated on the Monadnock Region and southern Vermont and has had a long term artistic relationship with Mount Monadnock. He is a featured artist in a number of local galleries and his work is often seen in regional print, web publications and in business installations throughout the country. For years Jeff has published a calendar celebrating the beauty of The New England country-side in all seasons. All of the proceeds from his New England Reflections Calendar have gone to support the Pulmonary Rehabilitation Program at the Cheshire Medical Center. Jeff has a strong commitment to sharing his excitement about the special beauty of our region and publishes a blog about photography in New England.
Showing posts with label panorama. Show all posts

Sunday, July 24, 2016

Chasing Rainbows


With Thanks to Sir Isaac Newton

Summer is the season of rainbows.  They are a magical, improbable manifestations of nature, which often seem to appear without warning and disappear just as quickly.  It is no wonder that they have long been associated with mystical properties, including the fabled pot of gold at their base.  Last week I was reminded that, although they are beautiful, rainbows are actually just a simple manifestation of the prismatic effect of light bouncing through rain drops and that, given the right conditions,  their occurrence can often be predicted.


Raindrop Physics

About four years ago, I published a blog article about rainbow photography, and last week I was once again able to put to work what I learned from my own research.  I was at home when a strong summer downpour passed through my village of Spofford New Hampshire.  I was just getting ready to settle into our gazebo to for some writing, but instead I

Double Rainbow - Opposite Color Spectrum

decided to do a little rainbow chasing.  I knew that rainbows often form as lines of showers pass by.  The storm must also be followed by unobstructed sun shining through to catch the rain drops at a low enough angle to be reflected back and refracted, separating the light into its full visual spectrum.  The secret is to place the sun at your back and look into the rain clouds as they move away. 


Full Unobstructed Rainbows are Easier to Find on the Coast
Rye Beach, New Hampshire


First Find a Rainbow
On this day, I was a little late in recognizing the conditions. I had no rainbow in Spofford, but I had a reasonable idea where one might form.  I grabbed my camera bag, jumped into the car and headed west toward Keene in hopes of catching up to the receding edge of the storm.  I first reached  my rainbow on the outskirts of the city. 


Find a Foreground

Nice Color but Distractions along Route 12

The two key steps which lead to great rainbow images are first, find a rainbow.  The second is to find something interesting to put in front of the garishly colored arch.  I have seen innumerable pictures of dramatic rainbows spoiled by weak and distracting foregrounds.  Telephone poles, wires, housing projects, windshields and highway overpasses,  all may provide a sense of place, but they tend transform the magic into just an uninspiring smear of color across an ugly distracting foreground.  Once you find your rainbow your next thought should always be “where can I go to put something of interest in front of it, that is also close enough to get to before the rainbow fades”.


First Rainbow

As I moved into Keene, my choices for foregrounds  were limited.  I needed to get away from all the layers of development.  I careened  down a industrial park service road and drove beyond the buildings to be able to shoot down the dead end circle and into the trees of the an old Ash swamp.  Not a great foreground, but I got a reasonably good arching rainbow.  After capturing  the “fact” of the rainbow,  the next step was to try to get a more complete and balanced image. 


Chasing the Storm's Edge
Cemetery Gazebo
I headed out chasing the color, always angling west, to keep myself on the critical back edge of the storm with the unobstructed sun to my back.  Given the location of the rainbow and its direction of motion, I didn’t think I would get much from Keene and so I headed southwest on route 12.  A couple of times the colors seemed to be fading, but then I caught up with the storm. I had in mind a spot in Troy that I though would give me a long view, and some nice unobstructed perspectives.   My target was a cemetery just outside of the village, that sits on a knoll with a clear view to Mt Monadnock.  On this day the storm was obscuring the mountain, but  the color was still there, shining brightly against the receding dark clouds. 


Rain Drops

I first grabbed a couple of multi-image panoramas, to capture the full arc of the colors.   My first attempt was marred by multiple rain drops which caused smudges on my lens.  The problem with multi-image panoramas is that any dust or smudges repeat across each of the frames which are merged into the final image.  I cleaned the lens, but my second attempt, although clean, was not as dramatic. 


Content Aware Fill
Post Fill


 I ended up spending too much time in Photoshop using combinations of Content Aware Fill and the Healing Brush to remove all the drops, but the pain fades, and I am happy with the results.  The cemetery also has a nice Gazebo up on the hill.  I had used it in the past for a foreground and once again I was able to combine it with a vivid portion of the rainbow to construct an effective image.


Worth the Tedium


As the sun dipped into the clouds on the horizon, I was finally forced to give up the chase.  I was still able to catch some of the warm light on the Black Eyed Susan decorated cemetery wall and, later, the clear sky opened for a nice view of the craters of the moon.


Given that I left home with only the potential for a rainbow, I was happy with my results.  It just goes to prove that, with a little physics, we don’t have to depend on pure luck to capture one of nature’s most colorful shows.


Jeff Newcomer, NEPG
partridgebrookreflections.com
603-363-8338


Sunday, February 28, 2016

Lightroom Panorama Tool


 One of the advantages of shooting digitally is the ability to blend a series of pictures into a wide panoramic image. As is true for most digital editing tools,  the capability for creating seamless panoramas from multiple images has improved remarkably. Not too many years ago the process of blending images required the use of a panorama head, the manual alignment of images and a sizable amount of luck. In recent versions of photoshop the process has been greatly simplified and the results much improved. It is now possible to routinely get good results from automatically blending hand held images. The creation of panoramas had been a function within Photoshop and a few other programs, but now this capability has moved to Lightroom and I have to say that the process is quicker and easier than in Photoshop and results are as good or better.

 
Pacific Vista, Puntarenas, Costa Rica, 12 Image Pano

The creation of panoramas had been a function within Photoshop and a few other programs, but now this capability has moved to Lightroom and I have to say that the process is quicker and easier than in Photoshop and results are as good or better.

In recent versions of Lightroom, the images can be brought into the panorama tool as Native RAW or DNG files.  When completed the

Poas Volcano Costa Rica
final panorama is added to the same directory or Collection as a separate RAW DNG file with all of its broad capability for further editing within Lightroom. Lightroom's automatic selection of the best projection is excellent and, as with Photoshop, the program can automatically crop the image. A new feature is the ability to adjust perspective to fill in the white gaps which inevitably appear around the edges of the final blend. This tool isn't perfect but it is amazing how much can be done to salvage the edges without causing significant distortion.

So let's look at an example of this new tool within Lightroom. 


Lake Winnipesaukee from Mount Major
Reworked in Lightroom from the 2006 images

Note: Although I have remade a few old panos, most of my recent Lightroom panoramas come from our recent trip to the wonderfully diverse landscape of Costa Rica.  Check out my growing Costa Rica 2016 Gallery


Shooting Right 

 We start with a series of  hand-held images of from one of my favorite farms in Chesterfield New Hampshire. The goal remains to overlap the images by at least 30% and to attempt to keep the views lined up along the horizontal.  A leveled tripod can help with this process but I find that, with attention, images can be made to line up well when hand-held. The real trick is to take extra care with camera stability. Just one blurry image destroys the whole series, and it is here that a tripod can be especially helpful. Also, given the variable effect of polarizers as the viewpoint is rotated, it is best to remove this filter before shooting.


Into Lightroom
 
Once I have selected a series of images for a panorama I like to copy them to a Collection within Lightroom. The Collection allows me to work with the images without becoming confused by the surrounding pictures and  it make it easier to find the final pano image. With the images selected, go to the Photo Menu and under "Merge" select "Panorama".  It's not hard, the only other choice is "HDR" - the subject for another blog. 


Projection


Un-Cropped
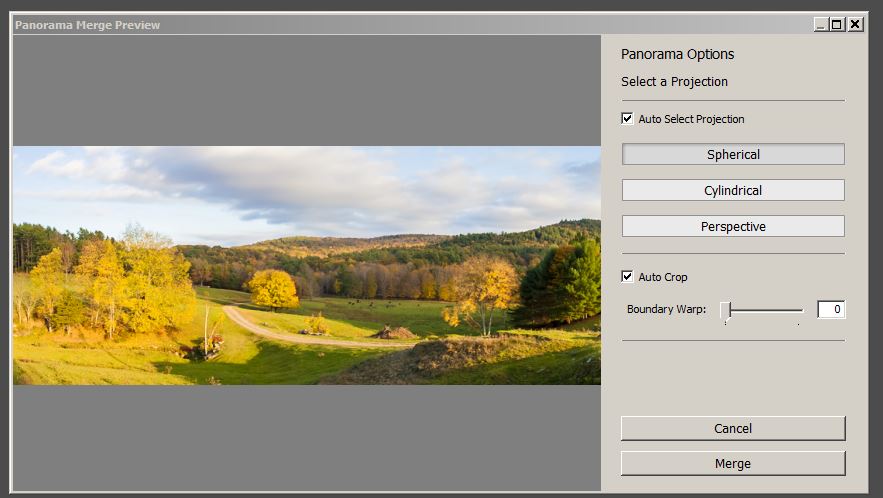
The Panorama Merge Preview window opens with a quick view of the panorama, and includes very few choices, the effect of each being rapidly visible in the preview. I routinely allow Lightroom to choose the appropriate projection and I almost never
have to over-ride the choice. Panoramas are never perfectly aligned and there is always white area around the sides. Typically these need to be cropped away, although in recent versions of Photoshop there is an option to allow the program to try to fill these gaps. Sometime it works great, but not always.  The Fill option is not available from within Lightroom - remember Lightroom is non-destructive, it doesn't mess with your precious pixels. 


Auto Crop
Lightroom does provide an option to automatically crop the offending gaps, but I typically leave this box un-checked until after the preview shows me where the problems occur. Cropping can be done at that point or with the non-destructive cropping tool after the image is opened back in Lightroom.


Boundary Warp

The latest version of Lightroom CC provides another option for
Boundary Warp
dealing with the gaps. The Boundary Warp slider can adjust the image perspective trying to draw out the edges to fill the gaps. It often works beautifully to avoid the need to crop key parts of the image, but it is not perfect and, if applied too aggressively, can cause obvious distortion.  When I took a fresh pass at my favorite old Roads End panoramas from 2006, the Boundary Warp created a sloping bank on the left where there is actually a flat glade.  Although upon review, I like the way the phony slope draws the eye to the road.


Roads End farm Road, Boundary Warped


The great thing about the Lightroom Panorama Tool is that the preview comes up quickly and adjustments are easy to make before finally pressing the "Merge" Button. The whole process is much quicker and with generally excellent results. After the merge is complete Lightroom places the new panorama file within the


source Directory or Collection, next to the original images. The panorama is saved as a RAW DNG file and remains fully editable from within Lightroom. When doing panos in Photoshop I typically perform a lot of global editing before I run the Panorama Tool but with Lightroom I more often send the images with very little preliminary manipulation.


Lake Arenal, Costa Rica


That's it. I love the ease and quality of the results from within Lightroom. It really is a lot simpler than you might guess from my unnecessarily long description, but your results will still depend on the care you take capturing the images. If there isn't sufficient overlap the program may not be able to produce a pano. In that case,  you will have to go back and do it again, but it doesn't take long to develop good technique.


Fertile Valley, Costa Rica

So get out and have fun and always approach any scene with the question, "would this make a good pano?".


Costa Rica 2016 Gallery

 
Jeffrey Newcomer
partridgebrookreflections.com

Sunday, May 24, 2015

Exploring Night Sky Photography


Pasture Arch, Walpole NH

Rye Beach, NH, July
I'm happy to admit that I am not an expert on astrophotography, but the improved low light capabilities of newer digital cameras have made the process of capturing the night sky so easy and the results so remarkable, that it is hard to avoid giving it a try. There are a number of great photographers who have concentrated on this special photographic niche. They have produced breath-taking star field images, and have generously published detailed descriptions of the special techniques required. I have included links to a couple of the best discussions, but I thought a more personal and less encyclopedic introduction might be helpful.


Milky Way over my Driveway
I remember how amazed I was when I looked at my first night sky photograph. It was just a random piece of unremarkable sky, but I was blown away by the ability of long exposures to see far deeper into the universe than is possible with the unaided eye. I had to do more.' I get out occasionally, but my explorations of the night sky are limited by a persistent laziness that makes it difficult to leave my warm bed for a cold and lonely pasture. I'm always happy when I come back from a night shoot, but it is just a matter of getting out of the door. I succeeded last week in capturing the Milky Way from a spot in Walpole that I had always thought would provide an interesting foreground and perhaps a description of the process from a aspiring amateur may be of value to those who are thinking of exploring this remarkable field of digital photography.


The Galactic Season


Alyson's Orchard Walpole, September
Of course when we talk about night sky photography, the major attraction is the dense band of stars in the Milky Way and for the best show, timing is crucial. Currently, we are in a great time of the year for capturing the Milky Way in the Northern Hemisphere. The Galactic Core season begins in the spring when it is located, at its highest point, in the southwest. The high point moves across until it is found in the southwest during the fall. In the spring, the Milky Way extends in an arc across the horizon, allowing the capture of dramatic panoramic views across a large portion of the sky. As we get into the summer and fall, the band of light moves into a more vertical orientation, making it difficult to capture the full Galactic disk as it arcs across the dome of the sky. Each season provides a variety of opportunities to use our Galaxy in your images, but, happily, the frigid months of winter are not the best time to look for the Milky Way.
Spofford Lake, Spring Arch


The Moon

 Star field observation starts with an understanding of the location of the moon. Each month I note on my calendar the few days around the new moon. Although a little peripheral moonlight can help illuminate foreground elements, the new moon is generally the best time to clearly capture the stars in their full glory. Around the time of the new moon, I start checking the weather for the best chances of clear sky's. It is exciting to find a crystal clear night on just the right day, but I'm embarrassed to admit that I am often equally thrilled to see clouds obscuring the sky, giving me a reasonable excuse to rush off to bed.


The Right Spot

I am always looking for good locations to capture the Milky Way. There are three basic requirements

South Facing View.

The Milky Way moves across the sky from Southeast to Southwest and a prime location must have a clear view to the horizon in that direction. I spend time scanning my favorite locations, looking for those with the proper orientation.

Avoiding Light Pollution.


Brattleboro Light Pollution

Light pollution is persistent problem. Even out in the country, it is amazing how much artificial light will show up when I am shooting with ISOs from 2500-3200 at f2.8 and 20-30 second exposures. 


Martha's Vineyard, Ocean Dark


A faint glow on the horizon,which is barely perceptible to the unaided eye, can look like a blazing sunrise when captured in a long exposure. I try to get away from major centers of civilization, but even a small village like Spofford can throw up a surprising amount of light. I envy my friends who are fortunate to live near the ocean, where views out to sea are relatively clear of artificial light. For those of us who are land-locked all we can do is get as far away from people as possible, minimize the glare in Photoshop and tell everyone that that orange patch is actually the first glow of sunrise.


Foreground

Jaffrey Silos
Finding something of interest in the foreground is key to achieving context and drama in a star field image. I'm always looking for trees, church spires, barns, or farm equipment that I can position before the great arch of stars. Of course the "sea coasters" have an endless array of lighthouses to use for drama, but we can catch the stars reflected in the calm waters of local rivers and lakes. The key to effective use of foreground elements is to get close enough.  Star fields are generally shot
Chesterfield Town Hall
atextreme wide angles. I almost always use my 16mm lens. and with that broad angle of view the foreground must be quite close to be seen to dramatic effect. The foreground elements can be striking in silhouette against the bright sky, but I often play with light painting using my trusty light LED flashlight. Light painting is all about experimentation and using a subtle touch. The foreground may also be captured in the natural light with a separate long exposure that can be blended with the star field image during post-processing.


My Walpole Apples

 For years I have been attracted to a couple of lone apple trees which sit out in the middle of a lovely pasture in Walpole New Hampshire. I have shot the trees in various seasons and conditions of light, but I have always felt that they might serve as interesting foreground subjects for a Milky Way photograph. The trees are isolated in the middle of a large pasture on the crest of a hill looking off to the south. I knew I would have freedom to move around the trees to find the best angle under the arch of the Milky Way. I had shot stars from edge of this location before, but I had never ventured out to get close enough to bring the trees into the foreground. About one week ago I finally got my chance.


The Right Day and Time

Photographer's Ephemeris, Walpole Apples

I used the Photographer's Ephemeris to find the nights in May when the Moon would not be an issue. TPE is THE essential piece of software for anyone wanting to predict the locations of the Sun and Moon from any location and on any day. My current favorite program for predicting the
PhotoPills
location of the Milky Way is Photopills. Although the program's user interface takes a bit of getting used to, it shows the position and elevation of the Milky Way throughout the night from any location. I was able to see that the Galactic Arch would be in the best position over my Walpole Apples between 1 and 3 AM on the days when the Moon would be new or below the horizon.


I knew the what, the where and the when, all that remained was the fourth "W", the weather. 


The forecast was for one clear night before a warm front was predicted to cloud the skies for several days. I took a nap in the
Dublin Lake & Too Distant Monadnock
early evening and then got out to my isolated spot at about 12:30 AM. After fumbling my way through the pasture's irregular ground I was where I wanted to be, next to my Apple tree. For once I prepared myself perfectly. I had clothing that was sufficiently warm, I used my Overshoe Boots to protect my feet from the damp and the ticks and I made sure that my flashlight had fresh batteries. I use a flashlight that is equipped with a red filter to preserve my night vision as I work the controls. Before I left home I had mounted my 16-35mm lens, set it to its max wide angle and adjusted the focus to where long experience has shown me that infinity lies. The stars are definitely at infinity but they come into sharpest focus slightly short of the lens' max position. It takes a bit of experimentation to find the right spot. An especially bright star, the lunar surface or even a distant light can be used to discover the best adjustment. Once set I used gaffer's tape to fix the adjustments in place.


In the Field
Walpole Apple, We'll Call It Sunrise

The night was lovely. With the exception of a few clouds on the southern horizon, the sky was crystal clear and peaceful, although, as always, it was a bit spooky standing alone in the inky dark with nothing but the hooting of owls and the howling of distant (hopefully) coyotes to keep me company. Fortunately I was too busy to spend much time thinking about being stalked by ravenous preditors, or shambling zombies. The Milky Way was beautiful and easily visible to the unaided eye allowing me to position the camera to capture the Apple tree nestled under the arch, but even when maximally dark adjusted my eyes could not remotely appreciate the intensity and depth revealed by the camera sensor. After a few experimental shots, I settled on ISO 2500, f2.8 and a 20
Cosmic Apple, Walpole, Light Painted
second exposure. I made sure that my camera was set for Mirror Lock-Up and Long Exposure Noise Reduction. With the extra time required for noise reduction, each exposure took close to one minute, a duration which seemed much longer when trying to stand perfectly still in the dark. I grabbed a few single shots near the tree, including experimenting a bit with light painting, and then settled into shooting several series of images across the sky for eventual reconstruction into panoramic studies. I shot 6-7 images for each panorama. Without clear references, the greatest challenge was in keeping the camera level through the series of images. It is at this time that keeping my eyes fully dark adjusted was critical to pick up on key landmarks. After expending so much effort to place myself in a special location at the perfect time, I felt reluctant to leave. I wanted to make sure that I had captured all the necessary shots, but the howling seemed to be getting closer, so I stumbled my way back to the car and headed for home and the welcoming arms of Photoshop.
Light Painted Apple, Walpole, NH


Connecticut River, Chesterfield, NH
I reached home at about 3AM and as always, instead of heading immediately to bed, I had to upload my images and apply some preliminary edits to get a sense of what rewards I had received for the my sleep deprivation. I'm still experimenting with post-processing techniques for star field images. My current approach includes preliminary adjustments in Lightroom and final localized tweaking in Photoshop, but it would be best to save that discussion for another blog. Besides, every time I come back from a night under the stars, I seem to take a different approach in the digital darkroom.

I hope this discussion provides a helpful overview of how a relative new-bee might approach star field photography. With just a little care, the technical aspects are actually quite simple. The biggest challenge is to haul yourself out of bed to get to the right place at the right time with the right weather.

And watch out for the Zombies!


Other Articles From My Blog:


Night Time Photography, Searching for the Milky Way 
April 2013


Look to the foreground in Milky Way Photography
June 2014 


Valuable References:
Night Sky Photography, Aaron Priest

Aim for the Stars, Mike Blanchette,
New England Photograhy Guild


Jeffrey Newcomer
Partridgebrookreflections.com