About Me

My photo
Spofford, New Hampshire, United States
Jeff Newcomer had been a physician practicing in New Hampshire and Vermont for over 30 years. Over that time, as a member of the Conservation Commission in his home of Chesterfield New Hampshire, he has used his photography to promote the protection and appreciation of the town's wild lands. In recent years he has been transitioning his focus from medicine to photography, writing and teaching. Jeff enjoys photographing throughout New England, but has concentrated on the Monadnock Region and southern Vermont and has had a long term artistic relationship with Mount Monadnock. He is a featured artist in a number of local galleries and his work is often seen in regional print, web publications and in business installations throughout the country. For years Jeff has published a calendar celebrating the beauty of The New England country-side in all seasons. All of the proceeds from his New England Reflections Calendar have gone to support the Pulmonary Rehabilitation Program at the Cheshire Medical Center. Jeff has a strong commitment to sharing his excitement about the special beauty of our region and publishes a blog about photography in New England.

Tuesday, June 28, 2011

Long Exposure Crowd Control

  Last Thursday I finally got my IR converted Canon 20D back from Lifepixel. Since then I have spent most of my free time running around town experimenting with every subject I can imagine. I look forward to blogging about infrared photography when I have a bit more experience. But this week I have to do something simple so I can get back to IR-ing. Today I will discuss another special approach to "Crowd Control"

  From reading a number of my blogs, it may seem that I hate people. I have discussed stacking multiple images and cloning to remove those pesky carbon based life forms from my landscapes. The truth is that I only question the role of humanity  when they have the unconscious audacity to come between me and my vision.   At the risk of further damage to my social reputation, I offer one more way to nonviolently eliminate people in a special situation.

   A few years ago, I happened upon a classic cobbled street in the heart of the wonderful seacoast city of Portland Maine. Wharf Street is a pedestrian passage that gets heavy foot traffic especially on warm Saturday evenings in the spring. I found that I could capture the warm light with an exposure of about 3 seconds, but, with folks continuously walking by, the road was filled with blurred bodies. My first approach was to wait for a magic moment when the street was clear of people, but I was with friends who were increasingly impatient to get to dinner. I only briefly considered returning at 3am in hopes that the lights would still be on, but I quickly decided that a more civilized choice was to try a long exposure.  


30 second Exposure
In the second image I was able to stretch my exposure to 30 seconds, f22 and ISO 100. During that 30 seconds a number of couples walked by, but, as long as they kept moving, they disappeared.  Of course I tried to maintain an unwelcoming expression to discourge curious people from stoppping in front of the camera to ask what I was doing.  A few stationary vagrants remained in the image, but overall I was pleased with the results. This approach might have worked better with a longer exposure, requiring the use of a neutral density filter, but image noise would have become an increasing problem.


  Long exposures can be used to remove or de-emphasize moving objects or people, but, as I've tried this in other situations, I have discovered a couple of factors that can effect the success of the approach. First, long exposures work best when the background shines though for the majority of the time. Ideally this would mean folks coming through on random paths with space in-between. A long continuos line of people walking past will obscure the background with a soft blur, artistically interesting, but collectively transforming
the individuals into an amoebic blob instead of removing them. Secondly, any bright or specular light will inscribe trails on the image regardless of how long they are in view.  The streaks of colorful light created when capturing a long exposure of a busy road at night can be interesting, but it makes it impossible to hide the presence of the vehicles.  As it turns out, Portland's Wharf Street was a good place to use this technique. On the other hand, the image of Main Street in Keene New Hampshire did not work as well.  I took a daylight 30 second exposure  with a line of cars coming by. The cars were not seen individually but they produced a soft blur which was punctuated by streaks of gleaming chrome. Although I like the soft appearance of the trees, this was clearly not the best situation for this technique.

I plan to continue to experiment with this approach. I am particularly interested in trying longer exposures, up to several minutes. Anything to remove the pernicious impact of humans on our environment!

Sunday, June 19, 2011

Floral Photography "Teed Up"

I am not at heart a floral photographer. I love the brilliant colors and delicate beauty of native and exotic flowers, but, based on a deficiency of both equipment and inclination, I don't seem to be optimally fitted to the task. In terms of equipment, I lack a good macro lens to focus on the fine detail. My workhorse 24-105mm lens has a minimum focal range of only18 inches.  As for inclination, I am generally not "inclined" to lay on my stomach in the moldy dirt for hours waiting for a split second of calm air to still the waving foliage. I admire all the dedicated people who do this so spectacularly, but for me, I need to have the flowers "teed up". That is why, in the spring, I love going to Walker Farm in Dummerston Vermont. Walkers is a unique place, combining the best of a wonderful organic farm stand and lush green houses supporting a brilliant array of flowering plants. A few weeks ago I accompanied my wife to the farm and while she was filling the car with flowers for the garden and the gazebo, I was in heaven shooting the flowers. Real flower photographers will undoubtedly be appalled, but for me, photographing in a green house is a joy.


First even on sunny days, the light in the greenhouse is generally soft and diffused, making the colors richer and eliminating troublesome glare and sharp contrast. I seldom need to use a diffuser . There is essentially no wind to contend with and the flowers are elevated on tables or hanging from above - no crawling in the dirt! Most importantly the flowers at Walker Farm are beautifully arranged and uniformly healthy. An added bonus is that the flowers are usually labeled making identification much easier for a botanical moron like myself. The folks at Walker Farm are always very welcoming and have even helped me identify unlabeled plants and flowers. They clearly love what they do and are excited to share their joy with everyone who visits.

There are some challenges that come with greenhouse photography. Most importantly the background needs to be carefully monitored and controlled to avoid distracting elements, such as posts and windows, that could spoil the natural feel of the image. Depending on the color of the roofing material, white balance can be tricky, but a white or gray card can be very helpful in setting a custom white balance that can then be used throughout the shoot. It is especially important to be sensitive to needs and safety of the other visitors. Wandering among all this beauty someone could easily stumble over a protruding tripod leg.

Real floral photographers may argue that flowers are best seen in their natural environment, and they undoubtedly have a point. But when I am shooting in the wild, I tend to look for soft light and calm air to capture flowers to best advantage. If it is argued that achieving those condition in a greenhouse is cheating, I can only quote the profound words of my friend Sarah and say "You Betcha".

Walker Farm is located on Route 5 in Dummerston Vermont just North of Brattleboro. For lots more information and directions check out there website. I particularly recommend the fascinating history page which follows the farm from the 1770's to the present. When you visit you will be unable resist the wonderful produce that keeps our family coming back thoughout the season. 

Most areas of  the country have farms and nurseries that provide similar opportunities. Find yours and enjoy the delicious experience of cheating with the flowers.


Sunday, June 12, 2011

Fixing Polarized Skies

This week I would like to share a short bit of Photoshop technique that I use to cope with a problem in the sky when using polarizing filters on broad landscapes. Hopefully this will be a quick one since I'm still working my way through the images from the Fields of Lupine Festival last weekend in Sugar Hill New Hampshire. The Festival was a lot of fun and provided one of the best chances I have experienced to find so many spectacular photographic opportunities in such a short period of time and in such a small area. While working through the images, however, I face a number of situations in which the polarized sky effect became a problem.

I love using polarizing filters. Depending on the direction of the light they can work wonders on the depth and brilliance of colors in my landscapes. On sunny days they block the light reflections that often dull the color of flowers and foliage. Many photographs also use a polarizer to darken blue sky and this is were we can get into trouble. The effect of a polarizing filter is directly related to the direction of the sun, being at its maximum when the light is coming from 90 degrees to the side. There is almost no effect when the light is coming from directly behind or into the camera. As we have all seen, when photographing a wide panorama the angle of the light varies across the scene and the polarizing effect varies as well. In the original of this panoramic view of Franconia Notch the sky varied from deep blue on the right to a pale blue-gray on the left. I'm getting better at anticipating this problem and will often limit it by dialing back on the polarizer, but in this situation I wanted to get the full polarizing effect to bring out the varied colors of the Lupines. This called for a solution in post.

Correcting this problem is really not difficult in Photoshop and similar approaches may work in other photo editing programs. The Goal here is to provide progressive, selective darkening to the left side of the sky without affecting the rest of the image. As is always true in Photoshop, there are a number of ways to achieve this. I prefer to make a curves adjustment to the sky and then drop the curve layer into a group onto which I can add a gradient mask to apply the adjustment in a gradual way across the image. Simple huh! ... Ok here are the steps.

  First I do a careful selection of the sky. This is by far the most time-consuming part of the procedure, although newer versions of photoshop have some magical tools that make this job MUCH easier. That could be the subject of a whole series of blogs

Sky Selection

 Next I usually open a curves adjustment layer with the sky mask applied. If you open the adjustment layer with the selection active, the mask is created automatically. Then, looking at the lighter side, I darken the sky to match what the darker side had been. I don't worry that the dark side gets even darker at the same time. I will fix that next. It's also not important to get the curve adjustment perfect since it can be fine-tuned later.


 I then open a layer Group (red dot) and move my Curves Layer into the Group.


 Finally I apply a gradient layer mask to the Group to apply the darkening effect gradually across the image. I experiment with the position of the gradient on the image to find the most natural blend. In this image I actually applied the technique a second time, in the opposite direction, to lighten the dark side of the sky. But that is about it.

There are other approaches to essentially double mask an image or adjustment layer. It is possible to intersect two different masks on a single layer, but I prefer the control that this technique affords, allowing the independent adjustment of both the sky selection and the gradient mask.
Final Image: Franconia Notch
Fields of Lupine Festival 2011
I apologize if these steps seem too technical. Photoshop's learning curve is infinite, but, come back the next time you are faced with this problem. It all may make more sense. The greatest enjoyment comes from playing around until you find your own solution.  In the end you will be able to use your polarizer in a more controlled and powerful  way. 

Now back to the Lupines. I swear, I'm dreaming in blue these days.


Tuesday, June 7, 2011

Fields of Lupine Festival 2011

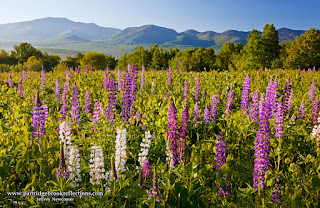
This weekend I finally got up to the Lupine Festival centered in Sugar Hill New Hampshire. In New England, Lupines are one of the most impressive and phallic of our wildflowers and they show up in all sorts of locations. Many of my special places for Lupines in the Monadnock region and southern Vermont are otherwise uninteresting. Near home one of my favorite spots is actually in the traffic circle at route 9 and 91 in Brattleboro Vermont. The only thing exciting about that location is trying to avoid getting run over. Wherever they are found Lupines are bright attractive flowers, but what makes the Fields of Lupine Festival special is not the Lupines, but the locations. In a small area around Sugar Hill, north of Franconia Notch, the flowers are set against some of the most spectacular scenery in all of New England. Within two or three miles, fields of blue, pink and white decorate views of ancient stonewalls, pristine pastures, churches, dramatic mountains, and classic rusting farm equipment.


I was fortunate to be staying in a house in Franconia with a group of friends, none of whom had any compelling interest in photography. We ate well, drank moderately, hiked and enjoyed the perfect spring weather from our deck overlooking Canon Mountain and Lafayette. Somehow, over the 3 days, I was able to shoot the Lupines at sunrise, evening and midday.I was like a kid in a candy shop running from one photographically rich location to another.


For years I have admired the wonderful images from the festival. As I approached the weekend, I was concerned about how to find many of the classic locations that I have come to know from browsing images on Flickr and elsewhere, but as it turned out, this was not a problem. With the help of Jim Salge and other “Flickr Friends” I got to most of the classic viewing spots, and The 2011 Festival Tour Book (available everywhere for $5) had a nice map showing all the best locations.

My morning shoot was the most rewarding, both due to the lovely light and to the relative lack of wind. At dawn in the Lupine fields on Sunset Hill Road I used my graduated ND filters to calm the bright sky allowing the transilluminated flowers to shine through, but most of the time I kept my polarizer on to cut reflection and deepen the rich colors. As the early morning progressed, the warm light played in constantly changing patterns on the flowers and their surroundings. One of the most famous backdrops in Sugar Hill is the St. Matthews Episcopal Church and it did not disappoint. The lupine field below the church draws the eye to the contrasting pristine white structure and I was pulled back a number of times to catch the scene in the changing light. The surrounding mountains, especially Lafayette and Canon also provided a wonderful background and I enjoyed looking for different ways to contrast their stark beauty with the soft carpet of brightly colored wildflowers. On a couple of occasions I had the good fortune to catch horses in the fields oblivious to the riot of color surrounding them. After several hours of gleeful shooting I returned to awaken my friends, drenched to my knees, accompanied by a few friendly ticks, but excitedly anticipating getting the images unloaded for a closer inspection.


I could go on about shooting during other times of the day.  Each had its own attractions and challenges. I should note that the mountains are better illuminated at sunset from this location. But you just need to go their to take advantage of this brief yearly opportunity to capture magic on your sensor.


This year’s Fields of Lupine Festival is June 3rd – 19th, 2011. For more information check out the Franconia Notch Chamber of Commerce Lupine Festival site

Want more Lupine?  Check out my Lupine Flickr Set.