About Me

My photo
Spofford, New Hampshire, United States
Jeff Newcomer had been a physician practicing in New Hampshire and Vermont for over 30 years. Over that time, as a member of the Conservation Commission in his home of Chesterfield New Hampshire, he has used his photography to promote the protection and appreciation of the town's wild lands. In recent years he has been transitioning his focus from medicine to photography, writing and teaching. Jeff enjoys photographing throughout New England, but has concentrated on the Monadnock Region and southern Vermont and has had a long term artistic relationship with Mount Monadnock. He is a featured artist in a number of local galleries and his work is often seen in regional print, web publications and in business installations throughout the country. For years Jeff has published a calendar celebrating the beauty of The New England country-side in all seasons. All of the proceeds from his New England Reflections Calendar have gone to support the Pulmonary Rehabilitation Program at the Cheshire Medical Center. Jeff has a strong commitment to sharing his excitement about the special beauty of our region and publishes a blog about photography in New England.

Sunday, December 29, 2013

The "Best" of 2013


 Best Images Stories of 2013

This is the time of year when we see many photographers showing
Graze the Fence, Alstead, NH
what they feel are their best images of the year. I decided to do the same, picking favorite images is like picking favorite children.  I found myself regretting the pictures I had to leave out more than celebrating the few selected.  I ended up with   over 100 "favorites", but chopping this down to 10 was agony.  Then it occurred to me that what was really worthy of celebration was not the images, but the experiences, the locations, the people and the ideas that I have been privileged to explore over the past 12 months.  Pretty pictures are great, but they are really just the frosting on the cake.  What attracts me to photography is the treasure hunt as I learn more about the unique beauty of our region and the hunt doesn't end when I get home. In the digital darkroom I continue to search for the best ways to uncover the full potential of my images.  My goal is always to place the viewers feet in my place, to have them feel that they have stepped into the scene.  That they can see what I saw and feel what I felt.

Why I Blog


One of the major advantages of doing a weekly blog is that it forces
Farrier's Touch
me to define a mini self-assignment every week. I must assemble images and information to highlight the beauty of a  special location or theme, or to illustrate a technical point about photographic technique or post processing.  Often my photography and study is dominated by the needs of the upcoming blog, but it is a great way to keep my photography moving forward. I usually learn much more than I teach. 

So this week, instead of sharing what I think are my best images, I want to recall some of the experiences of 2013. The images may not be considered my best, but they will hopefully recall some of the best stories of this busy year. 

If you are desperate for the pretty pictures, check out my slide show at the end of the article.   Pick whichever 10 you like.

Back Roads and Unexpected Treasures
 Many of my blogs focus on the attractions of a specific New England location, some of which are familiar to me and others that I must discover along with my readers.  Here are just a few of my favorite shoots of the past year.


Meandering Vermont's Back Roads
Mill Brook, Townsend, Vermont
One of my favorite activities is to get lost on the back roads of my region.  After years of exploration it still surprises me how easy it is to finds paths I have never explored.  I started 2013 with a meander on the back roads of southeastern Vermont. As always I found new photographic opportunities and many spots to ad to my "must return" list.
Vermont Meander


Treasures of Dummerston Vermont 
My blog article on the attractions of Dummerston, Vermont was
Dummerston Sunset
another good example of the value of self-assignment.  My home is  just across the Connecticut River, and I had many great images of this classic New England town, but the "assignment" was the stimulus to explore new areas and angles.  I think I saw just about everything in the village, except Tom Bodette, "leaving the light on". Yes there is a Motel 6 in Brattleboro.
 Dummerston, Vermont


Blow Me Down Mill, Cornish
 
Not all assignments are self generated.  Last spring I got a call from
Aspet House, St Gaudens Historic Site
Cam Mirisola, Senior Editor for New Hampshire To-Do Magazine looking for images for an up-coming article about Cornish, New Hampshire.  I already had plenty of pictures of the Cornish-Westminster Covered Bridge and St. Gauden's Historic Site, but the third site that she mentioned was entirely new to me.  Built in 1891, the Blow Me Down Mill was associated with the famous Cornish Art Colony.  I had a great time exploring the Mill From all angles.  The light was harsh and the trees bare, but I got some reasonable shots and last spring, I was reward with my images in NH To Do Magazine, including a two page spread.
 Blow Me Down Mill, Cornish, NH


Tale of Two Trees
 
I am Primarily a landscape photographer so, by definition, I love trees. This year I had the opportunity to celebrate two special trees
Only a Memory
one which is a grand champion and the other whose grandeur is only a memory.  This summer the great Red Oak in Chesterfield's Friedsam Town Forest was identified as the largest in the county.  The tree is in good shape, but, sadly, the once majestic White Oak on the hill-top of Alyson's Orchard in Walpole had to be cut to the ground this year after being irretrievably damaged by a lightning strike.  The two events gave me the opportunity to appreciate both the strength and vulnerability of these magnificent living things that do so much to enrich our experience on earth.

Tale of Two Trees


Green River
Green River, Vermont
Green River is a small village in the Vermont town of Guilford. 
The village is quintessential New England with a classic covered bridge, a lovely timber frame dam and water fall, a typically austere white New England church, a welcoming country Inn and of course the mandatory red barn.  For me, the place has been a favorite photography spot for years. No matter how many times I return, I always find new inspiration.   This year I finally, and reluctantly, shared the secret of this hidden treasure. 
Green River, Vermont


Seeing in the Dark
This was a year for exploring the night sky as everyone seemed to discover the capability of fast digital sensors to probe deep into space and time.


Comet PanSTARRS
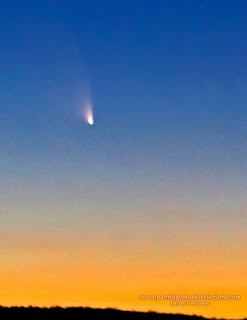

Comet PanSTARRS
2013 brought the promise of two, potentially spectacular Comets.  As it turned out Comet ION was a disappointment, but earlier in the year I was able to chase down Comet PanSTARRS.  The comet was barely visible to the eye, but, though the power of my digital camera's high IOS capability, I was able to capture it on a couple of evenings.  I even was able to sucker my friend Bob to join me for a cold evening to see the comet from the hill at Apryl's Orchard in Walpole, New Hampshire.
Comet PanSTARRS


In Search of the Milky Way
In any photographic exploration of the night sky, the most
prominent feature by far is the Milky Way.  We have become aware of capability of high ISO sensors to show the band of light from our galaxy at an intensity far beyond the ability of our eyes to perceive,  even on the clearest night.  The digital camera has become a time machine capable of looking back in time tens of thousands of years.  This year I learned more about the techniques needed to capture the night sky, how to predict the location of the Milky Way and  how to plan my shoots to place the Galactic band behind interesting foregrounds.  The Milky Way is the obvious center of
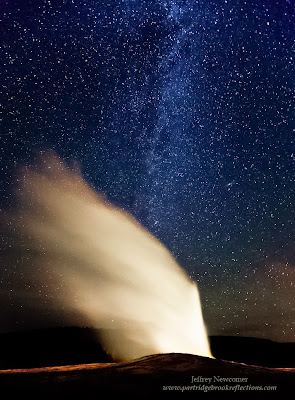
Old Faithful & Andromeda
attention in many night sky images, but one of my favorite attractions is the Andromeda Galaxy.  Our closest neighboring large galaxy is 2.5 Million lights years away and to the unaided eye is a barely perceptible smudge in the sky, float below the constellation Cassiopeia. It is much better seen through the digital camera. I first discovered the galaxy by accident about a year and one-half ago while taking night photos of the eruption of Old Faithful in Yellowstone, but  now I'm always looking for this distant neighbor.  It is remarkable to look at light which has been traveling since the human species was in its early development.
The Glory of the Milky Way


Back to the Sea and That Means Lighthouses


Whaleback Dawn
I grew up on the New England coast and I try to get back as often as I can.  This year I was fortunate to have a few fruitful trips.  After failing last year, this year's annual summer visit to Rye Beach, NH was rewarded with a spectacular sunrise over  Whaleback
Lighthouse and a dramatic full double rainbow floating over the ocean.  In the autumn, Susan and had great time exploring around Camden, Maine.  The weather started rainy, but I was able to capture early morning light on Camden Harbor and a classic sunset at Marshall Point light.  Finally I got to Nubble Light when I was able to sneak away from an admittedly lovely wedding of the daughter of one of our good friends.

Rye Beach and Whaleback Lighthouse

Camden and the Middle Maine Coast
Atlantic Rainbow, Rye Beach, NH


Special Projects
In 2013 I had the opportunity to shift from my usual photography and explore new modes of expression.

Monadnock Documentary
In 2013 I continued to enjoy being a small contributor to Rabbit Ear Films as we work to produce a feature length documentary
about our region's iconic feature, Mount Monadnock.  Most of the filming has been completed and the difficult editing phase is underway.  Our goal is to complete the film next year.  For me it has been a unique learning experience as I have come to understand the differences between what works for video as opposed to stationary landscape photography.  As a member of the Rabbit Ear Board of Directors I am experiencing the many complexities of assembling a top quality film, from the fund raising, to coordination of script, video, music and narration, and planning for promotion and distribution.  It is fascinating, but at times it reminds me of how easy it is to go out and photograph a tree. 
Monadnock Documentary Film (Check out our Trailer)


Chesterfield Conservation Commission Web Site
This year, I finally renovated our Chesterfield Conservation 
Commission web site.  The previous site dated back to a time when I was still coding by hand in HTML.  Needless to say, it was getting very clunky.  The overhaul was simplified by the fact that I used Zenfolio, the portfolio system that I had just used to redo my own photography web site.  The Commission site is loaded with great information, including descriptions and maps of public lands, information on events and general conservation resources.  The system makes updates simple and intuitive and most importantly changes can be easily made by any member of the commission.
Chesterfield Conservation Commission Web Site


Sound
At the end of last year I upgraded my portfolio site using Zenfolio.

Recorder & Dead Cat
Part of the program is the capability to create beautiful slide shows. At first I tried adding music to the shows, but then I decided to use the sounds of nature.  I started roaming the back roads with my Zoom H4n field record looking for the sounds of birds and crickets without the background drone of civilization.  I learn how hard it was to find real quiet, how to edit audio and what exactly is a dead cat.  it was worth the effort to add the music of a New England field, the washing of waves on the Atlantic shore or the drama of a summer thunderstorm to my images.
Sounds of Nature


And Finally Christmas Lighting
My last self-assignment this year was capturing Christmas

Central Square, Keene, NH
Lighting.  My approach to this project was similar to that for  many of my blog articles.  I started by searching my photo archives for pictures of holiday lighting.  I uncovered some general themes but most importantly I discovered that I haven't shot a lot of Christmas lights. I went to work, studying the work of talented photographers, assessing where my own work had fallen short and then getting out to shoot with a fresh eye.  The goal was not just to find pretty pictures, but also to illustrate the important rules that I had learned for beautiful and memorable Christmas lights photography. 
 Christmas Lights


This process of reflection and study is a perfect example of how much I learn every week through the effort to assemble information that I hope will be of interest to my fellow photographers. No matter how much I think I know about a topic there is always more to discover.  I love sharing my fascination for photography with others, but it is the self discovery that keeps me coming back every week.  So I look forward to another year of explorations into the endless potential for artistry within the Digital Camera.  Thank you for coming along and sharing with others.


 Check out some of my favorite images from 2013, and Nature's sweat accompaniment.

Sunday, December 22, 2013

Getting the Most from Christmas Lights Photography


Finding the Holiday “Sweet Spot”

This is the time of year when every good photographer turns their camera toward the lights that warm our holiday season. This week I completed an article for the New England Photography Guild on shooting Christmas lights. The blog includes a number of tips that I think are especially important when trying to capture the magic of Christmas illuminations. Check it out.  Christmas Lights Photography (to be published 12/23/13)


As always my companion “Getting it Right in the Digital Camera” blog will include some the images that didn’t fit in the NEPG article.


 I have never been a great fan of Christmas light photography; 
Lovely Understated Lighting
perhaps because of the tendency of some folks to bury their homes with garish displays that speak more of their egos than the peace and warmth of the holidays. This year I have been giving the lights another chance, looking for more understated beauty and iconic settings, and of course that led me repeatedly to the beautiful and icon Central Square in Keene, New Hampshire. 


I have taken hundreds of pictures of Central Square, but the most popular have been those taken during winter with the Christmas decorations and lights. The square has 4 key elements that can be mixed and match in a wide variety of compositions. These include the gazebo, the white church and, during the holidays, the Christmas tree. Oh yes, and the fourth element is the traffic, both human and vehicular, that always has to be accounted for. This year our tree is a bit small, but nicely decorated. I came back to the square 5 times looking for the best combination of light and atmosphere. I think I finally hit on the “sweet spot” earlier this week.


Bare Ground & Dark Skies

 When I started visiting the Square the lights were beautiful, but the ground was bare. I experimented with compositions including all of the elements, the church, the Gazebo and the tree, but later tried other combinations. The first problem was that the brown grass was unattractively barren and did nothing to reflect the lights. I tried to arrange compositions to include as little of the ground as possible, but I needed snow, and that came last weekend.


As soon as the snow had stopped, I was out again, shooting some of my favorite angles around the square. The key to snow photography is to catch it when it is fresh, the "winter wonderland" time when the trees and buildings are still frosted. This is especially true for Christmas lighting. As I discussed in this week's NEPG Blog, the snow on the trees reflects the color of the light best when the snow is close to the bulbs and before the heat of the lamps melts it away. 


The Blue Hour, but No Snow
One of the keys to Christmas light photography is to shoot during the “Blue Hour”, that time just before sunrise or after sunset when the sky retains a lovely blue glow, but does not obscure the illumination. Lighting photographed in the full darkness tends to appear as if floating in space without sense of context with the underlying scaffolding and surrounding, unilluminated structures.

So what is the sweet spot for Christmas lights photography? For me it includes all the important elements; an iconic New England scene, beautiful and not garish lights that complement the locale, cool twilight in the sky and fluffy fresh snow. After last weeks snow, I hit the jack-pot on central square with all of these elements, but there was on thing

missing. 


It was the classic white church at the top of the square. The United Church of Christ was an essential part of many of my compositions, but the flood light which illuminate the facade didn't come on until the darkness had nearly fully descended. I was

missing the "Blue "Hour"! There 
The Sweet Spot
was some reflected light from the gazebo, but even with enhancements in post, it didn't have a natural feel. There was only one thing to do. I called the church and asked them, for one night, to turn the lights on a couple hours early. Everyone was very nice and understanding and after a search for the appropriate people in charge of the switch, the light came on at 2 PM last Tuesday afternoon. The evening featured a snowstorm, but I was able to catch the fully illuminated church, somewhat softened by the falling snow, and the storm provided a fresh frosting on the trees. With the long exposures the snow flakes were not individually visible, but they acted to soften the overall scene, especially with more distant elements, such as the church. As always, it was a hassle photographing in the storm, but I kept my towel over the camera and managed to keep the lens clear. Most importantly, I had my "sweet spot".

Check out my more detailed list of tips on the New England Photography Blog, and get out to enjoy the show before it flies off to the North Pole for another year.

Jeffrey Newcomer
Partridgebrookreflections.com

Sunday, December 15, 2013

Cutting the Math from Matte Cutting

 
The Problem
 
 
Single Matte
Ok.  I know I'm in trouble.  I have mentioned "math " in the title of this week's blog.  I understand that this will chase away most of my readers and that I should off-set the damage by adding "Naked Women" to the title or introductory paragraph.  Of course I would never use such a cheap trick.  Hang-on though, the purpose of this article is to introduce my simple Excel application that quickly handles all the calculations necessary to cut a perfect matte for your photographs and without any requirement for even elementary school math.

The Power of the Print
These days when photographs are generally presented to the world

in digital form, the physical print seems to be increasingly looked upon as an archaic remnant  of an ancient time.  I have argued that there is something special about holding a print in your hands.  A picture on paper has a sense of depth and immediacy that can't be captured on an LCD screen.   Whether you include the craft of print making as part of your artistic process or trust a lab to convert your vision to paper, the presentation of a printed image does not stop with the print itself.  There are numerous ways to display an image, including gallery wraps and Image Blocks, but most other options involve a matte to frame the image and protect it from direct contact with the glass.

I have previously discussed my approach to matting and framing
and, at that time, I promised to post on my Excel Application for 
Logan Matte Cutter
matte cutting.  Whether you use a small Hand Cutter or a more expensive, table top device, the actual the calculations are the same.  My Excel application is a simple tool that works for me to quickly do the calculations to cut either single or double mattes.   So here it is.  If you have no interest in cutting your own mattes, please leave and go out to take a picture of a tree.


The Calculations
The calculations required to cut a matte are not complicated, but do take care, especially when a double matting is planned.  Let's look at a simple example of a single matting.

We have a 8"x10" picture which we want to mount under a single standard 11"x14" Matt.  Some people prefer to have a slightly larger matting at the bottom of the picture, but, for this example,  we will stick to even matting on all sides.

1 Measure Twice, Cut Once
First, both the matte and the photo must be measured carefully.  Precise measurements are critical.  Since my calculations are now automated, I find that most mistakes in sizing comes from inaccurate measurement or recording of the dimensions of the image or matte.  The old adage, "measure twice, cut once" certainly applies here. 

2 Going Metric 
Although mattes are generally sized to fit frames measured in inches, I use metric measurements for my calculations. Jimmy Carter was right, It is much easier to manipulate metric numbers within equations.

3 The Math
The picture's height and width are subtracted from those of the matte and half of these differences plus a small amount for overlap (usually about 1/4 inch or 6- 8mm) gives us the width of the matte on each side.  In our example :


4 Mark and Cut
I mark these dimensions on the matte and then gleefully cut away with my Logan Matte Cutter.  Perfect every time! With practice.

5 Double Matting


Double Matte
 I often use a colored under-matte  (typically black) to provide a contrasting rim of color inside the main white matte.   I attach the under-matte to the back of the white matte and then make a second cut with the border measured to be about 8-10 mm greater than the top.  The result is a even black rim around the inside of the main matte.  The details of the cutting can be easily found on the web.  Our concern today is the math.

Enough Math
The calculations are easy, but by about the time I was doing my 5th
matte it occurred to me, "this is the stuff that a spread sheet is made for".  I plugged the formulas into Excel and arrange things so that the input fields were clear and VOILA, no more math.  The inputs are all above the line and in addition to fields for the  dimensions of the Matte and Image, there are fields for the overlap and the size of the under-matte border for when a double matte is used.  There is a line to adjust the results to disproportionately increase the bottom border and I have also included a tool to convert between U.S. Standard and metric measurements.  Given my eyesight, I increased the font size of the results to make them visible across the room at my cutter.  Check it out:


There are a number of Matte Measuring Apps on the web, but none did exactly what I wanted.  My spreadsheet application works well for my needs, but it can also be easily altered to meet other requirements. 

You are welcome to use the application and modify it as needed.  I only ask that the original source be credited and that you send me a copy of any changes you make.  The simplest way to get a copy is to email a request to:


jeffn49@myfairpoint.net

When the queries approach one million, I may decide to use a different distribution system.  At some point I think an iPad App might be nice. Any suggestion about App creation resources would be appreciated.  For the time being this Excel App is simple and infinitely editable.  I apologize to all those without Excel, but the general layout can be adapted for other spreadsheet programs.

I hope this tool is useful.  Please let me know what you think. If you haven't started printing, matting and framing your work, give it a try.  For me it completes the circle of full control over my work and that has been well worth the effort. 

And again, I apologize to all those looking for the "naked women".

Jeffrey Newcomer
Partridgebrookreflections.com

Sunday, December 8, 2013

Branching Out in Your Photography


Love the Limbs
White Ridge
We are now approaching the end of stick season (hopefully). The leaves are all seeping into the soil, and we are all anxiously anticipating the first real snow. Ok, we had a dusting last night. I often talk about November and early December as my time to relax, recharge while focusing my efforts on working through all those spectacular Autumn photos, but I have also insisted that stick season has its own photographic attractions. Today I would like to focus on one, less obvious attraction, the stark beauty of the barren tree branches These are too often thought of only as depressing skeletons looming overhead. This time of year I routinely frame my images to minimize or eliminate the tree branches arrayed against the flat gray sky, but there is often much interest in the simultaneous stark strength and delicate beauty of the scaffold which holds the abundance of our seasonal foliage. I've been scanning through my images for examples of when I have allowed my photography to "branch" off in new directions. Sorry.


Mist and Sky
The fascinating pattern of bare branches are often best appreciated against the soft backgrounds of overcast and mist of approaching winter. They can also contrast nicely with the brilliant colors of an early winter sunset or silhouetted against the sky along a high ridge line. 


Looking Through the Veil
After the leaves have fallen away, new perspectives are revealed. We are able to see further into the forest where ranks of trees can form interesting patterns or the course of streams can be better appreciated. Unsuspected distant vistas may also appear, although always with a screen of branches. I have often struggled to find angles that would eliminate or reduce the obstructions, but more recently, I have come to appreciate how a veil of branches can add pattern and mystery to a scene. An intricate and chaotic curtain of branches in front of more regular shaped subjects, such as churches, houses or barns
Winter Wonderland
can add interest to an otherwise routine scenes. The art comes in finding an effective balance between order and chaos. Of course branches are not always bare and when they are coated with snow, the "winter wonderland" effect becomes fully apparent. I recently wrote an article about using various Photoshop tools to move a branch away from a church steeple. It was an interesting exercise, but in the end, I decided to leave the obstruction in place. It seemed more natural and is still one of my favorite village images - check out the cover of this year's New England Reflections Calendar.


Black and White

Of course, branches are a perfect subject for black and white photography, where contrast and pattern are most important. For black and white conversion, I look for images in which a strong pattern is the driving element. It is amazing how the removal of the distraction of color can totally shift the emphasis of an image. Experimentation is easy In Photoshop. Simply add a B&W adjustment layer and switch back and forth between color and B&W. 


If it Doesn't Move, Decorate It
It is that time of year when our branches become the scaffold for elaborate Christmas light displays. I won't dwell on this here, since I am scheduled to do an article on Christmas light photography for the New England Photography Guild later this month. Stay tuned.


The great thing about photography in New England is that, no matter how crummy the weather or uninspiring the season, there are always interesting subjects to shoot. The trick is to shift focus to what is available and try "branching" out to new perspectives. Once again, sorry. 


Jeffrey Newcomer
Partridgebrookreflections.com

Monday, December 2, 2013

Editing Your Photos With the "Blow-Up" Scan


West River Valley. Dummerston, Vermont

Looking for the Bodies
Thanksgiving Gathering
Since  Susan and I are just getting back from a week visiting our daughter in Washington, DC,  this week's blog will be mercifully short.  We gathered at Abigail's house for Thanksgiving with Abby, her boyfriend Grayson, and a number of Abby's  friends and their families. Even our son Jeremy came down from New York City.  It was our typical intimate holiday feast for 15, with lots of
fascinating new friends, a
Space Shuttle Discovery
great  feast and a lovely visit.  Washington has a limitless supply of interesting things to see, and just about everything is free.  On this trip we went to the Air and Space Museum in Chantilly, Virginia and the amazing National Gallery of Art.  The Gallery's collection is remarkable and It was a reminder of how much we can learn from the masters about photographic composition and the use of light . 
National Museum of Art

 We got home late Saturday night, leaving little time to put together an article.  I thought this would be a good time to mention a simple editing step that I use on all of my pictures.  My "Blow-Up scan" harkens back to a classic '60s movie that should be on every photographer's must see list.


The Film

Michelangelo Antonioni's classic 1966 film, "Blow-Up" tells the story of a fashion photographer in mid-60s London.  The film studies the glamorous world of high fashion photography, but for me the key moment comes when the photographer, played by David Hemmings, escapes the glitz to do some voyeuristic street photography.  In the park he catches a couple in an intimate

embrace.  He is seen and the woman (Vanessa Redgrave) does everything she can to get the film, including offering money and "companionship", but without
The Body
success.  Later, in the darkroom, yes a real darkroom, the photographer finds evidence of a murder.  While scanning the detail of the image he discovers the grainy image of a man in the trees apparently holding a gun and later the suggestion of a body lying in the grass.  The movie devolves into reflections on the nature of reality, but it was what the photographer found while scanning the image detail that made a lasting impression.


Where are the Bodies?


The Trash


The "Blow-Up" Scan


Part of my editing routine is to zoom in to 100% and then systematically scan every inch of the image.  I start at the top and move slowly across the image, row by row,  to the bottom. In the sky, I'm looking for dust specs, erasing them with my healing brush.  If the sky is bright, I will darken it with a levels layer, to make the blemishes more apparent.  The new version of Lightroom has a Spot Detection Tool which has a similar effect.   As I get down into the rest of the image, I look
Spots Highlighted with Levels Adjustment
for trash or other distractions.   I clone out the random candy wrappers and cigarette packs, but I also look for distracting elements, such as bright patches, that might draw attention from the main subject(s) of the image.  Of course, while I'm performing this systematic clean-up, I never forget Blow-Up.  Perhaps it is a bit macabre, but I always watch for the occasional dead body.  Creepy?  Yes,  but it keeps me remembering to carefully scan my images, and that's what is most Important.  

White Distractions, or Perhaps a Bleached Femur?

Check out "Blow-Up".  It is a classic, of particular interest to photographers and, although you will probably never discover a body,  scan your images carefully, You never know what you'll find.

Jeffrey Newcomer
Partridgebrookreflections.com