About Me

My photo
Spofford, New Hampshire, United States
Jeff Newcomer had been a physician practicing in New Hampshire and Vermont for over 30 years. Over that time, as a member of the Conservation Commission in his home of Chesterfield New Hampshire, he has used his photography to promote the protection and appreciation of the town's wild lands. In recent years he has been transitioning his focus from medicine to photography, writing and teaching. Jeff enjoys photographing throughout New England, but has concentrated on the Monadnock Region and southern Vermont and has had a long term artistic relationship with Mount Monadnock. He is a featured artist in a number of local galleries and his work is often seen in regional print, web publications and in business installations throughout the country. For years Jeff has published a calendar celebrating the beauty of The New England country-side in all seasons. All of the proceeds from his New England Reflections Calendar have gone to support the Pulmonary Rehabilitation Program at the Cheshire Medical Center. Jeff has a strong commitment to sharing his excitement about the special beauty of our region and publishes a blog about photography in New England.
Showing posts with label sunset. Show all posts

Sunday, July 16, 2017

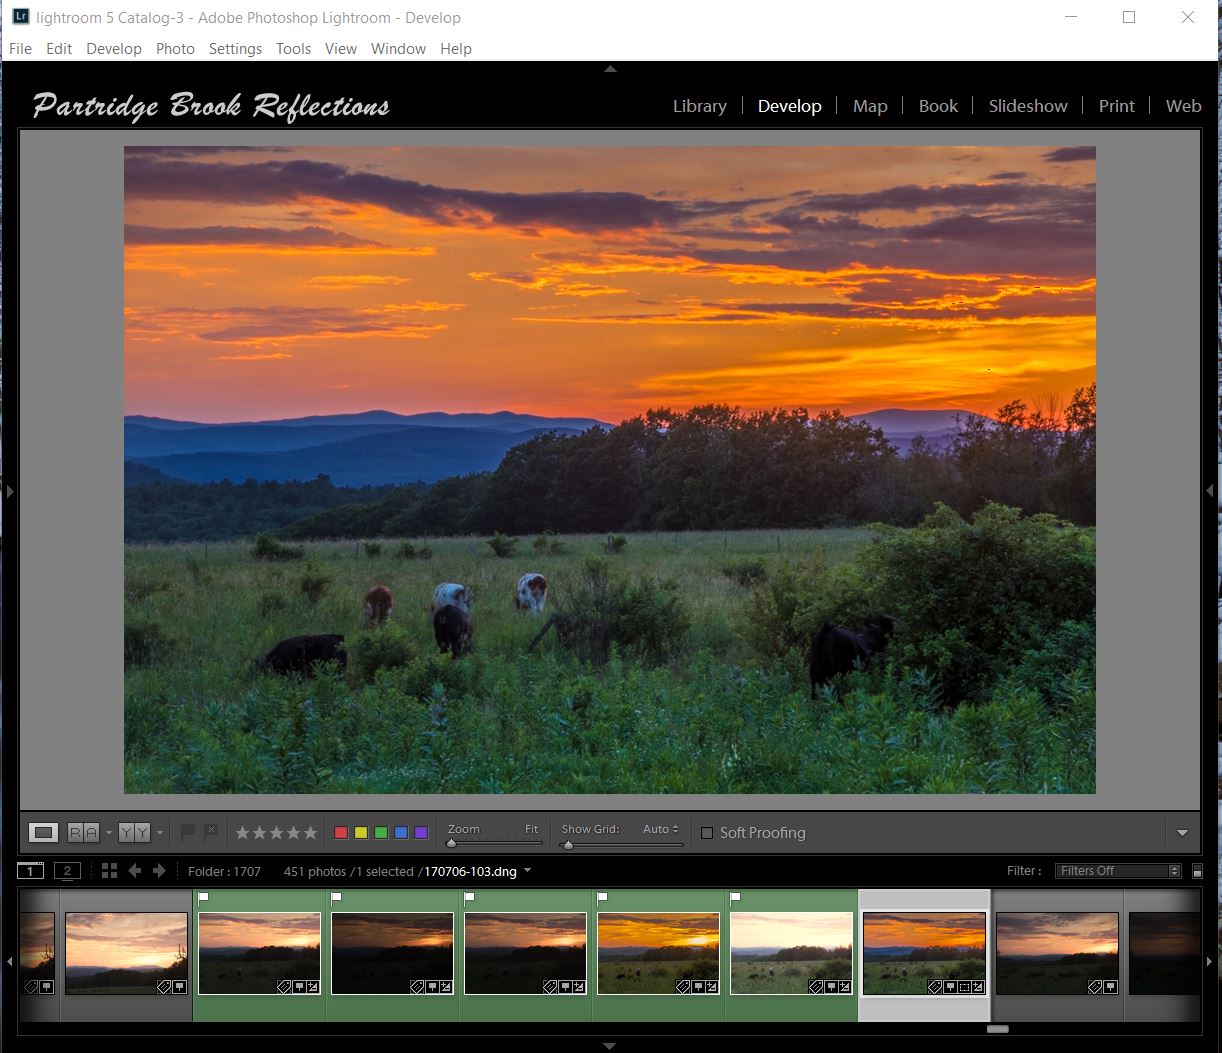
Using the Lightroom Reference Tool


Adobe regularly sends out updates to their Lightroom CC.  As the Creative Clouds “drift” by, these updates are often filled with new camera support and, hopefully, performance upgrades, but occasionally they slip in a new Tool to make things interesting.  These new gizmos are usually fun to play with, but it often takes a while to figure out what practical value they offer and how they might fit into my day-to-day workflow.  This was true for the new Reference Tool.

Enter the Reference Tool
Back a few months ago, the version 2015.8 (Catchy) included the addition of the Reference Tool in the Develop Module.  We are familiar with the Compare Tool in the Library Module, that allows a side-by-side comparison of two images. The Reference Tool appears in the same location in the Develop module as the Compare button, but exchanges the “X/Y” label for an “R/A” Label, standing for Reference and Active windows

The Reference tool allows you to compare two photos, with one a “Reference” image, which stays static, and the other a comparison image which can be edited (i.e. Active).  The usual goal is to match the Active image to the tone and color balance of the Reference.  

The Reference window can most quickly be opened by clicking on the R/A button or by using the short-cut “shift R”.  It is simple to set a reference image by dragging it onto the left window of the tool.  A single image or a series can then be moved to the right window and visually adjusted to the reference.

Easy, but when should you use the tool? 
Adobe suggests:

“This is helpful when making a group of images from a single event look similar or setting the white balance appropriately in mixed lighting conditions,”

Sunrise Challenge

Gradient Neutral Density and Flair

Nifty, but, until recently, I hadn’t found any situations in which this capability was helpful for my landscape photography.  Last week I was shooting a sunset from one of my favorite spots along Route 63 in Chesterfield New Hampshire.  The clouds were a bit too dense, and the sun peeking through them created excessively high contrast.  I tried using a graduated neutral density filter without much success and as usual adding an additional layer of glass just accentuate the flair coming from the brilliant solar disk..

  I tried a few shots, but then settled down to wait until after the sun dropped below the horizon.  In the meantime I studied the long shadow of my tripod and me, reaching back to the Chesterfield Firehouse.  Then the real show began.  As the sun set, the clouds lite up nicely.  Although the sky remained quit bright, the contrasts was easier to manage.  The problem then was to try to find a foreground with enough interest to balance the brilliant sunset glow.   From my location, the lovely pasture spread out toward the distant Vermont hills.  Classic, but rather bland, especially while mired in the shadows.  


Sunset Song

The sky was dramatic but I wanted to find something interesting to put in my foreground.  My first choice was a rather scraggly tree off to one side.  I was attracted by the flock of birds filing the branches, and ecstatically chirping at the fading gold.  It was a charming sunset sonata, but then I noticed cows grazing my way.   I had to scramble to get down to the herd’s level, but then I had my “foreground element”.   I was ready to go.   Again I tried to reduce the contrast with my Neutral density filter, but I got my best results by combining the graduated ND with a five exposure High Dynamic Range image.

Active Grazing


After processing, the sky came out beautifully and the foreground was reasonably exposed.  The problem was that the cows appeared blurred as they methodically grazed there way through the multiple exposures.

HDR Image


My Foreground Image, Exposed to the Right
Looking through the individual images, I found that all had some blurring, but some were less noticeable than in the HD image.  I decided to blend the foreground from one of the single images with the HDR sky.

To get better tonal quality and less noise, I selected my foreground picture from one of the brighter images.  Remember exposing to the right?  To make the blending easier, I wanted to darken the foreground image to closely approximate the tone and color balance of the HDR sky.  This is where the Reference Tool entered my workflow.


Reference Tool

Matched Images
I dragged my HDR image onto the reference window of the tool and then added the foreground to the comparison.  It was then a relatively easy matter to adjust the tone and color of my foreground image.  It wasn’t perfect, but after exporting it to Photoshop, the modified foreground image was close enough to easily to blend with HDR sky.  The final image showed the placid cows munching contentedly, totally oblivious to the spectacular fireworks hovering above their heads.  

Matching the Reference HDR Image, Step by Step


Final Composite Image
I could have roughly matched my two images without a dedicated side-by-side comparison, but the Reference Tool made this chore much easier and more precise.  I had to apply only a few minor adjustments to the masked foreground to reach a perfect the blend. The ability of the Reference Tool to match image layers for compositing is a great use for this new Lightroom feature, and allows me to comfortable position this new “gizmo” within my landscape workflow.

Check out more articles on Lightroom and Photoshop on my Blog at:
Photographic Editing (Photoshop & Lightroom) 

And watch here for information about my next Lightroom course, coming this winter. 
YES, winter is coming!


Jeffrey Newcomer

Sunday, June 18, 2017

Five More Photographic Secrets


Dummerston Sunset
A few months ago I discussed 10 of my Favorite Secrets of Photography. These were just a few of the “take-away” points that have come from several of my, over 350, blog articles.  As I assembled that list, I realized that I had come up with many more than just 10 “secrets”, so here, in no particular order, are 5 more.  I’m sure that these won’t be the last.   


These tips are short and sweet, but I have included links to more detailed discussions found elsewhere in my blog.


11) Diffuser should be held as close as possible to the subject.

A diffuser can block the harsh contrasts created by bright light and prevent stark reflections that tend to mute underlying colors. It is just one of the ways to deal with the challenges of bright midday sun.  Diffusers are available in many sizes.  Bigger is better, but regardless of size, they work best when held as close as possible to the subject, without intruding on the frame.  When positioned close, the light tends to be softer and more diffuse, seeming to wrap around the subject.  When locating the diffuser care should also be taken to avoid hot spots in the background created by areas not shielded from the sun.


12) Rainbows are seen when you turn your back to the sun and look at the receding edge of a rain storm.

 
It’s simple physics.  Rainbows form when the droplets in a storm cloud are illuminated by direct sunlight. The reflection and refraction of light within each drop divides the beam into its spectrum of colors.   Given the general flow of our storms from west to east, this means that, as  late afternoon fronts pass by,  the setting sun can shine on the clouds predictably creating a rainbow. 


Rye Beach Rainbow

It isn’t Leprechaun magic, given the right conditions, it will happen every time.  To see the strongest colors all you need to do is stand with your back to the sun and look into the dark receding rain-filled clouds.   The only other requirement is that the sun must be below 42 degrees, otherwise the colors will be reflected into the ground.  This means that Today (June18th), in my corner of southwestern New Hampshire, regardless of all the other conditions, I can’t expect to see a rainbow until after about 4:30PM.   


13) Get under a roof to avoid the snow blotches.


There is no other condition that so dramatically demonstrates weather conditions in photographs as does images of falling snow. Snow makes precipitation vividly palpable, and its appearance can be dramatically altered by both natural factors, and how the flakes are captured in the camera. The size of the flakes, as well as the density and rate of the fall are important, and changes in the shutter speed can make a gentle flurry look like a raging blizzard.


The Blotches

Another issue is “the blotches” which is the bane of my falling snow images.  You have undoubtedly seen beautiful atmospheric images of snow storms, but here and there are big blotches of white that seem out of place.  These white smudges come from the snowflakes that are close to the lens when the image is captured.  They are invariably out of focus and, to me at least, extremely annoying.  Happily, there are. number of ways to eliminate the blotch.  


Blotches can be removed in post processing, but this can be a time-consuming chore. In the field, they can be minimized by shooting with wider apertures and focusing on distant objects, but they are most effectively eliminated by shading the lens from nearby flakes.  In the tractor comparison, I shot from under a porch roof.  Magically, no blotches.  When a roof is not at hand, an umbrella or a piece of card board can also help.  Just keep your shade out of the frame.


14) Under harsh, bright midday sun, trans-illuminate the foliage.

Ashuelot Park Bridge, Keene NH

Bright sunlight can be terrible for capturing the full color of foliage and flowers.  This light results in high contrast between brights and darks, and causes reflections that mute the colors.  As discussed above, there are various techniques to block or diffuse the bright illumination, but another solution is to use the light to trans-illuminate the foliage.  Light shining through foliage or flowers can intensify their color, creating an electric brilliance.  This technique can be a lifesaver for the midday sun, but it is equally effective during the “Golden Hours”, when the sun is low in the sky.


15) During the Golden Hour, turn your back to the sun and make images using the warm light.

The “Golden Hours” are notable for the opportunity to capture the audaciously brilliant colors of sunsets or sunrises, but, while you are busy being enchanted, take a moment to turn away from the spectacle and notice the lovely effect that the warm light creates on everything behind you.  


Sally Lightfoot at Sunset, Galapagos Islands

 Even ordinary subjects can take on a magical glow and these often contrast nicely with the deep blues of the evening sky.  So, as the sun rises or drops toward the horizon, go ahead and capture the garish colors smeared across the sky, but that’s the easy part.  Then turn away and explore all that can be done with the soft warm light.

Point Judith Moonrise


That makes 15 quick tips.  Stay tuned for more.


Jeffrey Newcomer
partridgebrookreflections.com
603-363-8338


Sunday, March 26, 2017

We are back!


Sunset, Mallory Square Key West
Oh, I forgot ... We were Away
I should mentioned that we were away for the last month.


Back to the Cold
I love winter in New England, but this year, Susan and I decided to escape the worst of the season and head south for some much-needed warmth, and an early glimpse of spring green.  March is the time of year when the winter dark begins to show its earliest hints of fading, but it is also the time when the persistent cold, snow and sleet becomes increasingly hard to bare.  Now that we are both retired, we realized we could just get out of town and come back, whenever.


Roanoke Market

We had a great trip and I came home with over 4,000 pictures.  Many of the green landscape but mostly of animals, especially a great variety of birds.  Yes, I am a birder now.  But there was a problem.


Keeping the Secret

Florida Sunrise, Hollywood
Every evening, as I uploaded more fantastic images, I was desperate to share our experiences with pictures on Facebook, but there was a problem.  This was not the first time that we were worried about publicizing to the world that our house was empty, but this time we were away for a whole month.  As always, we had arranged for someone to stay in the house for many of the nights and our trusty local contractor kept the driveway clear.  Jason also came by for regular checks on the property.


Everglades Croc


Despite all these precautions, I still decided to avoid direct references to our absence, no blogs, no posts and no images.  It killed me to publish generic blogs, while I was seeing such amazing stuff.  Of course, I couldn't keep entirely silent.  I referred friends to a gallery of a few images on my web site, with the marginally cryptic title of “Search for Warmth”.  I trusted that the standard issue burglar would not venture that far down on my front page in search of prime targets.  


Ringbill at Dawn, St Augustine Florida
 Our plan worked and we returned to an intact house and the shock of frigid cold and blustery winds.  We considered turning around to head south again, but the van was due back.  To get me through the mud and stick season, I have the consolation of thousands of warm weather images requiring my attention.


The Trip

Kure Beach Sunset, Wilmington North Carolina
Susan is a master travel planner and she knows the cravings of my photographer’s eye.  She scheduled a month long, warmth seeking, tour along the coast as far south as Key West, planning visits with friends and family along the way. We packed all my camera gear and a full range of clothing, winter to summer, into our rented minivan.  The southbound itinerary included stops in Roanoke Virginia and Savannah Georgia, on our way to spending a few days with Sue’s college roommate in Hollywood Florida.


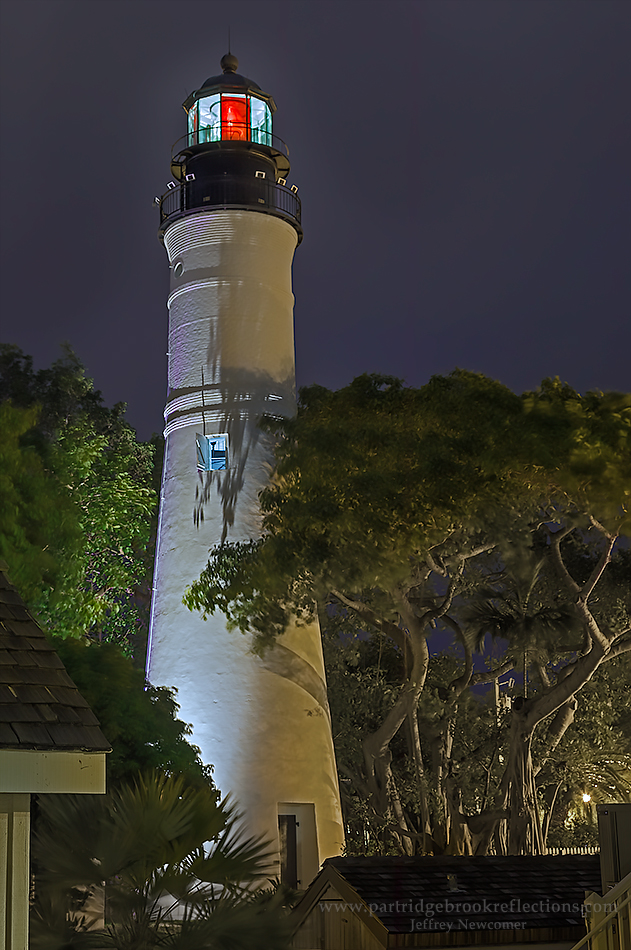
Key West Lighthouse

We spent the majority of our trip in Florida, mostly exploring both sides of the Everglades and relaxing for five nights in a quiet Key West condo oasis.  Key West is lovely and we were nicely shielded from the craziness of the spring break “thuglets” that roamed the bars on Duval Street.


White Egret Naples, Florida


Our trip back home included stays with friends and family around Naples on Florida’s west coast.  In addition to enjoying the beaches and nature preserves, we had the opportunity to see the criminally opulent seaside mansions of so many of the one percenters.  All during a time when we are told that we don’t have enough money to provide food or basic healthcare to our most vulnerable.


Everglades Osprey


St Johns Ruins, Harpers Ferry WV
On the way north we stopped for a quick tour of Saint Augustine and a morning in a pleasantly deserted Harpers Ferry Virginia.  The park’s empty streets made it easy to be transported back the town’s  turbulent 19th century past.


Quick Meal, Young White Ibis
It is good to be home.  I am excited about the impending spring, and I have shows to prepare, the spring and summer course and workshop schedule to finalize and, of course, a boatload of images to edit!


Appledore Sunset, Key West Florida

I have so much more to share from this trip, sunrises and sunsets, interesting architecture, lush landscape and most importantly a wide variety of fauna.  And of course, much thanks for the wonderful hospitality from; Joanie and Allen, Judy, Mark and Joan, Mark and Veronica, and Larry and Evelyn.  

It feels SO good to finally get out a few of my pictures from this wonderful adventure.  More to come, but in the meantime, you can follow my editing progress in my “Searching for Warmth” Gallery.