About Me

My photo
Spofford, New Hampshire, United States
Jeff Newcomer had been a physician practicing in New Hampshire and Vermont for over 30 years. Over that time, as a member of the Conservation Commission in his home of Chesterfield New Hampshire, he has used his photography to promote the protection and appreciation of the town's wild lands. In recent years he has been transitioning his focus from medicine to photography, writing and teaching. Jeff enjoys photographing throughout New England, but has concentrated on the Monadnock Region and southern Vermont and has had a long term artistic relationship with Mount Monadnock. He is a featured artist in a number of local galleries and his work is often seen in regional print, web publications and in business installations throughout the country. For years Jeff has published a calendar celebrating the beauty of The New England country-side in all seasons. All of the proceeds from his New England Reflections Calendar have gone to support the Pulmonary Rehabilitation Program at the Cheshire Medical Center. Jeff has a strong commitment to sharing his excitement about the special beauty of our region and publishes a blog about photography in New England.

Sunday, March 31, 2013

Photoshop's Many Disappearing Acts


Finding the Best Way to Skin the Cat : Is there a Bad Way?

Photoshop usually provides more than one way to solve a problem. The fun is to find the easiest and most effective technique, but the newest and flashiest approach is not always the best.

My photography lives and dies with Photoshop. All my pictures pass through the program as they progresses from a flat RAW image to a picture which reflects the brilliance and drama of the scene. Photoshop is a miraculous program and every few years, when the next version arrives, it gets even better . Whenever a new version is announced the debate begins about whether the improvements are worth the expense of the upgrade, but, given the hours that I spend using the program, it always make sense to use the latest version.

What's in an Upgrade?
Over the years, most upgrades have touted a number flashy new features. Not surprisingly, Adobe aggressively markets the flash, anything that looks cool in a two minutes on-line tutorial. In recent years new features have included HDR, Content Aware Fill, Content Aware Move and Puppet Warp. These are all neat tools but have limited usefulness and they never seem to work as well as they appear in the tutorials. For me the real improvements are often much more subtle, and with greater impact on my day to day work flow. Important, recently added, enhancements have included significant improvements to the selection tools, vibrancy control, Shadow and Highlight controls, the magic Auto-Align and Auto-blend tools, and improved cloning tools. These and other practical improvement have made my photo editing much easier, quicker and more precise.

Don't get me wrong, I am an avid geek and I am always looking for excuses to play with the flashy stuff. I occasionally use Content Aware Fill, to help in the process of cleaning up my images, but it is seldom that I a find situation that calls for some of the other more specialized tools. One of the great things about Photoshop is that there is generally more than one way to solve any particular problem. The trick is to find the one that is the simplest and most effective. Sadly, simplest and most effective are seldom the same approach.

An Unnecessary Example (Moving the Branch)
Recently I caught an image of my village of Spofford, New

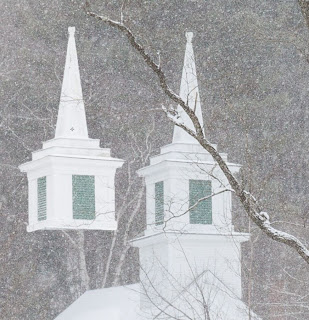
Snowy Village and Branch
Hampshire shrouded in fresh white just after a storm. This has become one of my favorite locations, not the least because I can literally see it from my home office window. It is easy to catch the scene in all sorts of light. The view only works when the leaves are down, but I enjoy the effect of seeing the village through a screen of bare trees. It adds to the soft and dreamy feel of the images, but I have always struggle with the one large branch that slashes across the church steeple. Because of an intruding house to the left of my position there is no way to "move" the branch by changing my location. I now feel that the branch does not substantially detract from the stately presence of the church, and adds a natural sense of a village nestled in the woods, but I keep wondering how it would look with the distraction removed. Even more significantly I was intrigued with the challenge of finding the best way to remove this prominent and intertwined feature. I have grown to like the branch right where it is, but I still decided to experiment with different techniques to remove it, including pulling out some of the “flash” of Photoshop CS6.

Skinning the Cat

Cloning 

My first approach was to try simple cloning, trying to pull 


Steeple Cloning
detail  from the surroundings to over-paint the branch. What makes the branch so challenging is that it is quite large and obscures a significant portion of the steeple structure. Cloning is relatively simple where the obstruction lies against a largely random pattern, such as the trees, but it becomes much more difficult against the rigid architectural background. Cloning can be a finicky and time-consuming task. Pieces of uncontaminated background need to found to copy over the problem areas. The final result is the complete removal of the branch. With care, patience and time, cloning can do an effective job. It took about 30 minutes to get a clean repair of this complicated image.  Much of the time was spent finding material to clone over the steeple structure.  It would be nice to find a way to simplify that portion of the repair.


Branch Cloned

Patch a Clean Steeple

Move to the left
For a second approach, I decided move to the left just far enough to move the branch off the steeple. The house gets in the way of a good, full image, but I selected and pasted the steeple as a separate layer to the original image and then moved it to overlie the difficult to clone structure. The rest of the branch still needed to be cloned but, again this was not a great challenge. Both of these first two approaches remove the branch entirely from the scene, but there is a way to rotate it out of the way while keeping it as a element framing the steeple. Enter the flash.


Steeple Patched
Steeple Patch


Puppet Warping
My final technique used one of the flashiest of the new features 


Web Around Branch
found in the last couple of versions of Photoshop (CS5 & CS6), Puppet Warping.  Puppet Warp allows selected portions of an image to be rotated around defined pivot points. It is often used to adjust the position of a model's arm or leg, sometimes with a rather grotesque effect. This approach is not perfect and still requires some careful cloning, but, in this case, it had the advantage of moving the branch rather than eliminating it all together. I started by selecting most of the branch and then chose the Puppet Warp Tool from the Edit menu. The tool creates a mesh over the selection that works as a framework that can be rotated around pivot points


Branched Moved
placed anywhere in the mesh. In this situation, I placed a pivot point where the branch met the tree and was then able to rotate the branch away from the steeple placing it in a location that nicely framed the spire. The hole left in the image was filled by a combination of Content Aware Fill and cloning, although using the steeple patch from the previous method would have been easier.  This is not the easiest approach but it saved the branch from extinction and, for a tree hugger like me, that is always a big advantage.
Context Aware Fill


Cleaned up with Cloning


This was all great fun, but after it all, I still think I like the picture with the branch untouched. I did this manipulation on a different image than the one that I captured in the midst of a snow storm, but I think I will leave the original picture unchanged. I apologize for rushing through these techniques. There are great tutorials all over the internet that discuss them in exhaustive detail. The point here was to show that Photoshop provides different way to reach the same goal. It is part of the power and fun of this remarkably pliable program. 

Branched Moved


Nice Puppet Warp Tutorial


Jeff Newcomer
partridgebrookreflections.com


Monday, March 25, 2013

Photography Close, Really Close, to Home


Frog Hunting in Spofford Lake
Walks with Nellie (a Photo Album)
This week I have published another article on the New England

Spofford Lake Sunset
Photography Guild web site. I’m pleased to be a member of this great group of dedicated and talented New England Photographers. The guild celebrates the unique qualities of photography in our special corner of the world. Our popular Facebook page has become a showcase for the best New England photography from guild members as well as from nonmembers. Personally, displaying my work next to so many amazing images is a constant inspiration to improve my own hotography. The guild members are strongly committed to education and are always generous with advice and support. A big part of our focus on education has been the regular contributions from members to the NEPG Blog. As members we are all required to post articles on a rotating basis. With so many contributors, the NEPG Blog is a rich and varied resource, with article ranging from technical discussions of photographic technique to more philosophical musings about the nature of photography. The blog is truly “like a box of chocolates”. 


Pine Grove Springs Country Club
Partridge Brook


Local Blooms
It Takes a Village

Winter Cover, Spofford
This week, my confection is about photography within the range of my daily walks with our dog Nellie. My wife has recently been incapacitated following bilateral knee replacement surgery and my photo shoots have been largely limited to strolls around the neighborhood. I live in Spofford, a lovely little village in Chesterfield, New Hampshire. My walking routes have become very familiar, but recently I reviewed the images that I have captured over the years within this easy walking distance of my house.
Partridgee Brook and My Backyard
The range of images was surprising. Spofford has several special attractions, but I'm sure that this is true for most New England communities. The keys to shooting close to home include; being on the lookout for interesting perspectives, being aware of how our ever-changing New England weather and seasons can refresh even the most familiar scenes, and most importantly, remembering to bring a camera along for the walks. It is amazing how having a camera I your pocket can excite your eyes to see the photographic opportunities all around you. Without your camera the eyes primarily become threat avoidance tools. Don't trip on that curb! 

Partridge Brook, Seasons Change


Spofford Autumn
My New England Photography Blog this week is a superficially claustrophobic, but surprisingly varied,  travelogue of the attractions of my small village. My goal is to encourage you to get out and engage in a deeper exploration of your own immediate environment. What is special about your community will, very likely, be different from my own, but that's what makes it exciting. Sue is getting around much better now and my photographic leash is significantly longer, but Nellie will still require walking and I will continue to bring my camera along for the ride. 


Storm Building
Lake at Peace


So check out my article about my walks with Nellie and then go find your own treasures. And don't forget to bring the camera. 


Nestled
I
just found this view this week.

As always the number of images I can show on the NEPG Blog is strictly limited. My pictures are my children and picking 3-4 favorites is impossible. Included here are a few more images which, I hope will flesh out the character of my little corner of New England.


Backyard Autumn


"Spofford the Moose"
Jeff Newcomer
partridgebrookreflections.com

Friday, March 15, 2013

Photographing Comet PanSTARRS


Imaging What You Can't See

Comets are quite common among celestial phenomena. We are all familiar with images of their luxuriant tails as these visitors from our solar system's origins streak around the sun. Most of these images come from telescopes. Comets that are visible to the naked eye are quite rare, on average occurring once every 5 to 10 years. This year we are anticipating two such "naked eye" comets and the first of these is in the sky right now (March 2013) . Of course, I had to take shot at photographing this unusual object.

Comet PanSTARRS was discovered in June 2011, and is rather unimaginatively  named after the telescopic survey that spotted it, the

No Comet, but the Orion Nebula
Panoramic Survey Telescope and Rapid Response System, which is located on the Haleakala volcano in Hawaii. Predicting the brightness of a comet remains an imprecise science, especially when we have never seen the object before. PanStarrs only makes a circuit around the sun once every 100,000 years.  We have no precise idea about it's composition and density and can't accurately judge how much of its surface will be blown off by the solar wind to form the characteristic and much anticipated tail. To this point I think it is safe to say that PanSTARRS' show has not been all we had hope for, but I couldn't let the opportunity literally slip past without taking a shot at capturing the performance. After all, this is March, the snow is brown, there is only a hint of buds on the trees, what else is there to shoot?

There is plenty of good information on the internet about where and when to look for the comet. Of course the first problem is the

Source: NASA
weather. Over the last several days there has only been two or three nights with reasonably clear sky's and I missed one of those while I was preaching my "Getting it Right in the Digital Camera" sermon to the nice folks at the Brattleboro Camera Club. 


First Night
My first clean shot at the comet was last Saturday night. We were invited to celebrate our friend John's birthday at their home in Chesterfield Village. Happily their house sits on a high ridge overlooking the Vermont Mountains to the west. A position out in there pasture provided a lovely unobstructed view to the setting sun and of the predicted position of PanSKARRS. A necessary requirement for seeing the comet was a location high enough to have a clear view of the horizon and this appeared to be perfect. As it turned out, timing of the observations was also a critical factor. PanSTARRS has been reaching its maximum brightness as it approaches the sun and can only been seen in a short period after sunset. Shoot too soon and the comet will be lost in the twilight brightness and too late, it will be obscured by the bright glow just above the horizon.

I settled in at a corner of John and Kathy's field, sitting on a stone wall. I arrived just as the sun was disappearing and began scanning the sky with my binoculars. I knew that the comet should be slightly south of the setting point of the sun on that night. There was a little haze right on the horizon but the sky was otherwise crystal clear. As the sky slowly darkened through the lovely "blue hour" of twilight and the

"Above Us Only Sky"
No Comet
background stars began to reluctantly appear, I kept hoping that I would catch a glimpse of a fuzzy dot that might be the first sign of PanSTARRS, but even with my binoculars, nothing appeared. I presume that by the time the sky was dark enough to see the comet, it had been lost in the hazy light at the horizon. Knowing that a long exposure in my camera might pick up something that my eyes would not, I began taking pictures across the sky. Exposure was tricky since there was enough light remaining to wash out long exposures. As my prospects faded I couldn't miss the fact that I was still in a beautiful New England farm pasture with the glorious blue twilight illuminating the adjacent barn and silo. As I focused on that scene, the previously
The Blue Hour
annoying glow on the horizon became a lovely compliment to the deep blue of the foreground. It was all remarkably calm and peaceful, but then, the gentle mood was abruptly broken. The farmer next door emerged and started repeatedly yelling at his cows to return to the barn, "Get the F!!k in Here!".   I love New England farms! But it was time to go. As I retreated to the house my defeat was softened by the knowledge that I was joining my friends for great food and much wine. We stumbled home late, but I couldn't go to bed without checking my images. I carefully surveyed each picture, and sadly saw nothing but points of starlight, but I was not ready to quite. 


Second COLD Night
My next opportunity came Wednesday night. I wasn't sure the clouds would clear, but I went back to the ridge along route 63 in Chesterfield to give it a shot. Once again the weather cooperated with clearer skies, but colder temperatures. This time, I set up at a small

Clouds Clearing at Sunset
Chesterfield, New Hampshire
town park across from the school. This location had the advantage of being right next to the road (and my car) and it had a granite bench which, with the help of a seat blanket, provided a comfortable observation spot. I set up in time for a dramatic sunset as the remaining clouds drifted away.  Then the wait began for the magic moment when the sky would darkened enough to reveal the "glory" of PanSTARRS. I thought I would have an easier time targeting the comet since it was predicted to be along the diagonal between the crescent moon and the sunset point on the horizon. That seemed to provide me with a simple path for my search. I settled in and with triumphantly hopeful music blaring from my iPhone, I began scanning back and forth. Back and forth for a long cold hour and one half. I knew the thing had to be there, but even with my binoculars, not a sign. Back and forth. I tried looking slightly away to benefit from the more sensitive portion of my retina, away from the fovea, no luck. Back and forth. It got darker and colder and I got more frustrated and annoyed. When I began loosing feeling in my fingers, I figured it was time to pack it in. I thought about getting some exposures of the sky before I left. They were worthless the last time, but summoning my last shred of hope, I grab a few wide images. I eventually settled on a 6 second exposure at f5.6 and ISO 800, which was enough to begin to see stars while avoiding blowing out the horizon. Done. I rushed to the car, cranked up the heat and headed home. 


PanSKARRS Appears
You can guess the rest. I sulked home and pulled up the few pictures.
The first thing I noticed was the dramatic sunset images. Then, bang! I had taken about 10 sky images where I though the comet should be and miraculously, there the bastard was! Hovering above the pink horizon glow was PanSKARRS. It wasn't big. I had shot at about 100mm to include the entire sky from the moon to the horizon, but it was crystal clear. I still can't believe that I couldn't see it, but, thank goodness for digital photography and high ISO.


I have since worked the image in as many ways as I can imagine, with a range of zoom. I would have loved to have captured the comet a bit larger and against some interesting background, but it is surprisingly

Zooming In
tough to frame something that you can't see! I have since heard from others who had the same experience, finding the comet only in a picture after the fact. This "naked eye" comet has provided to be decidedly non-naked, at least in our region, but I may not be done yet. the comet is expected to slowly fade over the next week or so, but it will also be getting higher in the sky. If I get another clear night, I may give it another try. I am thinking that I might use images from the camera to survey the sky zooming in on the LCD in hopes of finding the comet. If successful I will try to find some interesting foregrounds. Yes, I am, in all likelihood, tragically over-optimistic, but that's what keeps photography interesting. At least I will learn more preparing for the next "naked eye" comet. Comet Ison is scheduled to "blaze" across the sky this November and December! We'll see.

If you are interested in taking a shot at the PanSKARRS, get out soon. Find a clear night and an unobstructed view to the western horizon. Get there after sunset and bundle up. There are excellent resources on the web to tell you where to look. Good luck, and if you don't see the little sucker, you can always wait 100,000 years for its return.  Im the meantime, you can still enjoy the beautiful twilight hour, but don't forget to take a bunch of pictures anyway. You might get lucky.

For more information: NASA Site


Comet from Walpole

Addendum (A Third Night)
I took one more try and it was certainly the best for Comet PanStarr.    My neighbor Bob & I went to Alyson's Orchard on a hilltop in Walpole New Hampshire. The comet was higher in the sky to start. It was great to actually SEE the comet with binoculars and faintly with the naked eye.  I was able to get closer with my 100-400 Zoom. I am just about "cometed out", but I'm sure my enthusiasm will revive when PanStarrs returns in 100,000 years. 


Cosmic Plea


I was most impressed by the old Oak which has graced the peak for more than 200 years. This has always been one of my favorite majestic trees in the region. Sadly it is struggling after being hit by lightning a while back, but the folks at Alyson's are committed to saving this ancient witness to history. It struck me that the tree seemed to be beseeching the universe for salvation. I joined in.


Jeffrey Newcomer
partridgebrookreflections.com

Friday, March 8, 2013

Brattleboro Camera Club


I will start by apologizing for this weeks blog. Instead of my usual insightful and beautifully illustrated articles revealing the secrets of masterful photography, this week I descend to crass self-promotion. You are invited to join me and the Brattleboro Camera Club next Monday, March 11th for a discussion of photography in the digital age. The club will be meeting at the Brooks Memorial Library at 224 Main Street, at 6:30 PM

Over the last few years I have had the opportunity to talk to various groups including the Audubon Society, Keene State College and a number of regional camera clubs. It has been my goal to try to share some of my excitement about the expanding world of digital photography, but in these session, I always find that I learn more than I teach. I would like to do more teaching, but the challenge has been to find the time to assemble the materials needed for more formal coursesMy ideal would be to start with small personal workshops combining lecture with shooting and critique, but short presentation to interested groups is a great way to get started.  It is still challenging, but much more manageable. With each talk I have been building my PowerPoint slide collection and expanding the range of topics I can feel comfortable presenting.

Finding Something to Say
The first issue in preparing a talk is convincing myself that I have

Wet and Digital Darkrooms
something constructive to say. I have no degree in photography or fine arts, but I have been a student of photography for years, form film to digital.  Perhaps most importantly, I have accumulated a great deal of experience by doing almost everything wrong, at least once. So what should I talk about? I could drive myself crazy trying to figure out what people want to hear, so my approach is to talk about what interests me and hope I can find a few people to listen. Of course, I try to direct the talk to the interests and sophistication of the audience. For my presentation to the Southwestern Vermont Audubon Society, I guessed that I couldn't go wrong by discussing my experience photographing the remarkable wildlife of the Galapagos Islands off the coast of Ecuador. With that group, I had to be sure that I knew the name of every bird, fish and slithery thing that I had photographed. Camera clubs provide a much greater challenge. These clubs welcome the full range of photographic experience and expertise. Anything I say can be expected to seem overly simplistic to many and hopelessly advanced to others. In any discussion about the

Booby Dance
Blue Footed Galapagos Booby
benefits of digital photography, it is inevitable that digital editing and especially the magic of Photoshop will hold a prominent place. For those with no Photoshop experience I can only hope that my examples will open them to the possibilities that digital editing provides and entice them to consider jumping into the process. I work primarily with Camera Raw and Photoshop CS6, but I am aware that many photographers rely on Lightroom, Aperture, early versions of Photoshop, Elements and more. It is not possible to be familiar with all the different procedures, but again in a short talk the goal should be to open possibilities and not to present detailed work flows. 


Happily photographers are becoming more sophisticated. In my last talk to the wonderful folks at the Worcester Camera Club, I found that everyone seemed to be using some form of post-processing, mostly Lightroom and Photoshop. Only one was still shooting in JPG instead of RAW, and, of course, I was merciless with her. Given the growing sophistication of photographers and especially those who participate in camera clubs, I feel that I must go beyond discussions of pure technique. My goal is to try to link the fundamentals to a broader philosophy of how the digital world has change the approach to photography. That is, Getting It Right in the Digital Camera.


Getting Right in the Digital Camera, In the Can

For the few who have read my blog on a regular basis it can be no surprise that, on Monday, I will be talking about Getting it Right in the Digital Camera. It has been my perpetual theme that the best image in the digital camera is not the prettiest, but the one that provides the best material for the digital editing process. My blog is full of examples of this philosophy and the talk will be based on that discussion. Happily, I have presented the topic before and I have the advantage of many slides already in my Powerpoint collection (In the Can). The chore is to review, re-arrange and up-date the presentation. Powerpoint makes this all much easier, but it is important to keep all of the program's flashy bells and whistles under control. The message can be too easily lost among all the flying
Part of  "The Can"
images and exploding menus. Cutting is always the most difficult struggle. I inevitably have much more that I would like to say than the time will allow. I do my best when I leave plenty of time for discussion and questions. I hate to feel rushed. 


So, I'll stop here.  I have a lot of work to do. I hope to see some of you at the Brattleboro Camera Club meeting next Monday night.  Please be kind. If you can't come, keep checking in. I'm sure I will be assaulting other groups with my philosophies. The Queeche Camera Club is coming up on April 8th . Now I have some serious cutting to do.

Sunday, March 3, 2013

Photographing Covered Bridges in Context

Stark Village, New Hampshire

More than a Snapshot of a "Beautiful Thing"

As I see it, one of the most important aspect of strong images is how the subject is placed in the context of its surroundings. The web is full of photographs of "beautiful things". Soaring mountains, rushing rivers and placid lakes, all make wonderful subjects, but too often the photographs are merely pictures of the "beautiful things" without using the surrounding to support and highlight the visual and emotional position the "beautiful thing" holds in the environment. To me a photograph without the effective use of context is a snapshot. It is how the context is incorporated into the image that is an essential part of strong composition and it is how a snapshot can be elevated to a meaningful work of art.


Last week, I highlighted the classic Dummerston Covered Bridge in my celebration of the attractions of that lovely Vermont town. It got me thinking about what makes a covered bridge visually interesting. I’m a big fan of these unique examples of utilitarian
Sawyer's Crossing View, Swanzey, New Hampshire
beauty and it doesn’t take much to get me excited about photographing them. But why did our ancestors cover their bridges in the first place. Certainly it was not to attract tourists to wander about, reveling in their charm. It wasn’t, as is popularly assumed, to protect the people and horses crossing on the bridge, nor was it to keep snow off the floorboards. The fact is that, back in the days of untreated lumber, the major supportive beams and trusses of a bridge would last only about 10 years, but protected from the harsh New England elements they could last for centuries. Our ancestors were smart and practical folk and didn't want to replace the bridges every decade. We are lucky that the result of their practicality is that, we, in New England still have hundreds of bridges to photograph.


Beautiful Dummerston Bridge


Bridge in Context
Covered bridges are often visually stunning with powerful lines and brilliant color, usually red, against the stark New England backgrounds, but for me, the essential element in a great covered bridge image is the context. Taken by itself a bridge is interesting, but largely one dimensional. Perfect light can help, but what brings it to lif is its surroundings, how it fits into its environment and makes functional and artistic sense. When I start shooting a bridge my first thought is how to harmonize the structure with complimentary foreground and background elements. I often spend more time studying the surroundings than the bridge itself. Fortunately, bridges, doing what bridges do, are seldom devoid of context. The key is to find and use the context effectively.


Finding Context


West River and Dummerston Bridge
Flowing Water
Bridges are, almost always, built to span water, usually a flowing brook or river, and this provides a reliable source of context. I typically look up and down stream for perspectives that draw the eye
Waterloo Bridge, Warner, New Hampshire
to the bridge. Often the stream is the only place offering an unobstructed view of the entire  structure. With long exposures, the soft texture of flowing water can contrast nicely with the hard angular nature of a bridge. Sometimes it is the stream that becomes the center of interest with the bridge serving as a supportive background. 


Use the Landscape
Flume Bridge & Mount Lincoln

For some bridges, the best solution is to set the structure against a broader landscape of mountains and sky. The classic example of this is the Flume Bridge in Lincoln, New Hampshire. The bridge is shown to its best with the 5089 foot Mount Liberty looming majestically in the background, especially when the mountain is snow capped or engulfed in a riot of autumn colors. When broad views are unavailable because of surrounding foliage, trees and roads may be used effectively to frame and draw the eye to the bridge.


Framed, Keene, New Hampshire
Leading Road, Henniker Bridge, Henniker, NH


The Village Bridge
Stark, New Hampshire


West Arlington Bridge, Vermont
My favorite context is when a covered bridge is part of a classic village tableau. There may be no more quintessentially New England country scene than a covered bridge nestled among pristine old houses and the perfect village church. Fortunately, New England is rich with examples of the “village” bridge. A few of my favorites include the Stark Covered bridge in Stark, New Hampshire, the Green River Bridge in Guilford, Vermont and the West Arlington Covered Bridge in Arlington, Vermont. The challenge is to arrange the elements in a comfortably balanced composition. Sigh! Now all we need to do is clone out all those ugly wires and the *&%$ satellite dishes. Postcard here we come! .

Green River Bridge, Guilford, Vermont


People (ugh)
A bridge is designed to carry people across something, and images of a bridge being functionally bridge-like can be effective. Definitely not cars: ideally an ambling horse and carriage, but I will accept the occasional walker or biker as long as they are not wearing heavy metal tee shirts. I have to fight my natural urge to clone intruders into oblivion, but magazines often like to see people in their pictures, and occasionally the commercial urges take over. Photographer Ned Therrien once told me that he often brings a wardrobe of classic country clothing to a shoot, placing himself or his wife, properly attired, into the scenes. It’s a great idea, but, like many of us, I became a photographer to avoid being in the picture!

Crossing Over Arlington Covered Bridge Vermont

So get out and shoot those bridges. Just remember that it is the context that changes a snap shot of a pretty bridge into a meaningful portrayal of New England country life.

For more examples of our great great New England Covered Bridges, check out the Covered Bridge Collection on my Partridge Brook Reflections web site.


Jeffrey Newcomer
partridgebrookreflections.com