
About Me

My photo
Spofford, New Hampshire, United States
Jeff Newcomer had been a physician practicing in New Hampshire and Vermont for over 30 years. Over that time, as a member of the Conservation Commission in his home of Chesterfield New Hampshire, he has used his photography to promote the protection and appreciation of the town's wild lands. In recent years he has been transitioning his focus from medicine to photography, writing and teaching. Jeff enjoys photographing throughout New England, but has concentrated on the Monadnock Region and southern Vermont and has had a long term artistic relationship with Mount Monadnock. He is a featured artist in a number of local galleries and his work is often seen in regional print, web publications and in business installations throughout the country. For years Jeff has published a calendar celebrating the beauty of The New England country-side in all seasons. All of the proceeds from his New England Reflections Calendar have gone to support the Pulmonary Rehabilitation Program at the Cheshire Medical Center. Jeff has a strong commitment to sharing his excitement about the special beauty of our region and publishes a blog about photography in New England.

Sunday, June 18, 2017

Five More Photographic Secrets


Dummerston Sunset
A few months ago I discussed 10 of my Favorite Secrets of Photography. These were just a few of the “take-away” points that have come from several of my, over 350, blog articles.  As I assembled that list, I realized that I had come up with many more than just 10 “secrets”, so here, in no particular order, are 5 more.  I’m sure that these won’t be the last.   


These tips are short and sweet, but I have included links to more detailed discussions found elsewhere in my blog.


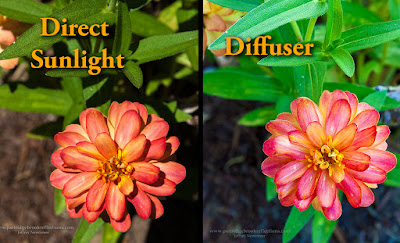
11) Diffuser should be held as close as possible to the subject.

A diffuser can block the harsh contrasts created by bright light and prevent stark reflections that tend to mute underlying colors. It is just one of the ways to deal with the challenges of bright midday sun.  Diffusers are available in many sizes.  Bigger is better, but regardless of size, they work best when held as close as possible to the subject, without intruding on the frame.  When positioned close, the light tends to be softer and more diffuse, seeming to wrap around the subject.  When locating the diffuser care should also be taken to avoid hot spots in the background created by areas not shielded from the sun.


12) Rainbows are seen when you turn your back to the sun and look at the receding edge of a rain storm.

 
It’s simple physics.  Rainbows form when the droplets in a storm cloud are illuminated by direct sunlight. The reflection and refraction of light within each drop divides the beam into its spectrum of colors.   Given the general flow of our storms from west to east, this means that, as  late afternoon fronts pass by,  the setting sun can shine on the clouds predictably creating a rainbow. 


Rye Beach Rainbow

It isn’t Leprechaun magic, given the right conditions, it will happen every time.  To see the strongest colors all you need to do is stand with your back to the sun and look into the dark receding rain-filled clouds.   The only other requirement is that the sun must be below 42 degrees, otherwise the colors will be reflected into the ground.  This means that Today (June18th), in my corner of southwestern New Hampshire, regardless of all the other conditions, I can’t expect to see a rainbow until after about 4:30PM.   


13) Get under a roof to avoid the snow blotches.


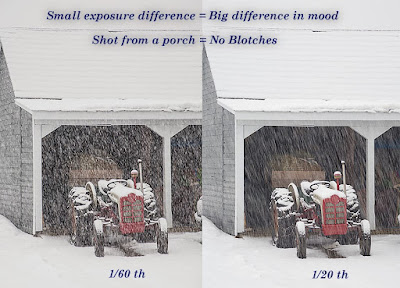
There is no other condition that so dramatically demonstrates weather conditions in photographs as does images of falling snow. Snow makes precipitation vividly palpable, and its appearance can be dramatically altered by both natural factors, and how the flakes are captured in the camera. The size of the flakes, as well as the density and rate of the fall are important, and changes in the shutter speed can make a gentle flurry look like a raging blizzard.


The Blotches

Another issue is “the blotches” which is the bane of my falling snow images.  You have undoubtedly seen beautiful atmospheric images of snow storms, but here and there are big blotches of white that seem out of place.  These white smudges come from the snowflakes that are close to the lens when the image is captured.  They are invariably out of focus and, to me at least, extremely annoying.  Happily, there are. number of ways to eliminate the blotch.  


Blotches can be removed in post processing, but this can be a time-consuming chore. In the field, they can be minimized by shooting with wider apertures and focusing on distant objects, but they are most effectively eliminated by shading the lens from nearby flakes.  In the tractor comparison, I shot from under a porch roof.  Magically, no blotches.  When a roof is not at hand, an umbrella or a piece of card board can also help.  Just keep your shade out of the frame.


14) Under harsh, bright midday sun, trans-illuminate the foliage.

Ashuelot Park Bridge, Keene NH

Bright sunlight can be terrible for capturing the full color of foliage and flowers.  This light results in high contrast between brights and darks, and causes reflections that mute the colors.  As discussed above, there are various techniques to block or diffuse the bright illumination, but another solution is to use the light to trans-illuminate the foliage.  Light shining through foliage or flowers can intensify their color, creating an electric brilliance.  This technique can be a lifesaver for the midday sun, but it is equally effective during the “Golden Hours”, when the sun is low in the sky.


15) During the Golden Hour, turn your back to the sun and make images using the warm light.

The “Golden Hours” are notable for the opportunity to capture the audaciously brilliant colors of sunsets or sunrises, but, while you are busy being enchanted, take a moment to turn away from the spectacle and notice the lovely effect that the warm light creates on everything behind you.  


Sally Lightfoot at Sunset, Galapagos Islands

 Even ordinary subjects can take on a magical glow and these often contrast nicely with the deep blues of the evening sky.  So, as the sun rises or drops toward the horizon, go ahead and capture the garish colors smeared across the sky, but that’s the easy part.  Then turn away and explore all that can be done with the soft warm light.

Point Judith Moonrise


That makes 15 quick tips.  Stay tuned for more.


Jeffrey Newcomer
partridgebrookreflections.com
603-363-8338


Monday, June 12, 2017

Lightroom to Photoshop, When to Jump?


I have just started my next Introduction to Lightroom class. With each major update, Adobe’s Lightroom keeps getting more powerful, and I love sitting around my dining room table demonstrating all the features of this remarkably capable and intuitive program.  


I have been a devoted Photoshop user for years, but for many,
Sugar Hill Lupines Remembered
Photoshop’s complexity has represented a daunting barrier to the discovery of the broad potential of the “Digital Darkroom”.   Since its initial release in 2007 Lightroom has progressed from image organization, to progressively more sophisticated editing  and outputting capabilities.  I initially came to Lightroom to help organize my 400k (now 500K) images in a more easily accessible database program, but, as I became familiar with the editing functions in the Develop Module, I stayed to do much of my global editing within the program.  I found that Lightroom’s workflow was more intuitive, it had the same functions as Photoshop’s Camera RAW and the sliders were easier to use.   So why move my images to Photoshop.


I routinely tell my students that, for many of them, and especially as they get started in image editing, Lightroom may be all they need for simple image adjustments. I probably do about 90% of my image editing in Lightroom, and the resulting images could often stand on their own, but I still routinely make the move to Photoshop before feeling that my work is truly done.  So why do I make the jump?


Complicated Selections

Lightroom allows simple localized adjustments with gradient, oval and brush tools, but Photoshop allows much more finely controlled selections which can be applied to layers affecting a full range of adjustments as well as to  image layers.  The ability to use layers is a key  strength of Photoshop and essential difference between it and Lightroom.
Focus Stack


Comparing Images


Compare Mode
Lightroom has several ways to view and compare images, most notably, the Survey and Compare options in the Library Module’s Tool Bar.  My biggest problem comes when I have several images to compare.  This most often happens when I want to find the sharpest image among a group of captures of the same scene or, when I want to select the best images from a focus stack.  The Compare Tool allows two images to be compared side-by side at varying magnifications, but it is tedious to step through a long series of similar images to find the best.  


Survey Mode, Keene Central Square
The Survey Tool allows several images to appear in an array on the work screen, but each can only be seen in full size.  This is helpful when prominent defects are apparent, but since the images can’t be zoomed together,  the survey is not useful to make precise comparisons of sharpeners and focus.  This is where Photoshop comes to the rescue.


Photoshop Arrange, Zoomed
In Photoshop several images can be arranged in various patterns, horizontally, vertically or in grids.  The images can then be zoomed together for detailed comparison.  The windows can be locked to allow synchronized movement around all the images.  Sometimes, early in the editing process,  I will move a group of images to Photoshop for this comparison and then, when I have identified the best capture, I can remove the Photoshop versions and go back to finish work on the chosen image in Lightroom.


Compositing and Text

There's always one that needs help
 Lightroom doesn’t allow the blending of different image layers.  I can’t move heads around in group portraits or add that dragon sitting on top of the lighthouse.  

I also need to jump to Photoshop to add text to my images.


Dragon on Portland Head Light


Cleaning Up

Harrisville Library Wires
Lightroom can be used to remove dust spots and other simple distractions, but, for more complex problems,  the spot removal tool does not offer the precision of Photoshops Cloning and Healing Brushes. Also the miracle of Content Aware Fill and Move, and the Puppet Move are only available in Photoshop.

 
Complex Cloning


Since I am teaching Lightroom, I enjoy pushing the limits of what can be done with the program’s limited tools.  It is remarkable how much can be accomplished, but at some point, for both ease and accuracy, I have to make the jump.  For now, when it comes to seriously “punishing the pixels” Photoshop is the only way to go


Sharing

Tulip Path, Putney VT
It is important to understand that a file in Lightroom is not a finished image.  The price of nondestructive manipulations is that the image that you see in the Lightroom‘s working panel is not real.  It is still just the RAW file with a bunch of adjustments stored in the catalog, but not actually affecting the original image file.  That is why there is no “save” command in Lightroom.  To make the Lightroom image actually “real”, available for you to save, and others to see, it must be Exported into any of a number of standard formats.  Whether it is in a PSD, TIFF, JPG, PNG other other, more exotic, formats the Lightroom adjustments are burned in and the image is no longer RAW.  


Most of the time, I make this jump by moving the image for final touch-ups to Photoshop, but the Lightroom adjustment can also be applied as the file is exported to a specific image format.


Either way, before the jump, I ask myself if I have done all I can within Lightroom. When I make the move I want to know that I am leaving a pristine RAW file in my directory and a safely separate and nondestructive set of adjustments carefully archived in my Lightroom Catalog.


Printing

OK, this is an admission of my Lightroom ignorance.  I have never been able to get the best results when I try to print from Lightroom.  All the controls seem to be there, but I remain more comfortable applying my printer profiles and adjusting the resulting soft proof from within Photoshop.


I’m always embarrassed when I reach the point in my Introduction to Lightroom Class when I have to review the Print  Module.  The Module is powerful and intuitive.  I know I’ll get it eventually, but for me fine art printing is a whole different part of the process of image making and, for now, to get it right, I still make the jump to Photoshop.  


These are just a few of the reasons why I make the jump.  I am sure that there are many more.  Sometimes, when I’m happy with the image in Lightroom, and don’t have any obvious reason to move, I will still finish my work with a final examination in Photoshop. A fresh look in the context of the expanded tools of my old friend can often suggest subtle final adjustments that can make a significant difference.


Sunday, June 4, 2017

Showing the Work - And Then Some

September Setting
Chesterfield, NH

Orchard Wall
Dublin, NH
From the moment that I started trying to take my photography seriously, I have believed and taught the central importance of “Showing the Work”.  Over the years I have hung my pictures in churches, banks, offices, government buildings, art fairs, galleries, coffee shops, furniture stores and almost every restaurant in the area.  Basically, if there is a public wall within the Monadnock region, my work, at some point, has, almost certainly been nailed to the plaster.


Bellows Walpole Inn
My shameless self-promotion became especially clear to me this week as I was hanging pictures, at our local Chamber of Commerce, for the Annual Keene Art Walk.  Every year the businesses along Keene’s wide main street open their windows to local artists.  For ten days in the late spring, the downtown becomes an expansive, open-air, art gallery.  It is great fun, with the chance to meet lots of new people who may not have seen my work in other venues.  Over the years I have had the opportunity to grace the windows of several downtown establishments, but I am happy to be back at the Chamber on Keene’s historic Central Square.


Sunset Lake : Bellows Walpole Inn
I had room for eight of my pictures in the Chamber’s windows, but what struck me was that I had to do a bit of scrapping to collect these images for display.  Normally this is not a problem.  Because I do my own printing, matting and framing, I have the luxury of keeping a substantial inventory of works for my shows.  I could never afford to have so many if they needed to be printed commercially, and framed by one of our local shops.  The issue is that I am currently taking the command to “show the work” to extremes. With the addition of Art Walk I now have my pictures in four different venues.  Over forty of them!  I am at serious risk of going from “show the work” to drowning the community in the work.


I guess I shouldn’t complain about the exposure, but if you want to escape my pictures, here are the places to avoid .


Bellows Walpole Inn

This is, by far, my biggest show at present.  The Inn’s restaurant and bar are lovely classics of New England ambiance and I am thrilled to have 27 of my images on their walls. I have many old favorites and five newly framed pictures.  
Reflected Spire,
 My show was set for May but has been temporarily held over.  Restaurants are favorite places to display my work, especially when I like the food.  At the Bellows Walpole Inn, I like the food.


Syd’s Furniture

Syd’s Carpet and Snooze Room is a great store near Keene’s Main Street, and behind the Keene Sentinel building.  For several years they have generously allowed the artist of
Pemiquid Light
Maine
the Monadnock Area Artist Association to hang their work on their walls. They get a beautiful and varied selection of artistic decoration and we get place to show our work surrounded by comfy chairs and couches.  I have a few pieces in the showroom on more or less permanent display, one of which won a Best in Show prize.


Keene Family YMCA

The YMCA is a great facility, offering a wide variety of programs for kids and adults.  I try to flog myself around the weight machines and aerobic equipment several times per week, but the Y has many more options including racquetball courts, a large pool and an extensive menu of classes.  Perhaps its most important asset is the friendly staff who create a relaxed family atmosphere. A few months ago, I was excited to be asked to hang some of my larger pictures on walls in the main stairwell and the exercise area.  I get annoyed when I see perfectly good blank walls in public locations.  I was please to fill a couple these spaces, that I am regularly forced to look at through sweat clouded eyes.


The Keene Art Walk

Finally. I return to the Art Walk.  Despite my thinning reserves, I am happy with the selection that I was able to assemble for the Chamber. They include one of my favorite covered bridges in the idyllic New England village of Green River Vermont, a glowing Sunflower, an evening view of the classic hill-top town center of Washington and the
Green River, Guilford Vt
Keene Chamber
Whaleback Lighthouse at dawn.  I also have a new picture of peak fall colors along the road to Roads End Farm in Chesterfield, New Hampshire.   This is one of my favorite autumn foliage images and, for the first time, I tried rendering it as a canvas gallery wrap.  I still prefer to do my own printing, but I liked the results from this lab and will be trying more on appropriate images.


Roads End Farm, Chesterfield NH
Bellow Walpole Inn


So that is my current exhibition menagerie.  From a practical perspective, I am often asked if I sell much from these shows, and
Multnomah Falls
YMCA
my answer is always the same.  I do sell occasional pieces, but that is not the primary goal of showing the work.  My most important result is to stay in the minds of my regional neighbors.  I think I have become known as a good source for quality New England images, with a special emphasis on the Monadnock Region and southern Vermont.  The hope is that, at some time in the future, when they need a gift for a friend or some images to give local flavor to a web site or brochure, my pictures will come to mind.  Also, as I have been focusing more on teaching these shows serve as graphic advertisements for my photography classes.  


Of course, beyond all the coldly practical reasons, it is just nice to release my work to the world and enjoy the moments when people seem to share the joy that I experienced when I captured these brief glimpses of the unique beauty of New England.  


I hope to see you at some of my current “venues”, but, if you can’t make it, don’t worry.  If you live in the Monadnock region you can be assured that my pictures will remain annoyingly hard to avoid.


Jeffrey Newcomer
partridgebrookreflections.com