About Me

My photo
Spofford, New Hampshire, United States
Jeff Newcomer had been a physician practicing in New Hampshire and Vermont for over 30 years. Over that time, as a member of the Conservation Commission in his home of Chesterfield New Hampshire, he has used his photography to promote the protection and appreciation of the town's wild lands. In recent years he has been transitioning his focus from medicine to photography, writing and teaching. Jeff enjoys photographing throughout New England, but has concentrated on the Monadnock Region and southern Vermont and has had a long term artistic relationship with Mount Monadnock. He is a featured artist in a number of local galleries and his work is often seen in regional print, web publications and in business installations throughout the country. For years Jeff has published a calendar celebrating the beauty of The New England country-side in all seasons. All of the proceeds from his New England Reflections Calendar have gone to support the Pulmonary Rehabilitation Program at the Cheshire Medical Center. Jeff has a strong commitment to sharing his excitement about the special beauty of our region and publishes a blog about photography in New England.

Monday, November 26, 2018

Lightroom CC Classic Course, Coming in January!


Introduction to Lightroom Classic – AND the Transition to Photoshop

Six Tuesday Evenings January 8th - February 12th
Monadnock Imaging, Main Street Keene New Hampshire

Once again, beginning in early January, I will be offering my Introduction to Lightroom CC Classic.  If you are unfamiliar with the Adobe Lightroom program, I am not surprised.  I have found that everyone has at least heard of Photoshop.  “Lightroom” often draws vacant stares, but if you are interested in getting the most from your images there is no better place to start.

Lightroom Catalog Database -Lynda.com
For a long time, I have been a dedicated user of Photoshop, but over the last few years I have become increasingly impressed with the power of Lightroom.  Lightroom began primarily as an image organizing program and, for managing large collections of visual assets, it remains far superior to Photoshop. As my own image library grew to hundreds of thousands, I realized I needed a database system to manage the glut.  It was for this reason that I began using Lightroom.  

Saving a terrible image


Lightroom's  Modules
With each new version of Lightroom, the program’s capabilities and features have grown.  Its image management tools have improved, but the major advancement has been in its sophisticated editing capabilities. Lightroom’s Develop Module now is as fully capable as Photoshop’s Camera RAW, but Lightroom organizes these tools in a simpler and more intuitive work flow. The program also facilitates the sharing of images through Slide Shows, Books and simple Web designs.

Bring life to a flat RAW Image

 I still bring almost all my images into Photoshop for final tweaking, especially when complicated masking is required, but I now use Lightroom for 80-90% of my global editing.  Given its power and ease of use, for the majority of digital photography enthusiasts, Lightroom is likely all they will need to get started with image management and editing. 

The Course
During the last couple of years., I have offered a comprehensive introductory course covering all the essentials of Lightroom.  I run the class as a live demonstration.  Students are encouraged to work along on their own laptops, but a computer is not necessary to benefit from the material.   I’ve had a great time and, as is always true of teaching a course, I have learned a great deal more about the intricacies of this amazing tool.  Over the last couple of years Lightroom has evolved and grown, with increased capabilities, and I have worked to keep up with the changes. 


The Big Split
Lightroom CC
Recently Adobe has complicated our lives by splitting the Lightroom Program in two.  There are many good discussions of the differences between these very different programs, but simply speaking, the new Lightroom CC is an entirely new cloud-based program.  It offers a simpler interface, but significantly pared down capabilities.  It is designed for more casual photographers, and those who work primarily through a mobile interface.  For more serious photographers who store larger image archives locally on hard drives and who want to use the full features of the “old” Lightroom, the new program has a limited place. 

Lightroom CC Classic
For me, and most serious photographers, the “new” choice is called “Lightroom CC Classic”.  It sounds disconcertingly like the old “Coke Classic”, but Lightroom CC Classic is just the old Lightroom CC, with all of its amazing features and functions, and a few new tricks.  This split seems to be designed to create a simpler path for mobile, and other smart phone photographers, without stripping the power of the “Classic” Lightroom program.  Adobe promises to keep up with innovation on both versions of Lightroom.  We will be watching.


If you, like many, are still confused, just know that the CC and Classic versions are both included among the options in the Adobe Photography Subscription Plan, and still cost only  $9.99/month.  
My course will be covering the full power of the Lightroom CC Classic Program. 


When I in initially planned my course, I thought that that four, two-hour classes would be enough to cover the lightroom's many features, but because of my tendency to ramble and lots of great questions, I added a fifth class to cover Lightroom’s image sharing tools, including Slide Show, Book, Printing and Web Modules.

Why A Sixth Class?
Focus Stacking in Photoshop
Lightroom is a great program which covers most organizing and editing needs of the majority of photography enthusiasts, but there are many aspects of fine tuning that can be performed best from within the scary confines of Photoshop.  My Lightroom students frequently asked, “When are you going to do a course on Photoshop?”.  The prospect of trying to organize a comprehensive course on this massive program scares me to death.  But perhaps an easier approach is to take a smaller bite of the apple.  Some time ago I added a fifth class to my Lightroom course and this time I will be adding a sixth session.

Deep DOF with Focus Stacking

Lightroom to Photoshop, The Why and How

I will focus on the transition from Lightroom to Photoshop.  Starting with pictures which have been optimally edited in Lightroom, I will examine some of the important ways that Photoshop can refine those images using more precise selections, layers and compositing.  Consider it a chance to dangle your toes in the ocean of possibilities that is Photoshop.  For many who already own Photoshop as part of the Adobe Photography Plan, it can be an encouragement to take the plunge.

I have held previous Lightroom classes at my home in Spofford NH, seated comfortably around my dining room table.  Last year, the great folks at Monadnock Imaging in Keene generously offered to host the class at their store in Keene New Hampshire.  This has made the location more easily accessible, especially during the snowy winter weeks. With my next course in January, I will again gratefully accept Monadnock Imaging’s hospitality.  There will be no struggling over Chesterfield Hill in a blizzard, except for me.
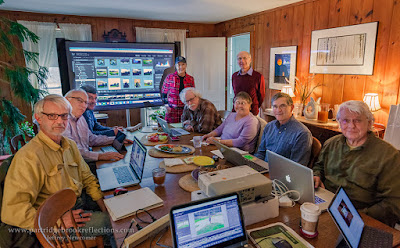

There will be not five, but six, two-hour, evening sessions, and of course, snacks will be provided. The expanded course will be $225.  Please get in touch by phone or email as soon as possible to reserve your spot on the list.  I look forward to seeing you and to sharing my wonder over the amazing capabilities of Lightroom CC Classic.

Jeff Newcomer
jeffn49@myfairpoint.net
www.partridgebrookreflections.com
603-363-8338  

Sunday, November 18, 2018

Lens Correction


The Curved Door

The bad news is that every photographic lens induces some degree of distortion to the image that it sends to the sensor.  Some lenses cause more warping than others, but the amount and type of distortion is dependent on the focal length and the proximity of the subject. 

Types of Distortion
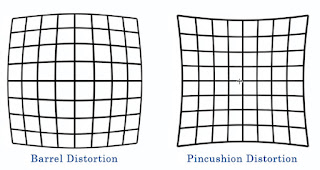
There are two types of distortion.  Wide angle lenses can cause the appearance of swelling out from the middle of the image, called Barrel Distortion.  This warping is often associated vignetting, a darkening at the corners.  Conversely, looking at more distant subjects with a telephoto lens can result in an inward bending of lines on the edges, called pincushion distortion.


The good new is that tools in both Lightroom and Photoshop can correct much of these problems and most of the adjustments are essentially automatic.  In Lightroom the magic all happens with the Lens Correction Tool.

The Curved Door
Recently, I was shooting along the waterfront in Rockport Massachusetts. I was especially attracted by the interesting detail in many of the Lobster shacks; colorful buoys, ropes and weathered doors.  I loved my angle on this shack, but I noticed that by using a 67mm focal length the lines of the distant door showed considerable pin cushioning.  The result was some post-processing correction and an excuse for another blog article


Lightroom’s Lens Correction Panel
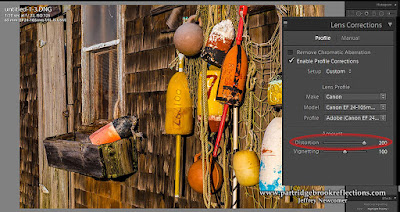
Recent versions of Lightroom have a few nifty tools for correcting Lens distortion in the “Lens Corrections Panel”.  In Lightroom CC Classic, the first choice is between “Profile” and “Manual”.  In most cases you will not need to venture into the Manual options. 


Chromatic Aberration
The first option under “Profile” is to remove Chromatic Aberration.  I discussed the cause and treatment of Chromatic Aberration in an article six years ago.   Since then the causes have not changed, but many new lenses have become better at reducing the problem and the software has made its correction easier.  Just click on the button and most of the color banding will disappear. To fine tune the results you may need to dive into the Manual Options, but that will a subject for a future article.


Profile Correction
Profile Adjustment
I love automatic stuff.  Adobe has assembled a large and expanding data base on the characteristics of most of the lenses that are available on the market and many legacy lenses that you may still be using.  This means that it is very likely that Lightroom can identify the lens in your metadata and automatically make the necessary adjustments to compensate for the distortion and vignetting.  Click “Enable Profile Corrections” and chances are your; Make, Model and Profile will pop up and the image distortion will be corrected. 


If the meta data does not contain the lens information, then you can look for it in the Lens Profile drop-downs.  If you can’t find your lens, most likely because it is new, you can wait for the next update which always includes a bunch of new profiles.  When all “automatic stuff” fails you can drop down to the “Amount” sliders and adjust both Distortion and Vignetting manually.


Fine-tuning the Door
The automatic profile adjustment made a marked improvement in the pin cushioning of the door, but it wasn’t quite perfect. The door edge still had a definite curve.  I went to the Distortion slider and found that a full +200 correction led to a better result.  For Lightroom and Photoshop automatic adjustments can work great, particularly for lens profiles, but sometimes they are just a good place to start.


Brick Wall Barrel Distortion
A wide-angle close-up of a plain brick wall gives a nice view of Barrel Distortion and for this I must thank the imposing façade of Dick’s Sporting Goods in Keene New Hampshire.  A straight-on view with my 16mm lens clearly shows barrel distortion and edge vignetting.  In this case the built-in Profile Correction nicely fixes the problems without any need for further adjustments.


Maple Trunk
Often lens distortions are not immediately obvious until they are corrected.  It is always helpful to compare a corrected image with the original, especially when using telephoto or wide-angle shots and it is nice that the process is so quick and easy.  My original shot of a Maple trunk in my yard looks reasonable, but when compared to the corrected version it is easy to see the bloated barreling in the center of the image.


Needs Work


The Lens Correction in Lightroom is one of the program’s simplest and most magical tools.  It is a worthy stop every time you travel through the Develop Module’s workflow.

Jeff Newcomer, NEPG
www.partridgebrookreflections.com


Sunday, November 11, 2018

New England Photography Guild and Rockport Cape Ann


The New England Photography Guild was organized in early 2011 as a group of photographers who focus on celebrating the 

Bearskin Neck

beauty of our unique corner of the country.  Since being establish by Jeff Folger, Butch Lombardi and Liz Mackney the Guild has grown to include 12 talented photographers from throughout New England.  It has been my honor to be member since 2012.  As stated in its initial blog article, Jeff Folger described the Guild as, “a place where some of the best photographers I've met will have a small gallery representing their work” to bring “all the incredibly beautiful areas of  scenic New England in one location”.


Rockport Sunrise

The Guild started as a gallery to show amazing images of New England, but over the years its focus has broadened.  Primarily through our regular blog articles, we have expanded our role to include a celebration of many of the region’s most beautiful locations, and as a source for information about photographic techniques and vision.  

The Meeting, Finally!

New Hampshire Photography Guild


Recently we gathered in Rockport Massachusetts for a long overdue assessment of the on-going goals of our group.  We hadn’t met  in several years, and it was exciting that eleven of our current 12 members were in attendance.  It was a long meeting, including catching up with new and old members (I am one of the OLD members), chatting and comparing our various activities and of course planning how to keep the Guild relevant in the rapidly evolving world of digital photography.

Lobster Shack Door
We decided on a long list of tasks and goals, which might be worthy of a future article.  I was especially excited by plans to highlight the list of classes and workshops that many of our members organize throughout the year.  We came away with a fresh sense of connection and purpose, and a commitment to stay closer in touch with each other and our community.

In all, it was a productive and enjoyable meeting, but the other attraction of the weekend was the chance to revisit the Gloucester and classic New England fishing village of Rockport.


Back to Rocky Neck

Grounded

I grew up spending my summers on our family's little boat on Rocky Neck in Gloucester.  I explored every corner of the harbor in my own eight foot dinghy with its ferocious 3 HP motor, and we spent weeks cruising the coast from Block Island to Acadia.  I wasn't surprised to find that Rocky Neck showed signs of development, but, for me, it still held the charm of many years ago.    

Low Tide on Rocky Neck

Rockport
Rockport harbor is tucked away in a far corner of Cape Ann on the northern Massachusetts coast.  Despite its relative isolation, Rockport still attracts tourists to its artist studios and unique shops especially along famous Bearskin Neck.   Photographers are drawn to its well protected harbor, which is almost entirely populated with working lobster boats.  Unlike so many harbors on the New England coast, Rockport has not become overrun by pleasure craft.  The waterfront provides many opportunities to capture scenes of lobster boats, weathered shacks, lobster pots. colorful buoys and coils of rope.  


Motif #1
Of course, Rockport is most famous for the iconic red lobster shack “Motif Number One”.  Every photographer who has ever lived must get the classic shot of the motif.  It would be trite if the damn place wasn’t so ironically iconic!  The goal is to find a few fresh angles on the shack, but a “fresh angle” means that it has been captured by perhaps 1,000 previous photographers.

Of course, I bagged my Motif from several perspectives.  I included lobster boats, pots and skiffs.  I shot evening and dawn light and mixed in a little tone mapping.  That should last me for a few years.


Dinner and a Thacher Island Dawn
Sunrise Line
Our Guild meeting was scheduled for 9:30 Sunday morning, so Susan and I headed down on Saturday afternoon and stayed at the friendly Tuck Inn.  Saturday night we joined Guild Members Liz Mackney and Jonathan Steele (with his partner Jules) for dinner at a local fish restaurant.  The food was great and Jonathan, Liz and I got to consult the Photographer’s Ephemeris for the best place to catch the sunrise over Thacher Island.  Susan and Jules seemed happy to entertained themselves.

Sunday morning, I met Jonathan before dawn on the rocks opposite Thacher Island, with its twin lighthouses.  Right on cue, the sun rose between the two lights.  It was a beautiful calm and clear morning, sadly entirely too clear!  The hope is always to have enough clouds in the sky to light up with the gold of the rising sun, but this morning we had to contend with the “terrible clears”.  


Blue Hour Gold


Dealing with the Terrible Clears
I tried many of the approaches to a dull clear sky.  Before the sunrise I took advantage of the “blue hour” with its additional shades of red and yellow.  I caught the first slight crescent of the sun as it rose above the island.  For most of my sun shots, I accentuated the star burst appearance by stopping down on the aperture to f16-f22.  Unfortunately, the small apertures also increased the prominence of flare, which required correction in post-processing.

Another approach to an uninteresting sky is to eliminate most of it.  In one shot I zoomed in on the South Lighthouse, reducing the sky and showing the sunlight shining through the light and the tower windows.  In another image, I pulled back to show the foreground rocks and the light scintillating across the water.   

I always enjoy finding excuses to travel to our New England seacoast.  On this occasion I got the opportunity to capture images around one of the coasts most iconic little harbors while also renewing connects with some of our regions best landscape photographers.  What could be better?


Jeffrey Newcomer

Monday, November 5, 2018

Photographing Our Autumn Oaks


As our autumn is fading, we are sadly saying goodbye to the brilliant reds and gold of the Sugar Maples and happily goodbye to the hordes of “peepers” who congest our roads and then leave without offering to rake a single leaf.  Things are getting quiet, but before we descend to full November stick season, there is still much late season color to enjoy.  The Maples are spectacular, but delicate and short-lived.  This year we seem to be enjoying an especially lovely late foliage season and, as always, it is coming primarily from the long-lasting beech and the sturdy Oaks.


Beach Forest
The beeches display bright orange and gold. Over time the leaves mature to a rich brown, but when the Maple leaves are largely on the ground, the Beech are just reaching their peak.


I have previously sung the praises of the “Underappreciate Beech”, so this seems a good time to celebrate the wide variety of New England Oaks.  Oaks come in a wide variety, from low lying shrubs to majestic giants. 


Champion Red Oak
In Chesterfield’s Friedsam Town Forest we are blessed with the county champion Red Oak, nearly 100 feet tall and estimated to be over 300 years old.  Other varieties of Oaks include the White,  Pin, Black and the Swamp Oaks.  Their leaves vary widely in shape and in autumn color.  Oaks can have bright russet foliage, but they are known predominantly for earthy browns and rusty tones.  


Stickney Falls Autumn


Black Mountain Oak
All autumn colors become apparent only after the green of Chlorophyll has faded.  Maple leaves get their yellows from Carotene while their reds and oranges come from anthcyanins.  For Oaks, the distinctive brown color comes from Tannins.  Actually, Tannins cause the brown color that most leaves, including Maples, display after they have settled into the forest floor.


Over the last days I have been out looking for autumn Oaks and I have come to freshly appreciate the variety of photographic opportunities that they provide. 


The range of color in the leaves makes for attractive intimate tableaus especially when something of interest can be placed in the background. 


Frozen Floor


Whether frosted, frozen or lying in the grass, fallen Oak leaves can portray a sense of autumn’s end.


Because autumn Oak leaves tend to reach their color after most other leaves have fallen, their arrangements tend to stand out in greater relief, creating clearer patterns than are apparent in the masses of early foliage


A few years ago, I included Oak leaves in my back-lite Macro leafstudies.  The results showed the variety of shapes and the delicate quality of the “mighty” Oak leaves.


Of course, I still miss the amazing colors of that split-second of peak foliage, but there is much to enjoy in autumn’s prolonged mellow tail.  So, get out there and capture all the beauty that our Beeches and Oaks have to offer, before stick season fully descends.

Jeff Newcomer, NEPG
www.partridgebrookreflections.com