About Me

My photo
Spofford, New Hampshire, United States
Jeff Newcomer had been a physician practicing in New Hampshire and Vermont for over 30 years. Over that time, as a member of the Conservation Commission in his home of Chesterfield New Hampshire, he has used his photography to promote the protection and appreciation of the town's wild lands. In recent years he has been transitioning his focus from medicine to photography, writing and teaching. Jeff enjoys photographing throughout New England, but has concentrated on the Monadnock Region and southern Vermont and has had a long term artistic relationship with Mount Monadnock. He is a featured artist in a number of local galleries and his work is often seen in regional print, web publications and in business installations throughout the country. For years Jeff has published a calendar celebrating the beauty of The New England country-side in all seasons. All of the proceeds from his New England Reflections Calendar have gone to support the Pulmonary Rehabilitation Program at the Cheshire Medical Center. Jeff has a strong commitment to sharing his excitement about the special beauty of our region and publishes a blog about photography in New England.

Sunday, May 31, 2015

Spring Flowers

Walker Farm, Dummerston Vermont


 It's a Little More Colorful Than the Noble Lichen


There are times when life gets in the way of blogging. I remain committed to getting an article out every week (usually Sundays), but this has been one of those weeks when other responsibilities have made it difficult for me to generate my usual fresh, incite-full and voluminous content. The good news is that there is a very good reason for my time pressure. Our daughter Abigail is moving from DC to North Cambridge to be with her
The Depth, Spofford NH
boyfriend, and, needless to say, Susan and I are thrilled to have our daughter moving closer to home. Now if we could only get Jeremy to evacuate dreaded NYC for friendlier digs. Anyway we are getting ready to head down to Washington by the end of the week to help Abby with the move and that has become a significant but happy distraction. As a result I will focus this week's photographic musings on something quick and easily at hand, spring flowers.


Don't Ask Me the Name!

  
Flowers are easy to discuss because they are bursting forth everywhere and because I can summarize my entire understanding of the topic in three words. "Flowers are pretty". That's it, don't ask me to identify everything, all I can say is that flowers are natural miracles of structure, color and texture, and that they are a joy to photograph. The blooms are especially wonderful subjects for Macro Photography and I have been out with my 100mm Macro capturing all I can.


Walking Nellie

Day lilies Keene River Park
Whether cultivated or wild, flowers are everywhere this time of year, and I have been shooting along forest trails as well as at local gardens and parks, and my daily walks with Nelly through Spofford Village routinely yield colorful subjects. The trick is to wait for the wind to drop and to balance f-stop, shutter speed and ISO to achieve adequate depth of field. It is seldom possible to get everything in focus, but, if the stamen is sharp, the rest can fall out of focus without loosing impact. Interestingly I have captured some of my best floral macros with my compact Canon SX-50. The SX-50's small sensor
Lady Slippers - I Know These!
has a substantially larger Depth of Field than does my lovely full-frame monster and at times the sharpness seems to wrap around the petals. Flowers captured in natural settings are spectacular, but controlling the environmental conditions can be a frustrating struggle. It can help to shoot early in the morning or late in the afternoon when the light is soft and the wind light, but after spending hours waiting for the wind to calm, I begin to think about ways to cheat Mother Nature.
Rhododendron with Canon SX50


Flowers Served on a Platter

 On occasion a local whole-sale florist in Marlborough, New Hampshire lays large pallets of flowers on their parking lot and last week I dropped by in the evening to shoot the display in the soft light. With careful adjustment of angle the flowers can appear as if they were growing in an open field. The trick is to approach from low enough to avoid revealing the trays, baskets and pavement underneath. Of course shooting across the tops of the flowers makes capturing sufficient depth of field a challenge. This week there was a mild breeze and to avoid turning everything into a pastel blur I had to use faster shutter speeds and wider apertures than would have been best for maximum depth of field. Thank goodness for focus stacking. I used 7 stacked images to capture the field of blue image, which meant that, during the early editing, I had 14 image layers including the blended layers and non-blended correction layers. It can all be a strain on my computer's RAM, but fortunately, after the blending and clean-up, I could flatten everything to a single layer. My Marlborough florist doesn't bring out the pallets every year, but, when they do, it is an opportunity that I try never to miss. It may be considered cheating, but I have captured some of my best "flower field" images from this location, and, after all, the flowers don't know that they are in pallets.


The Big Greenhouse Cheat


As in previous seasons, I have been liberally cheating with photography of the flora in the protected environs of local greenhouses. Greenhouse photography tends to be screened from the wind and the soft diffused light eliminates reflection and glare. Once again the key is to avoid artificial distractions in the background


Walker Farm


Every spring I await Susan's announcement that it is time to get our spring plants at Walker Farm. Walkers is across the Connecticut River in Dummerston Vermont and is a wonderful place which, throughout the summer, has some of the best produce in the region. In the spring it also stocks trees, shrubs and flowering plants of all varieties.


Grand Finale, Dummerston, Vt


While 
Susan is loading up, I run to the green house to grab shots of the beautifully cultivated flowers and ground cover. This year I was a bit self-conscious about lugging my tripod around the flower beds and I paid the price. It was difficult to steady the camera at the slow shutter speeds that would have permitted the high f stops required for optimal DOF. I tried to find flowers that I could keep on one focal plane and focused on the center of the blooms.


Don't Try This at Home

 I also tried some hand-held focus stacking. Everyone, including me, will tell you that focus stacking requires a tripod to keep the view consistent. Having no tripod, I lined up my composition, broadened my stands and ran through the series of variably focused exposures. I did the best I could keeping the frame steady by fixing my center focus square on one spot in the scene. Photoshop, being the miracle that it is, did the job of aligning and blending remarkably well and I had very little clean-up to perform after the process. The picture of the mixed flowers was assembled from 5 hand-held, focus stacked images, but "DON'T try this at home". Focus stacking still requires a tripod!
Mountain Laurel, Ann Stokes Trail, Chesterfield NH


With what little time I've had this week, I have been trying to process a few of my flower images. I love working with the colors and textures to create macro floral "landscapes". When we get back from DC, I will return to these, but before that I have to get my daughter safely back close to home. Yea!

Jeff Newcomer
partridgebrookreflections.com

Sunday, May 24, 2015

Exploring Night Sky Photography


Pasture Arch, Walpole NH

Rye Beach, NH, July
I'm happy to admit that I am not an expert on astrophotography, but the improved low light capabilities of newer digital cameras have made the process of capturing the night sky so easy and the results so remarkable, that it is hard to avoid giving it a try. There are a number of great photographers who have concentrated on this special photographic niche. They have produced breath-taking star field images, and have generously published detailed descriptions of the special techniques required. I have included links to a couple of the best discussions, but I thought a more personal and less encyclopedic introduction might be helpful.


Milky Way over my Driveway
I remember how amazed I was when I looked at my first night sky photograph. It was just a random piece of unremarkable sky, but I was blown away by the ability of long exposures to see far deeper into the universe than is possible with the unaided eye. I had to do more.' I get out occasionally, but my explorations of the night sky are limited by a persistent laziness that makes it difficult to leave my warm bed for a cold and lonely pasture. I'm always happy when I come back from a night shoot, but it is just a matter of getting out of the door. I succeeded last week in capturing the Milky Way from a spot in Walpole that I had always thought would provide an interesting foreground and perhaps a description of the process from a aspiring amateur may be of value to those who are thinking of exploring this remarkable field of digital photography.


The Galactic Season


Alyson's Orchard Walpole, September
Of course when we talk about night sky photography, the major attraction is the dense band of stars in the Milky Way and for the best show, timing is crucial. Currently, we are in a great time of the year for capturing the Milky Way in the Northern Hemisphere. The Galactic Core season begins in the spring when it is located, at its highest point, in the southwest. The high point moves across until it is found in the southwest during the fall. In the spring, the Milky Way extends in an arc across the horizon, allowing the capture of dramatic panoramic views across a large portion of the sky. As we get into the summer and fall, the band of light moves into a more vertical orientation, making it difficult to capture the full Galactic disk as it arcs across the dome of the sky. Each season provides a variety of opportunities to use our Galaxy in your images, but, happily, the frigid months of winter are not the best time to look for the Milky Way.
Spofford Lake, Spring Arch


The Moon

 Star field observation starts with an understanding of the location of the moon. Each month I note on my calendar the few days around the new moon. Although a little peripheral moonlight can help illuminate foreground elements, the new moon is generally the best time to clearly capture the stars in their full glory. Around the time of the new moon, I start checking the weather for the best chances of clear sky's. It is exciting to find a crystal clear night on just the right day, but I'm embarrassed to admit that I am often equally thrilled to see clouds obscuring the sky, giving me a reasonable excuse to rush off to bed.


The Right Spot

I am always looking for good locations to capture the Milky Way. There are three basic requirements

South Facing View.

The Milky Way moves across the sky from Southeast to Southwest and a prime location must have a clear view to the horizon in that direction. I spend time scanning my favorite locations, looking for those with the proper orientation.

Avoiding Light Pollution.


Brattleboro Light Pollution

Light pollution is persistent problem. Even out in the country, it is amazing how much artificial light will show up when I am shooting with ISOs from 2500-3200 at f2.8 and 20-30 second exposures. 


Martha's Vineyard, Ocean Dark


A faint glow on the horizon,which is barely perceptible to the unaided eye, can look like a blazing sunrise when captured in a long exposure. I try to get away from major centers of civilization, but even a small village like Spofford can throw up a surprising amount of light. I envy my friends who are fortunate to live near the ocean, where views out to sea are relatively clear of artificial light. For those of us who are land-locked all we can do is get as far away from people as possible, minimize the glare in Photoshop and tell everyone that that orange patch is actually the first glow of sunrise.


Foreground

Jaffrey Silos
Finding something of interest in the foreground is key to achieving context and drama in a star field image. I'm always looking for trees, church spires, barns, or farm equipment that I can position before the great arch of stars. Of course the "sea coasters" have an endless array of lighthouses to use for drama, but we can catch the stars reflected in the calm waters of local rivers and lakes. The key to effective use of foreground elements is to get close enough.  Star fields are generally shot
Chesterfield Town Hall
atextreme wide angles. I almost always use my 16mm lens. and with that broad angle of view the foreground must be quite close to be seen to dramatic effect. The foreground elements can be striking in silhouette against the bright sky, but I often play with light painting using my trusty light LED flashlight. Light painting is all about experimentation and using a subtle touch. The foreground may also be captured in the natural light with a separate long exposure that can be blended with the star field image during post-processing.


My Walpole Apples

 For years I have been attracted to a couple of lone apple trees which sit out in the middle of a lovely pasture in Walpole New Hampshire. I have shot the trees in various seasons and conditions of light, but I have always felt that they might serve as interesting foreground subjects for a Milky Way photograph. The trees are isolated in the middle of a large pasture on the crest of a hill looking off to the south. I knew I would have freedom to move around the trees to find the best angle under the arch of the Milky Way. I had shot stars from edge of this location before, but I had never ventured out to get close enough to bring the trees into the foreground. About one week ago I finally got my chance.


The Right Day and Time

Photographer's Ephemeris, Walpole Apples

I used the Photographer's Ephemeris to find the nights in May when the Moon would not be an issue. TPE is THE essential piece of software for anyone wanting to predict the locations of the Sun and Moon from any location and on any day. My current favorite program for predicting the
PhotoPills
location of the Milky Way is Photopills. Although the program's user interface takes a bit of getting used to, it shows the position and elevation of the Milky Way throughout the night from any location. I was able to see that the Galactic Arch would be in the best position over my Walpole Apples between 1 and 3 AM on the days when the Moon would be new or below the horizon.


I knew the what, the where and the when, all that remained was the fourth "W", the weather. 


The forecast was for one clear night before a warm front was predicted to cloud the skies for several days. I took a nap in the
Dublin Lake & Too Distant Monadnock
early evening and then got out to my isolated spot at about 12:30 AM. After fumbling my way through the pasture's irregular ground I was where I wanted to be, next to my Apple tree. For once I prepared myself perfectly. I had clothing that was sufficiently warm, I used my Overshoe Boots to protect my feet from the damp and the ticks and I made sure that my flashlight had fresh batteries. I use a flashlight that is equipped with a red filter to preserve my night vision as I work the controls. Before I left home I had mounted my 16-35mm lens, set it to its max wide angle and adjusted the focus to where long experience has shown me that infinity lies. The stars are definitely at infinity but they come into sharpest focus slightly short of the lens' max position. It takes a bit of experimentation to find the right spot. An especially bright star, the lunar surface or even a distant light can be used to discover the best adjustment. Once set I used gaffer's tape to fix the adjustments in place.


In the Field
Walpole Apple, We'll Call It Sunrise

The night was lovely. With the exception of a few clouds on the southern horizon, the sky was crystal clear and peaceful, although, as always, it was a bit spooky standing alone in the inky dark with nothing but the hooting of owls and the howling of distant (hopefully) coyotes to keep me company. Fortunately I was too busy to spend much time thinking about being stalked by ravenous preditors, or shambling zombies. The Milky Way was beautiful and easily visible to the unaided eye allowing me to position the camera to capture the Apple tree nestled under the arch, but even when maximally dark adjusted my eyes could not remotely appreciate the intensity and depth revealed by the camera sensor. After a few experimental shots, I settled on ISO 2500, f2.8 and a 20
Cosmic Apple, Walpole, Light Painted
second exposure. I made sure that my camera was set for Mirror Lock-Up and Long Exposure Noise Reduction. With the extra time required for noise reduction, each exposure took close to one minute, a duration which seemed much longer when trying to stand perfectly still in the dark. I grabbed a few single shots near the tree, including experimenting a bit with light painting, and then settled into shooting several series of images across the sky for eventual reconstruction into panoramic studies. I shot 6-7 images for each panorama. Without clear references, the greatest challenge was in keeping the camera level through the series of images. It is at this time that keeping my eyes fully dark adjusted was critical to pick up on key landmarks. After expending so much effort to place myself in a special location at the perfect time, I felt reluctant to leave. I wanted to make sure that I had captured all the necessary shots, but the howling seemed to be getting closer, so I stumbled my way back to the car and headed for home and the welcoming arms of Photoshop.
Light Painted Apple, Walpole, NH


Connecticut River, Chesterfield, NH
I reached home at about 3AM and as always, instead of heading immediately to bed, I had to upload my images and apply some preliminary edits to get a sense of what rewards I had received for the my sleep deprivation. I'm still experimenting with post-processing techniques for star field images. My current approach includes preliminary adjustments in Lightroom and final localized tweaking in Photoshop, but it would be best to save that discussion for another blog. Besides, every time I come back from a night under the stars, I seem to take a different approach in the digital darkroom.

I hope this discussion provides a helpful overview of how a relative new-bee might approach star field photography. With just a little care, the technical aspects are actually quite simple. The biggest challenge is to haul yourself out of bed to get to the right place at the right time with the right weather.

And watch out for the Zombies!


Other Articles From My Blog:


Night Time Photography, Searching for the Milky Way 
April 2013


Look to the foreground in Milky Way Photography
June 2014 


Valuable References:
Night Sky Photography, Aaron Priest

Aim for the Stars, Mike Blanchette,
New England Photograhy Guild


Jeffrey Newcomer
Partridgebrookreflections.com

Sunday, May 17, 2015

Favorite Light for Spring Foliage


A Short Word on Spring Light 
 
Hilltop Farm, Guilford Vt


Every time it begins the same way, as I settle in to start writing my weekly digital photography blog. From who know where, I've come up with a topic and I promise myself, "Well this is going to be a quick one". I've been doing this for well over six years and I've NEVER figured out how to do a "quick one", but maybe this will be a first? I think I have just a couple of brief things to say about the best light for the wonderful spring foliage. Let's see how it goes.


My Favorite "Season"

 
Trans-Illuminated, Guilford Vt
There is little doubt that the early spring foliage season is my favorite time of year. The colors are not as brilliant as the fall display, but they are every bit as varied and have the vibrancy of new life, which I find more exciting than the desperate splashes of color which proceed the inevitable death & drop of autumn. Of course it doesn't hurt that spring represents blessed relief from the long cold winter, while autumn only leads, unavoidably, to the dismal "stick season". The fresh foliage of the early spring lasts for only a week or two, and so it is especially important to catch the subtle greens on the few days when the light is at its best. For me there are two kinds of light which show the foliage to best advantage and these are soft diffused light and, my favorite, brilliant trans-illumination.


-----------------------------------------------------------------------------------------------------------------


The Softness of Spring

Soft Light, Westmoreland, NH

  
We haven't seen many rainy or even cloudy days this spring, but I love the richness and variety of the spring foliage which glows from the hillsides when the light is soft, and especially the depth of the scene is accentuated by layers of mist. Diffused light reduces the reflection off the leaves allowing their subtle colors to shine through and even without bright directional light, a polarizing filter can further enhance the richness of the color. Photographers love to get out when the weather is bad and this works especially well for the new green.


--------------------------------------------------------------------------------------------------------------------------------------------------------------------

The Problem with Bright Light

Flat Mid-Day Light

Walpole Academy, Walpole, NH
Spring foliage is beautiful in any conditions, but it is shown to least advantage under direct bright illumination. The challenges of the brilliant midday sun are evident in every season, but the light pastels of early spring are especially vulnerable to being washed away by the reflected sunshine. So what is a photographer to do when cursed with beautiful sunny weather - shoot into the sun. It is true throughout the year, but especially in the spring, the color of the foliage turns electric when trans-illuminated. It is an entirely different feel from the soft subtle

One of my Favorite Places
Spofford, NH
tones brought out by overcast light, and shooting trans-illuminated foliage gives us something great to do between golden hours. The low lying sun in the morning and evening makes it easier to find strong trans-illumination, but I'm not a fan of shooting spring foliage close to sunrise or sunset. Spring colors are delicate and easily washed away by strongly golden or blue illumination. For me, neutral light works best to appreciate the sense of spring's new life.


Golden Corner, Guilford Vt

We are getting to the end of the brief spring foliage season and the leaves are beginning to settle into their darker, maximally photosynthetic, hues, but, while there are a few more moments of magic, get out, take a deep breath of the sweet air, and capture the color of fresh new life.


You might also want to check out some of last year's spring color:
"Zooming in on Spring Leafscapes"

That's about as short as I can get. I'm trying to let the images tell the story. If well received, I may do more of these short articles. It appeals to my ingrained laziness.


Jeff Newcomer
partridgebrookreflections.com

Sunday, May 10, 2015

Digital File Types


The Basics from Your Digital Camera


Digital photography has reached a remarkable level of beauty and sophistication. The output from today's digital cameras are capable of reproducing an amazing range of color, subtleties of tone and detail. This is even more remarkable given the fact that, at their essence these images are nothing more than collections of million of sterile little zeros and ones. This week I want to briefly discuss how those digits are stored in image files and how the choice of the file type can affect the results of the final image.

The Basic Choice, Lossless vs Lossy
 
There is a long list of image file types that are available, but only a few which are routinely used to record images within todays digital cameras. Most commonly these include JPEGs (.jpg), TIFFs (.tif) and various versions of RAW files. The choice of file type centers around two factors, image quality and file size and as is true for almost all of photography, the decision involves compromise. The highest quality image files (TIFF and RAW) record the photographic data with what is referred to as "Lossless"
algorithms that retain all of the information from the sensor. The resulting images are of higher quality, with optimal tonal range and less noise and they are less subject degradation during editing or copying. The only disadvantages of lossless images are their requirement for editing to reach their full potential and their substantial size. TIFFs and RAW images fill memory cards quicker and take longer to save. The longer save times becomes a significant issue when capturing bursts of images such as when shooting wildlife or sporting events.
JPEG Have Trouble with High Contrast Situations

The opposite of "lossless" are those file types that achieve smaller files by compressing and discarding the data. These are somewhat

JPEGs struggle to Salvage Detail in Shaddows
comically referred to as "lossy". Within digital cameras, JPGs are the primary example of this compressed format. JPEG algorithms reduce file size by throwing out data and reducing the tonal depth. Depending on the level of compression, the results are files which are much smaller, allowing quicker recording of bursts of images and room for more pictured on the memory cards, but there is a significant price to pay for the compression. JPEGs and other Lossy file types have poorer tonal range with higher noise and artifact. They stand up much less well to aggressive editing or repeated copying. Depending on the image's intended usage, this loss of quality may not be important, but, as we will see, it is important to understand how the choice of original file type affects your ability to reach your photographic goal.

Those are the basics, now let's look at the individual file types.

Lossless Files

Doing It in the RAW

Capt. Zerubbabel's Rest
Many, but not all digital cameras have the capability of recording images in "RAW" format. RAW files record the "naked" data from the sensor without any loss of tonal depth or color information. They are totally unedited within the camera, although the image that you see on the LCD screen is actually a JPEG rendered within the camera to allow for quicker display and a better sense of how the final image might look. RAW images are like film negatives. They contain the maximum amount of information from the sensor, providing the greatest capability to undergo editing and adjustments of brightness and color balance. RAW files are substantially larger than compressed formats, but given the inexpensiveness of memory and the greater processing speed of modern cameras, this is not a major disadvantage.

Capt Zerubbabel Snow returned to Chesterfield after fighting in the Revolutionary War
He died in 1795 and lies next to his father, John Snow, in the West Burying Grounds.
"Winter is Coming !"

 Perhaps the RAW file's greatest disadvantage comes as a consequence of its greatest advantage. The down side of the format's ability to be manipulated is that RAW files must be edited to reveal their true beauty. Unedited "raw" RAW files appear flat with low contrast and washed out colors. All the glorious potential is there but it must be brought forth in post-processing. For me this is he most exciting part of working with RAW files. It is akin to the darkroom magic of watching prints slowly appear from the developer bath, but if you want to snap the picture and be done, then RAW is not for you. All I can say is that if the quality of your images is important to you, then learning to work with RAW images is unarguably worth the effort.


Whose RAW is It Anyway?
There is no single RAW format. Each camera manufacturer has their own proprietary format and provides the software required to

edit it. Lightroom, Photoshop and many other photo editing programs can read
Spring Sentinel, Keene, NH
most of these formats, but every time Canon or Nikon comes up with a new camera or wrinkle in their format, the software companies have to scurry to catch up. The persistent question is, if a camera company disappears or looses interest, will support for their RAW files vanish as well. For this reason Adobe has created their own open source RAW format called Digital Negative ".dng". My standard workflow involves archiving the proprietary RAW files in a separate directory and then converting the files to DNGs that I use as my working images. It may sound complicated, but, happily, Lightroom can do it all automatically as I upload the files from my memory card.

TIFF

Tiff files might be more appropriately discussed among the various "output" file types, used to store and transmit images after processing, but some cameras have the option of recording images
Persistent Maple
in this format. TIFF (Tagged Image File Format) files are often used to store images since the image files are Lossless. Like RAW files, they retain all the information on brightness, contrast, color balance and saturation, but unlike proprietary RAW formats, TIFFs are universally accessible to essentially all editing software. TIFFs come in 8 and 16 bit versions with the same quality advantages in the 16 bit files. When used to save files edited in Photoshop, TIFF files have the ability to retain most of the layers created by that program, but this capability comes with a cost in file size. TIFFs can be gigantic, but this is less of an issue when the file is coming unedited directly from the camera. For me TIFFs are primarily useful when I want to send an easily readable, full resolution, edited image to a friend or client. When I want to record losslessly in the camera, I stick to RAW.

Lossy Files

 
JPG
JPG stands for Joint Photographic Expert Group and is the most

Central Square Gazebo, Keene, NH

common file type, found in essentially every digital camera. Again it uses a lossy algorithm to record image data into compressed files. JPEGs undergo processing within the camera including "Baking in" the color balance based on the camera settings. The resultant images can often look better than unprocessed RAW images, but this preprocessing limits the ability to make adjustments during editing in Lightroom or Photoshop. The level of compression of the JPG file can be adjusted, but in all cases the resulting images are reduced in tonal depth, usually from the RAW 12-16 bits to only 8. 8 bit images have only 256 tonal gradations for Red, Green and Blue as compared to more than 64,000 with 16 bit images. This difference may not be apparent in small images
RAW or JPEG, Makes Little Difference on the Web
designed for sharing on the internet, but it becomes strongly evident when they are manipulated in Photoshop or other programs, resulting in loss of detail, color banding and restriction of the ability to enlarge the image. Despite the loss of quality, JPEG is a popular format because the images come out of the camera requiring little if any processing to get an acceptable picture and because the image files are much smaller making them easier to store and to share.
The Quality Shows with Bigger Images


Size Matters
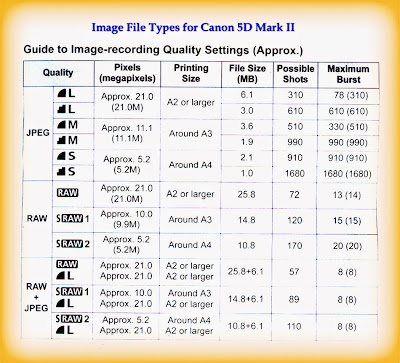
A full resolution, 21 megapixel RAW file coming from my Canon 5D Mark II is 25.8 megs in size compared to only 6.1 megs for a 21
megapixel maximal resolution JPEG. This means that more than four times as many JPEGs than RAW files can be stored on any memory card. It also means that, with the JPEG files, I can shoot a burst of 78 images before the camera will be forced to pause in order to buffer the data. In RAW I am limited to only 13 images in a burst. The choice of higher levels of JPEG compression has further impact on both the file size and image quality. At the highest degree of compression the file size drops to one megapixel, but, at a resolution of only one meg, image quality severely suffers.

Dancing Lady.  When trying to anticipate the action, JPEGs allow longer bursts of images.
For only the second time in years of shooting Stonewall Farm's "Dancing of the Ladies",
I caught a lady in full kick.
   

The Choice

It really comes down to what you want to do with the image after it leaves the camera. Modern digital cameras are remarkably sophisticated and, in unchallenging situations, do an excellent job
Many cameras can record image in two formats
recording images in JPEG. If your only goal is to grab that picture of the ham sandwich you had for lunch, and transmit it as quickly as you can, to as many people on the internet as possible, then JPEG is the way to go. If your goal is to go beyond the mere FACT of the image, and explore the remarkable quality and capabilities of modern digital photography, then RAW is the ONLY choice. And, when the situation arises, during post-processing, you can always compress that delicious RAW ham sandwich into the tiny JPEG that it truly deserves.

Jeff Newcomer
partridgebrookreflections.com