
 |
| Shallow Depth : f/2.8 |
Easy for You to Say
Simply stated aperture and shutter speed control the amount of light that reaches the sensor and ISO controls the level of sensitivity of the sensor to the light falling upon it. In this article I want to discuss the nature of each of these adjustments, how they affect exposure and their impact on other aspects of the final image. In a future article I will suggest my approach to finding the optimal balance of these adjustments based on the special requirements of each photographic situation.
The relationship between aperture, shutter speed and ISO is often illustrated with the "exposure triangle". I have never felt that a triangle works geometrically to illustrate the interaction between these factors, but it does provide a structure to present the impact of each of these adjustments. So if you need a triangle, here you go:
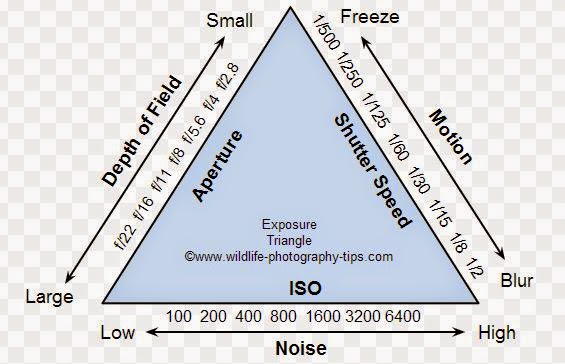 |
| Exposure Triangle : wildlife-photography-tips.com |
 |
| Finding the perfect Exposure |
Aperture
 |
| Deep DOF, f/22, 1/15", ISO 100 |
The aperture is the size of the opening through which light the passes to the sensor. The larger the opening, the more light gets through to expose the sensor and the brighter will be the image. Simple, but a stumbling block to understanding aperture has always been the apparently random and counter intuitive "f" numbers or "f stops" used to measure the size of the opening. The problem is two fold. First the numbers do not seem to follow any recognizable pattern and secondly, as the numbers increase in size the aperture opening actually gets smaller.
The standard progression of f stops, is:
1, 1.4, 2, 2.8, 4, 5.6, 8, 11, 16, 22, 32 .......
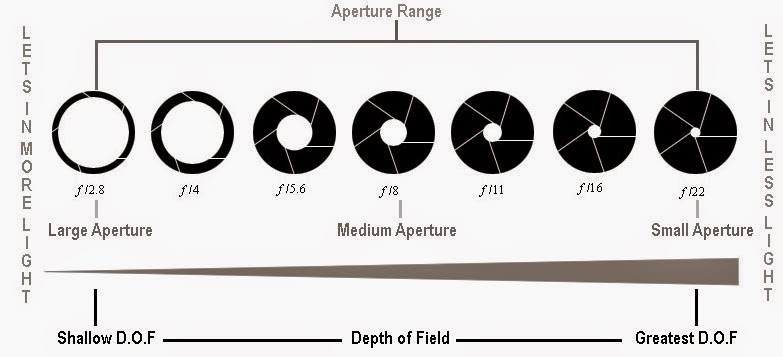
Although it is rare to find a lens that can go this wide, F/1 would be the widest aperture in this sequence, letting the most amount of light to the sensor, and f/32 would be smallest. Each step increase in the f/stop is calculated to represent a halving of the size of the aperture and therefore a halving of the amount of light hitting the sensor. These steps are referred to as "stops". Of course there are f numbers which represent changes of fractions of a stop, but for our discussion it is easier to focus on the one stop increments. Great, but how does it make sense that f/5.6 admits twice the amount of light as f/8.?
Shut Up. It Just does! It's a Mystery!
 |
| Abby f/3.5, Shallow DOF for Portraiture |
Back to the Mystical f/stop
The aperture setting or f/stop controls the intensity of the light
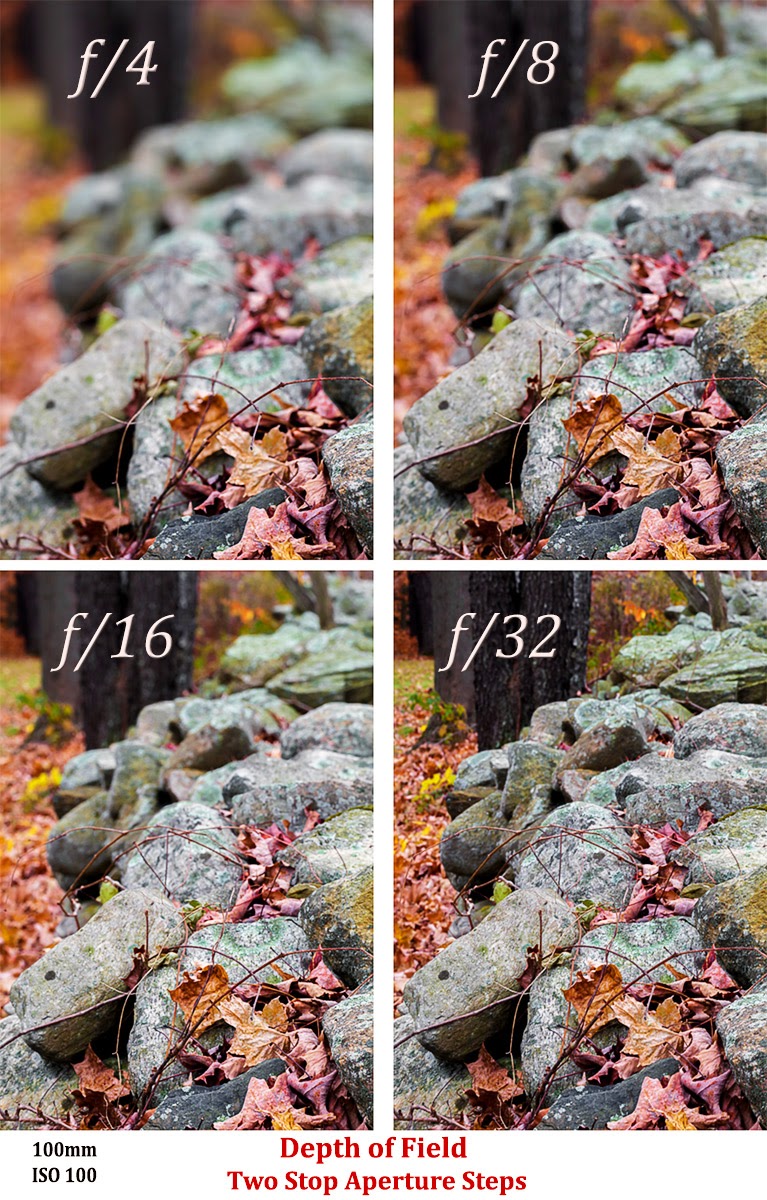 hitting the sensor by regulating the size of the aperture. As the f/stop gets smaller more light is admitted and we can shoot in darker locales, but nothing comes free in photography. As the aperture widens the depth of field is reduced. Depth of field (DOF) is the distance between the closet and farthest points that are in sharp focus and that range is much larger at f/32 than at f/4. Varying the DOF can be used in creative ways. Sharp focus from foreground to infinity is often preferred in landscape photography, but a narrow DOF, with a soft background can work well with portraits. When shooting in low light it can be difficult to use an aperture which is small enough to get the desired deep depth of field and that is when compensation with longer shutter speeds can be important.
So Aperture's primary effect is on exposure and its secondary effect is on the depth of field.
Shutter Speed
 |
| Catsbane Falls: 0.5 seconds, f/20, ISO 100 |
Shutter speed is the second of the two adjustments that control the amount of light hitting the sensor. After our struggle with the seemingly nonsensical number of f/stops, it is a pleasure to discuss shutter speed. No complicated math, but here again the standard intervals represent steps which double or halve the amount of light and therefore match or offset the effects of changes in the aperture. Of course, as with aperture adjustments we aren't restricted to full stop intervals, but for simplicity it is helpful to know that the standard, one stop, steps of shutter speed are:
... 2", 1", 1/2", 1/4", 1/8", 1/15", 1/30", 1/60", 1/125", 1/250", 1/500", 1/1000" ...
If you ventured to my f/stop explanation below you will be happy to note that there are no Pi or Squares, just straight ahead, good old non-metric, American doublings! With each doubling of the shutter time the exposure doubles. Now we can see how the aperture and shutter speed are locked together but can be shifted to produce a balance that can work the best for the perfect exposure in most photographic situations. Perhaps an example will help.
Example:
Assume that a scene is properly exposed with a relatively wide aperture of f/4 and a shutter speed of 1/125". The wide aperture would lead to a shallow depth of field, but I could expand the depth of field by increasing the f/stop to f/16. Since I would be reducing the light by 4 stops the image would be quite dark unless I offset this change by increasing the shutter duration by the same 4 stops to 1/8". The result would be the same exposure but a much wider depth of field.
But There is a Problem
 |
| Red Tail: 1/800th Second, f/9, ISO 400 |
 |
| Sprint : 1/13th Second, f/5.6, ISO 100 |
So Shutter Speed's primary effect is on exposure, but its secondary effect is on the ability to freeze motion.
ISO
A Bit of History / OK, I'm Old
With film photography, aperture and shutter speed were usually the only two adjustments available to balance exposure. For any amount of light, a specific aperture had only one shutter speed to which it was irrevocably linked to achieve proper exposure. Using
 film with a different sensitivity to light (ASA) could shift that link, but It was extremely awkward, to switch film. I did it a few times. I had to carefully roll the film back into the canister trying to stop before the leader got disastrously sucked into the can. When it was time to put the original film back in the camera I had to remember how many pictures had been exposed and, to avoid double exposures, advance the roll beyond that point, wasting a few pictures in the process. It was a colossal pain, and was never a practical way to add media light sensitivity as a third adjustment for the control of exposure.
With digital photography that has all changed. Now sensor light sensitivity can be changed from shot to shot with the press of a button or the twist of a dial. On digital sensors, the light sensitivity is described by a scale established by the "International Standardization Organization", located in Geneva Switzerland, hence "ISO Numbers". Fortunately, ISO settings, like shutter speed, follow simple doublings to adjust exposure by one stop increments and higher numbers reflect greater sensitivity. God bless the Swiss! A typical IS0 range, in one stop increments, might be :
... 50, 100, 200, 400, 800, 1600, 3200, 6400 ....
Many newer cameras go well beyond this range
Example
In the same example from above, Suppose I require a shutter speed of 1/8 " to get my desired DOF with f/16 at an ISO of 100. I left my tripod at home and my shaky old hands could never hold the camera still for the 1/8" exposure, but now I can break the chains connecting the aperture to a specific shutter speed and use what I like to call the ISO Fudge Factor. By increasing the ISO by three stops to 800, I can shift the aperture/shutter relationship to a more manageable speed of 1/60" while keeping the f stop and its resultant deep depth of field unchanged.
 |
| ISO Noise Test |
 |
| Digital Noise increases with increased ISO |
Juggling Three Balls
That is really all there is to exposure control. Three adjustments, two which control the amount of light and one which controls the sensitivity of the sensor. As the exposure triangle shows each adjustment has a secondary effect that must be consider as the 3 factors are balanced.Amount of Light:
1) Aperture : Affects Depth of Field
2) Shutter Speed: Affects the Ability to Stop Motion
Sensor Sensitivity
3) ISO : Increased Sensitivity Increases Image Noise
Simple, especially if you don't wander any further into the abyss below, but how do you decide what is the best balance of these controls for any particular photographic situation. It all depends on the light, the intended composition and the eventual use of image. There is no single right answer, but I will save that discussion for another article. A hint? It doesn't involve a triangle.
---------------------------------------------------
The Source and Sense of F/stop Numbers :
"Here There Be Dragons"

Here Goes,
If I have this wrong, keep it to yourself!
F number Ratio
The "f" in the term "f stop" comes from the fact that the number is a unit-less ratio (or fraction) where the
F number = Focal Length of the lens (mm) / Diameter of the Aperture (mm).
Rearranging the equation:
Diameter of the Aperture = focal length / f number
So a 50mm lens set at f/2 will have an aperture opening of 50/2 = 25mm, and
the aperture of a 100mm lens will be 50mm.
The key point is that, at any f/stop, the size of the opening is not the same on different lens, but varies based on the focal length.
Why Are Different Aperture Sizes Necessary
Longer lens' collect less light at any fixed aperture size and therefore they require larger openings than in shorter lens' to bring the same amount of light to the sensor. The f number ratio allows a particular f stop to provide the same amount of light to the sensor regardless of the focal length of the lens. At f/5.6 the camera sensor sees the same amount of light through a 400mm telephoto lens as it does through a 16mm wide angle, simply because the aperture on the 400mm lens is 25x larger than on the 16mm. This explains why fast telephoto lens' are so gigantic and expensive. The aperture of a f/2 400mm lens would have to be 200mm in diameter (400/2) and this requires much larger, heavier and expensive glass. As I discussed above, the large apertures on telephoto lens' also result in a shallower depth of field for any f/stop than at the same setting on a shorter lens.
Ok, so that explains where the f numbers come from and why they get larger as the openings get smaller. The f number is inversely related to the aperture size and therefore to the amount of light striking the sensor. As the standard f/stop numbers increase they reflect progressive halvings of the amount of light admitted to the sensor. Each time the exposure is doubled or halved we refer to the change as representing a one stop difference, but why these numbers?
1, 1.4, 2, 2.8, 4, 5.6, 8, 11, 16, 22, 32 .......
The simple Answer: They Work
If we consider a 100mm lens, at f/2 the aperture will be 50mm in diameter (25mm radius). The amount of light passing through the aperture is related to the area of the opening and high school geometry tells us that:

So, for our 100mm Lens
At f/2 the radius = 25mm
3.1416 x (25) ^2 =1963 mm^2
At the next stop smaller, f/2.8 : the radius = 17.86mm
3.1416 x (17.786)^2 = 1002mm^2
The aperture at f/2.8 is effectively half of that at f/2
It works!
Empiricism not enough for you?
Give me a break ! This is photography, not higher math ! But if you must .....
Ok , what follows is mostly for me since I know, if I don't write it down, I will have no clue about the explanation tomorrow. The next time some dweeb asks me, it will be much easier to say, "Go read the blog". This is how I can understand it. First remember that each stop represents a halving of the light on the sensor. You MUST have that by now!
The Power of the Square
Going back to the f/stop ratio :
Diameter = focal length / f number
It can be seen that doubling the f number will halve the diameter and therefore also halve the radius. Since the aperture area is proportional to the radius squared, each doubling of the f number will actually reduce the aperture area by one quarter or two full stops.
If we go back to the f/stop numbers they no longer appear random, and it all comes back to simple doublings.
1, 1.4, 2, 2.8, 4, 5.6, 8, 11, 16, 22, 32 .......
Starting with f/1, doubling to f/2 will drop the exposure by two stops. Then by successive doublings we drop by two stops for each step through f/4, f/8, f/16, and f/32. Great, but What about the single stops between the numbers in this f/1 sequence?
We can calculate that f/1.4 results in an aperture one half the size of that at f/1, and twice the area of f/2. That is f/1.4 is one stop smaller than f/1. Now all we need to do is follow the same doubling procedure to generate the f numbers that fill the single stop gaps between the numbers in the f/1 sequence.
The f/1.4 sequence is : f/1.4, f/2.8, f/5.6, f/11(close enough), f/22 .....
By alternately doubling the numbers starting from f/1 and f/1.4 we get those previously mysterious numbers which are etched on your lens.
1, 1.4, 2, 2.8, 4, 5.6, 8, 11, 16, 22, 32 .......
There you go. There are more complex formulas to describe these numbers, but this works for me and I'm more than ready to get back to actual photography.
---------------------------------------------------
 |
| West River, Jamaica, Vermont |
Jeffrey Newcomer
Partridgebrookreflections.com
Having a small house doesn't mean you can't create a comfortable atmosphere and even make it look bigger. Previously, you need to know that this comfortable house does not always have to be filled with a lot of supporting furniture or decorations that are expensive, but simple home decorations, minimalist home terrace ideas with minimalist plant garden. Yes, you only need to choose simple home decorations that can create the illusion of an eye and are space efficient. Still confused with simple home decorations that can create the illusion of an eye and are efficient? Come on, take a look at the list of simple home decorations that you must have from Kania below!
ReplyDeletebedroom design ideas Having a small house doesn't mean you can't create a comfortable atmosphere and even make it look bigger. Previously, you need to know that this comfortable house does not always have to be filled with a lot of supporting furniture or decorations that are expensive, but simple home decorations. Yes, you only need to choose simple home decorations that can create the illusion of an eye and are space efficient. Still confused with simple home decorations that can create the illusion of an eye and are efficient? Come on, take a look at the list of simple home decorations that you must have from Kania below!
ReplyDelete