I
have just started my next Introduction to Lightroom class. With each major
update, Adobe’s Lightroom keeps getting more powerful, and I love sitting around
my dining room table demonstrating all the features of this remarkably capable
and intuitive program.
I
have been a devoted Photoshop user for years, but for many,
Photoshop’s
complexity has represented a daunting barrier to the discovery of the broad
potential of the “Digital Darkroom”. Since its initial release in 2007
Lightroom has progressed from image organization, to progressively more
sophisticated editing and outputting capabilities. I initially came
to Lightroom to help organize my 400k (now 500K) images in a more easily
accessible database program, but, as I became familiar with the editing
functions in the Develop Module, I stayed to do much of my global editing
within the program. I found that Lightroom’s workflow was more intuitive,
it had the same functions as Photoshop’s Camera RAW and the sliders were easier
to use. So why move my images to Photoshop.
 |
| Sugar Hill Lupines Remembered |
I
routinely tell my students that, for many of them, and especially as they get
started in image editing, Lightroom may be all they need for simple image
adjustments. I probably do about 90% of my image editing in Lightroom, and the
resulting images could often stand on their own, but I still routinely make the
move to Photoshop before feeling that my work is truly done. So why do I
make the jump?
Complicated Selections
 Lightroom
allows simple localized adjustments with gradient, oval and brush tools, but
Photoshop allows much more finely controlled selections which can be applied to
layers affecting a full range of adjustments as well as to image layers.
The ability to use layers is a key strength of Photoshop and
essential difference between it and Lightroom.
 |
| Focus Stack |
Comparing
Images
 |
| Compare Mode |
 |
| Survey Mode, Keene Central Square |
 |
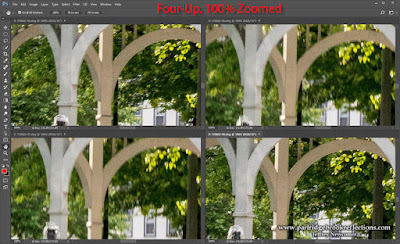
| Photoshop Arrange, Zoomed |
Compositing
and Text
 |
| There's always one that needs help |
Cleaning Up
 |
| Harrisville Library Wires |
Since
I am teaching Lightroom, I enjoy pushing the limits of what can be done with
the program’s limited tools. It is remarkable how much can be accomplished,
but at some point, for both ease and accuracy, I have to make the jump.
For now, when it comes to seriously “punishing the pixels” Photoshop is
the only way to go
Sharing
 |
| Tulip Path, Putney VT |
Most
of the time, I make this jump by moving the image for final touch-ups to
Photoshop, but the Lightroom adjustment can also be applied as the file is exported
to a specific image format.
Either
way, before the jump, I ask myself if I have done all I can within Lightroom.
When I make the move I want to know that I am leaving a pristine RAW file in my
directory and a safely separate and nondestructive set of adjustments carefully
archived in my Lightroom Catalog.
Printing
 OK,
this is an admission of my Lightroom ignorance. I have never been able to
get the best results when I try to print from Lightroom. All the controls
seem to be there, but I remain more comfortable applying my printer profiles
and adjusting the resulting soft proof from within Photoshop.
I’m always embarrassed when I reach the point in my Introduction to Lightroom Class when I have to review the Print Module. The Module is powerful and intuitive. I know I’ll get it eventually, but for me fine art printing is a whole different part of the process of image making and, for now, to get it right, I still make the jump to Photoshop.

These are just a few of the reasons why I make the jump. I am sure that there are many more. Sometimes, when I’m happy with the image in Lightroom, and don’t have any obvious reason to move, I will still finish my work with a final examination in Photoshop. A fresh look in the context of the expanded tools of my old friend can often suggest subtle final adjustments that can make a significant difference.
Jeffrey Newcomer
partridgebrookreflections.com


No comments:
Post a Comment