About Me

My photo
Spofford, New Hampshire, United States
Jeff Newcomer had been a physician practicing in New Hampshire and Vermont for over 30 years. Over that time, as a member of the Conservation Commission in his home of Chesterfield New Hampshire, he has used his photography to promote the protection and appreciation of the town's wild lands. In recent years he has been transitioning his focus from medicine to photography, writing and teaching. Jeff enjoys photographing throughout New England, but has concentrated on the Monadnock Region and southern Vermont and has had a long term artistic relationship with Mount Monadnock. He is a featured artist in a number of local galleries and his work is often seen in regional print, web publications and in business installations throughout the country. For years Jeff has published a calendar celebrating the beauty of The New England country-side in all seasons. All of the proceeds from his New England Reflections Calendar have gone to support the Pulmonary Rehabilitation Program at the Cheshire Medical Center. Jeff has a strong commitment to sharing his excitement about the special beauty of our region and publishes a blog about photography in New England.

Friday, May 25, 2012

Cows Gone Wild


Breaking Away 201


If you photograph in New England it means that you shoot cows. Although it is no longer true that there are more cows than people in Vermont, they remain an unavoidable part of rural New England life. You might as well photograph them intentionally since regardless of intention they are bound to wander into even your most carefully planned landscape. Personally, I love these placid, four-legged milk factories. They provide a sense of balance and peace to many compositions, but photographing cows is always a
Head Above, NE Kingdom, Vermont
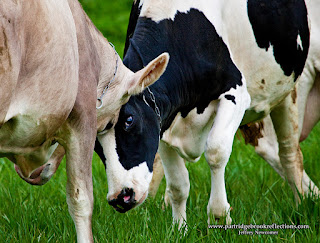
challenge. They seem to spend all their time with their heads buried in the grass or elegantly discharging massive amounts of pee. Watch out, when they start arching their backs, it's time to stand back.  Of course, a herd almost always presents many more buts than faces to the camera. These guy never take direction well and it can be a long wait for them to randomly sort themselves into a pleasing arrangement. When they finally look my way they often move in to try to chew my camera. On one occasion in the Northeast Kingdom of Vermont I was nearly stampeded by a herd that obvious thought I was serving breakfast.

Dancing of the Ladies


Twist and Shout

Every spring Stonewall Farm, in Keene New Hampshire, offers a
Head But
unique opportunity to catch “cows gone wild” in a fleeting moment of energy and activity that is not potentially homicidal. The Dancing of the Ladies at Stonewall Farm was a hit once again this spring and seems to be attracting larger crowds every year. The "dancing" occurs on the morning in spring when the cows are first released from the barn and allowed to feast on the fresh spring grass. They are obviously thrilled to get out and for one brief moment they go cow crazy.
Connection
They run, or more accurately prance, out into the pasture, spinning, jumping and butting heads. The whole event is witness by folk lining the path to the field. Kids seem especially fascinated by the cows doing very “uncowly” things. The remarkable thing is that all these people come out early in the morning to see a spectacle that lasts only a few minutes. Before one can say “chewing their cud” the cows are back to their usual semi-comatose grass munching status.  Brief as the excitement is, I confess I am attracted every year. My best image of the dance came the first year I attended. I was told at the time that no one before had ever captured a cow in full kick and I have to admit that I haven’t yet been able to get a similar shot. What I find most fascinating about the shot is that the cow's face seems to betray no awareness off what her legs are doing.

Cow Kick


Strolling of the Heifers

Another good chance to catch cows in a more controlled environment is the annual Strolling of the Heifers Weekend held in Brattleboro Vermont every spring. The festival includes many family friendly bovine events, all built around the Strolling of the Heifers Parade. The parade features cute heifer calves marching down Main Street, accompanied by tractors, bands, clowns and more. It is a classic celebration of rural New England life and tradition. The parade this year is at 10a.m., Saturday , June 2nd. 


Cowscapes
This year the Vermont Center for Photography, in Brattleboro, is complimenting the stroll with a juried photography exhibition celebrating cows in New England. "Cowscapes" includes 38 images contributed by photographers from throughout New England. The opening is June 1st from 5:30 to 8:30 p.m.. Check it out if you are in the area. You will even get a chance to see my "famous" jumping cow photograph. VCP Gallery is tucked away in a back alley in Brattleboro. Check out our web site for directions.

Dancing, parading and a show. If all of this is not enough cow for you, I suggest you follow another New England tradition of spring. Fire up your barbecue and have a burger.


Thinking of Home

For more dancing check out my blog about last year's event:
http://jeffnewcomerphotography.blogspot.com/2011/05/dancing-of-ladies.html 

Links:

Stonewall Farm :

 http://www.stonewallfarm.org/


Strolling of the Heifers:
http://www.strollingoftheheifers.com


Vermont Center for Photography
http://www.vcphoto.org/

Sunday, May 20, 2012

Great Blue Heron on Harvey Pond


The news is that the Great Blue Herons are back in their nest on Harvey Pond in Westmoreland New Hampshire. We missed them last year but when a picture of them settling in showed up on Facebook I ran over to see for myself. People must be tired of my protest that I am NOT a bird photographer, but I have found that recently my gaze has risen more often to the tops of the trees. I’m still not willing to freeze behind a blind for hours, but the Heron are spectacular birds with an almost pre-historic appearance in flight and more importantly they provide a very civilized viewing experience.


Welcome Home, Chicks 2 years Ago

I first saw the Herons on Harvey Pond two years ago. I camped out a couple of times by the road with a clear view to their nest high up in a dead tree that had been drowned by the pond years ago. I trained my 400mm lens on the nest where there was always one of the parents watching over
Nest Building Teamwork
the two chicks as they became more active. I discovered I could relax in my car with the camera on my tripod shooting bursts of images whenever things became interesting. My only challenge was avoiding falling asleep. I quickly discovered that the real action occurred about every 45 minutes when the heron that was out hunting returned to the nest to elegantly regurgitate its catch into the gaping mouths of the ravenous kids. My best shots were of the birds as they arrived at the nest and the interaction between the parents as they switched roles and the other headed off to hunt. The heron approach the nest swooping up from below and float briefly
Greetings
before settling into home. Even while taking advantage of these fleeting pauses in the action I still had to turn up the ISO to 800-1250 to allow a sufficiently fast shutter speed to freeze the motion. With my lens pre-focused on the nest I didn’t need to stop down to get adequate depth of field and locked down on the tripod,  I could turn off the image stabilization.


Growth 2010
Parental Guidance
It was fascinating to see how quickly the chicks grew in both size and boldness. In just a couple of weeks they were pushing the boundaries of their nest. I missed their first flights, but I hope they did well.


What a Difference in a Couple of Weeks


Sadly the herons were missing last year. I wonder whether this is the same pair, returning after an ill-advised experiment into an alternative life style. Perhaps they were on sabbatical studying yoga in the Rockies. Whatever , we are glad they are back, and it was a joy last weekend watching them meticulously work on enhancing the nest. There were no chicks visible, but the popular opinion is that the eggs have already been laid.


One of the greatest attractions of such a well known location is the opportunity to learn from other observers who are much more familiar with bird photography. The chance to chat about equipment and technique filled the long intervals of inactivity. It can be frustrating however, since, upon arrival, they invariably told me that I had just missed the best opportunities to capture the action.


Pond Life

Although it is natural to stay focused on the dramatic Herons, I had to remind myself not to miss the varied natural beauty and wildlife which is part of a New England bog in the spring. The lily pads were spreading across the shallow areas of the pond forming a multicolored carpet against the reflected shades of green from the surrounding trees, and the skeletal ranks of  drowned trees  provided striking contrast to the soft spring tones. Turtles were sunning themselves on almost every exposed log and the Canada Geese seemed to be saying “hey what about us” as they splashed down and came right up to the bank. On rarer occasions otters or deer might venture to the water's edge.


Splash Down

I'll be returning every few days to check on the progress. The photographic opportunities are great, but even more exciting is the chance to learn about the behavior of these magnificent animals. If you come by to see the show, please be as quiet and unobtrusive as possible.  Frequent human disturbance can lead to nesting failure. The only thing visible last evening was the head of one of the parents as it was settled peacefully down into the nest. All-in-all a good sign for the future.


Showy Canada Geese


Sunday, May 13, 2012

Exposing to the Right

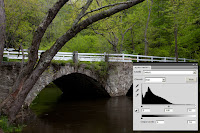
Old Stone Bridge, Ashuelot River, Keene New Hampshire

Getting Exposure Right in the Digital Camera

Last week I began the discussion of exposure control in digital photography and more specifically about the use of the histogram to nail the optimal exposure every time. Much of that discussion focused on the importance of adjusting exposure to avoid the extremes. To avoid overexposure, positioning the histogram against the right side and clipping the highlights or underexposure, pushing the histogram against the left side and loosing detail in the shadows, but there is more to optimal exposure than avoiding the extremes.


Technically if the histogram is safely enclosed within the graph without piling up on the right or left then you might expect that the  Goldilocks Rule would apply, since it is neither too bright or too dark and all tonal levels are recorded. But unlike Goldilocks, every position within the graph is not “just right”. It is here that the “Expose To The Right” (ETTR) rule applies.


ETTR
Exposing to the right is an approach designed to get the most from the digital sensor in terms of tonal range, noise reduction and color quality. In practice it means slightly overexposing images, shifting the histogram to the right where digital light sensors work more efficiently.

The Physics

Digital image sensors are linear devices that translate the incident light into an electrical signal which is directly proportional to the intensity of the light. The greater the light, the greater is the portion of the sensor's tonal range that is dedicated to that part of the image.
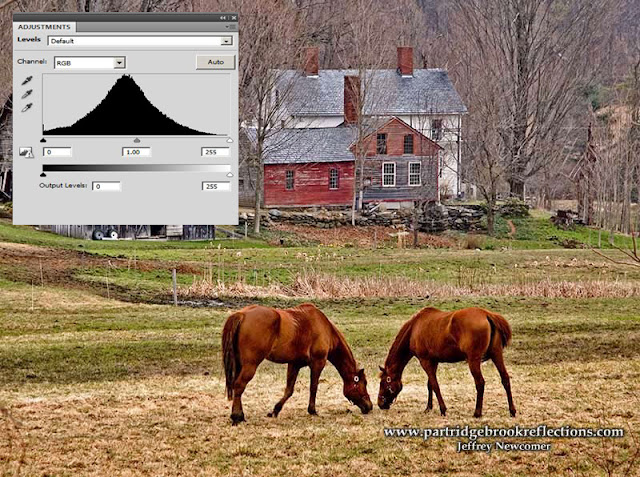
Low Contrast : Histogram in the Middle
But f stops are not linear, but logarithmic. Every time you drop by one stop you are cutting the light in half and, remarkably, what this means is that the brightest stop on a digital sensor uses one half of the total tonal information. The next stop down gets only one half of what is left and so on until the darkest tones are recorded with a much smaller amount of tonal information. The result is that dark regions are much more susceptible to noise, loss of detail, and posterization in post processing. Digital sensor noise is actually higher in the bright tones, but since there is so much more information (signal) at this end of the range, the high signal to noise ratio (S/N ratio) obscures any noise. Noise can be significantly more intrusive at the dark end of the range, where the smaller signal is susceptible to being overpowered by the noise.

Anytime I start talking about the interaction between linear and

Exposure Right Shifted, ETTR, Not Pretty
logarithmic scales, I know I am in trouble, so let's get to the simple, practical application. Since there is more tonal information available at the bright (right) end of the scale, by increasing the exposure, the darker regions are moved into a portion of the scale that can better record detail with a more favorable S/N ratio. Again the resulting image on the LCD will not be the most attractive, but it will give you the highest quality information to take home to your editing software. This is a real test of your ability to trust the histogram and I have struggled to avoid the natural tendency to "improve" the resulting overbright, washed out image by lowering the exposure to get the prettiest LCD rendering.

An Example


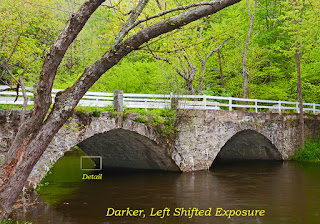
Left Shifted Exposure
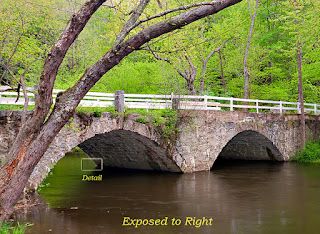
Exposed toward Right


As an example, here are two exposures taken of the classic old stone bridge in Keene New Hampshire. The first was underexposed, but looked better on the LCD screen. The dark tones are recorded on the far left of the histogram. The second was "exposed to the right", appearing overexposed and washed out on the screen, but the histogram showed that the dark tones were shifted to the right, on a more favorable portion of the scale, and that the highlights were not clipped. The two images looked very different on the LCD screen, but I then processed each in Camera Raw and Photoshop to get the best results. The two images were adjusted to look grossly the same, but examination of the detail, especially in the shadows, shows that the brighter image has smoother tonal range and less noise. ETTR does work!


Detail Comparis


A Few Caveats for ETTR:

First, to get the tonal benefits from ETTR, images must be shot in RAW, with the proper brightness brought back in the RAW converter. In addition to having a much smaller native tonal range (only 256 at 8 bits), JPG images are processed in camera. Their tonal range is "baked in" before the picture ever reaches the computer, leaving little margin for salvaging the over exposed images.

Secondly , as you increase the exposure it is important to avoid going too far, clipping or blowing out the important highlight tones. As I discussed last week, you must trust the histogram and avoid piling up against the right side. Most cameras have an additional visual aid to help avoid clipping. The "blinkys", the flashing lights on the LCD image are there to identify areas of blown highlights. Annoying but very helpful.

Finally, although ETTR has become the conventional wisdom for digital exposure, there is still some controversy about it's value. No surprise, we are photographers, we must debate! Digital sensors are constantly changing and improving. Only experimentation will tell you how valuable this technique will be for you.

So give ETTR a try. The biggest hurtle is to get over the strong desire to make the LCD image look it's best, but here again, in the digital world, getting it right IN the camera means something different than getting it looking it's best directly FROM the camera.


Check out Part One of Getting Exposure Right in the Digital Camera

Monday, May 7, 2012

Using the Histogram

Getting Exposure Right in the Digital Camera


A while ago, someone asked me how to get rid of the little graph 
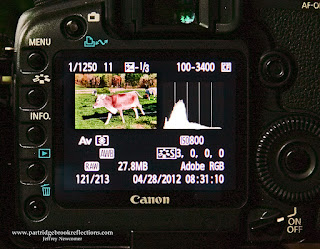
that kept showing up on her camera's LCD screen. I could only assume that she was trying to make it go away so she could see the full size, unobstructed picture of her drunken uncle with the lamp shade on his head? Although I am confident most of my audience understands the value of the histogram, this article is for those who are still trying to figure out how to make it go away - DON'T. In a future article, I will be getting more technical, but this week I would like to show how a simple understanding of the basics can make a world of difference in your control of exposure. Anyway, that little graph is called a histogram and it is the essential key to unlocking optimal exposure, every time.

This week, to continue my series on "Getting It Right In The Digital Camera", I will begin a discussion about getting exposure right in the digital camera. So far I have discussed the control of focus and of perspective, but for me, the improvement in my ability to control exposure has been the most significant benefit of my change from film to digital photography. With film it took great care to assure a properly exposed image and even with the help of light metering and bracketing, I still couldn't be sure that I nailed it until the pictures came back from the lab or were revealed in the development tray. Now it all comes down to the histogram, and with the use of this marvelous tool there is no excuse for a poorly exposed image. If you want to take a bad picture you must simply find another way to do it.

Find the Histogram
The LCD image on the back of essentially all digital camera can be
very useful. It is helpful for a rough review of composition, and an even rougher assessment of focus, but it is should not be relied upon for exposure monitoring. The best exposure is often not the one that looks best on the screen. The brightness of the LCD image is affected by the JPG rendering that is done in camera and also on the brightness you have set for the LCD screen itself. The primary reason I look at the LCD is to evaluate the exposure from the histogram. The histogram is simply a visual representation of the range of brightness in your images. Brightness varies from the blackest black on the left to the whitest white on the right. If you are shooting 8 bit jpg images, that brightness range is divided into 256 steps. In RAW at 14 bit the dynamic range is divided up into over 14,000 steps – you should be shooting in RAW. Regardless of the bit depth, at every point on the graph the height of the column is proportional to the number pixels at that level of brightness. 


Study the Histograms


 The best way to understanding what the histogram is showing is to study the graphs for a range of images.   In the wildflower photograph, the histogram shows a full dynamic range with a bias toward darker tones (to the left). 
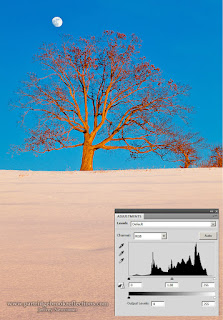
The histogram for the winter picture of the hill-top Oak at Alyson's Orchard, is shifted to the right by the preponderance of bright tones.  The slight tail extending to the far right represents the brightness of the moon whereas the few deep shadows in the tree explain the tail to the left. In a photograph dominated by a bright sunny beach the histogram columns will be shifted far to the right, while a dark, shady forest will be represented by columns bunched over to the left side. An extreme example is seen in the silhouette image of a Frigate on the Galapagos Islands.  Here there is only bright light and deep shadow and the histogram shows the two peaks at opposite ends of the dynamic range.


The histogram of a low contrast image will float in the middle of the graph without extreme whites or blacks. How to best position this truncated graph is a discussion for another time, but think "expose to the right".


Control Exposure with the Histogram
Every image will have its own distinct natural pattern, but in digital photography the goal should be to capture the range of brightness that will provide your editing program with the information it needs to show quality detail throughout your desired dynamic range.  There is no "ideal" histogram. The best exposure, and therefore the best histogram, depends on the dynamic range of the subject and the artistic goals of the photographer.

 My routine approach is to lock down my initial settings in aperture or shutter priority, depending on whether depth of field or shutter speed is most important. I don't worry a great deal about other setting until I have taken my first image. That first picture is primarily for metering the scene. Once I have seen where the graph lies I will have a good sense of how the final exposure will need to be approached


Avoid Clipping
 It is most important to check the general position of the graph. To assure that there is no significant loss of detail in the brightest highlights of the image or in the shadows.


If the histogram is shifted too
Right Shifted
far to the right with data piling up against the far side of the graph, the brightest areas of your image will be blown out or "clipped".  There will be no salvageable detail in these regions, and there is nothing that even the most magical editing program can do to bring this back. You will need to reduce exposure to shift the graph to the left.

Highlights Recovered

There will be times when it is ok to blow out the extreme highlights, when it is not necessary to find detail in some highlight areas. The classic example is when specular reflections are recorded, such as bursts of sunlight reflecting off a chrome automobile fender or sparkling light on ocean breakers. In these situations as well, the histogram is essential to controlling the results.  The sunflower picture has a spike at the far right of the histogram, but these "blown" highlights are in the direct sun where no detail is expected or possible.


Sun Clipping

Excessively dark images
Left Shifted Histogram
will be shifted to the opposite side of the histogram, with the columns piling up against the left side. Lost shadow detail can often be retrieved in post processing, but the results are usually excessively noisy with a muddy appearance. Here again the shadow detail can be preserved by increasing exposure, shifting the graph to the right. As with the highlights, there are times when extremely dark areas can help to provide contrast in an image.
 
Shadow Detail Recovered

When dynamic range is high, it may not be possible to protect both highlights and shadows and compromises need to be made. Using the histogram, I will often increase exposure until important highlights begin to be compromised and then back off slightly. This is called "exposing to the right" and although it often does not yield the prettiest picture on the LCD, there are good reasons why, 
regardless of the dynamic range, this is usually the optimal approach to positioning the histogram .  But I will reserve that discussion is for another time.

For now, get into the habit of reviewing your histograms. Understand what they represent and then use this to get all the exposure data you will need to fulfill your vision of the scene.  Your drunken uncle probably will appreciate having his indiscretion obscured by the graph and you will get a perfectly exposed record of the event. 


Check out Part Two of Getting Exposure Right in the Digital Camera: Exposing to the Right

Tuesday, May 1, 2012

Who Needs a Tripod?


Hand-Held City Lights, Boston

I Do, but Sometimes I Have to Make Do


Basin Sails
I have been struggling to get out to enjoy and photograph the beautiful New England spring colors. This weekend has been consumed with moving our son Jeremy to New York
City. Two weekends ago we were visiting our daughter in Washington DC and much of the week after that I was tied down in a conference in Boston from dawn to dusk. I love Boston in the spring, but it was frustrating to be watching it from inside the Sonesta Hotel along the Charles River in Cambridge. I got out when I could, mostly in the evenings, and I was blessed with a couple of clear nights to play with city light photography.


One secret to good city lights photographs is to get there at twilight. You want to have a little light remaining in the sky. A completely black sky is uninteresting and also renders anything which is not illuminated hopeless dark. The smooth, deep blue sky provides a lovely contrast to the specular lights from the buildings.

The Light Won't Wait
On my way back from dinner one night, I realized that the light was perfect. Just enough color in the sky, with the lights of the Boston skyline shinning through and reflected in the Charles River Basin. The Longfellow Bridge, also known as the Salt and Pepper Bridge for its distinctive towers, stood out in nice relief. Thankfully, I had my camera with me, but I knew that if I ran up to my room for my tripod, the twilight would be gone. I had to make do with sources of stabilization that were at hand and then use all the available camera controls to get the shutter speed down to something that an old guy like me could reasonably hold steady. It is amazing how many control are available on a digital camera to optimize low light, hand-held images. On this night I needed all of them:


Making Do
I started by looking for something for external stabilization, and found a part of the railing that nestled the camera nicely.  If it wasn't so blustery and cold, and the rail wasn't so dirty I would have balled up my jacket to provide a "bean bag" effect to further damp vibrations. Nestled on the railing and using image stabilization, I decided that I could steady the camera for sharp exposures of no longer than about 0.5 seconds, preferably less.

Thankfully my 5D Mark II can do a reasonable job at higher ISOs, so I cranked it up to 3200. I didn't need crazy depth of field to keep the boats and skyline sharp. f 4.5 worked well and with that I achieved my 0.3 second shutter with reasonable detail in the darker regions.

Of course I didn't have my cable release and I knew that the shake

from pressing the shutter would be impossible to control. The solution was to set a 2 second shutter delay giving me time to steady the camera with both hands.

I held my breath and shot. It was important to take many images with the same setting, since, despite my best efforts, most of the pictures were still blurry, but a few were acceptably sharp.


Enjoying Mistakes
I got what I came for, but as I looked at the other failed images, I
Jittery 5 Second Exposure
discovered some were actually interesting. I especially liked the one that was probably my worst early attempt at stabilization. This one proved to me what I already knew. There is no way to hand stabilize for a 5 second exposure. The squiggles reflect my poor technique and the coffee I had after dinner. This is almost diagnostic of a three cup indulgence, but I swear I only had one. Regardless of the process I really like the festive, Christmasy appearance. So I decided to try a few on purpose.


Zoom 0.8 Seconds
I concentrated on trying to do zooms. The trick was to allow a longer exposure and to start zooming the lens before I hit the shutter. Here again, the lack of a tripod was a issue, but, in these free flowing images, the lack of precision was not much of an problem. 


I finished with a few more straight images pulling back to include
the railing and walk-way. Here I braced the camera into the side of a tree. Again, many failures and a few not so bad. I even caught one with a woman walking on the path. Happily, her movement created a ghost-like effect that blurred the lovely, but suspicious look on her face.
Ghost Walk, Charles River Basin


I would have loved to have had more time to capture Boston in bloom, but as always the challenged was to make the best of any situation. In a way it can be more fun to make do and the results can be even more rewarding.