
 |
| Indian Pond : Canon 5D Mark IV : Nice Dynamic Range |
 |
| Sure is Pretty |
 |
| Upward : Mark IV |
From my early experience with this camera, I am very pleased. Compared to my Mark 2, the image quality is in another world and the features meet most of what has been on my wish list. The one disappointment is that the articulated LCD is missing. Given the ubiquitousness of this feature, it seems an unnecessary omission, but I’m not here to quibble. I’ll just glory in all the new stuff I get to work with.
 |
| Sunset Shore, Spofford NH Canon 5D Mark IV |
It has been awhile since I acquired a new high end camera, and I thought it would be a good time to discuss a few key elements and functions with which to becoming familiar in any a new camera. Fortunately for me, when compared to my 5D Mark 2, the Mark 4 has a familiar layout of controls. I don’t have to retrain my muscle memory for many of the essential buttons and dials, but there are still some basic steps required to become familiar with these remarkably capable tools.
The Basics
As soon as
you open the box, before the new camera smell fades, and before you take a
single shot, there are a few basic steps to get your camera ready to go.
Batteries
Charge the battery and get a second battery to keep charged and ready in your bag at all times. You should never risk running out of juice in the middle of an important shoot. There are few electrical outlets in the forest.
Charge the battery and get a second battery to keep charged and ready in your bag at all times. You should never risk running out of juice in the middle of an important shoot. There are few electrical outlets in the forest.
Memory
Confirm that you have the right memory card and have extras. With bigger sensors, image files are getting massive. Make sure that your cards have sufficient capacity and that they are fast enough to keep up with the pace of your shooting. Especially with 4k video, only the fastest read speeds will serve.
Confirm that you have the right memory card and have extras. With bigger sensors, image files are getting massive. Make sure that your cards have sufficient capacity and that they are fast enough to keep up with the pace of your shooting. Especially with 4k video, only the fastest read speeds will serve.
Filters
Before I take my new camera out into the nasty, dusty, environment, I always take measures to protect my lens. Sure, new cameras always come with a lens cap, but it has been my experience that you can’t capture many pictures with the cap on. A simple clear, or UV filter, can provide an extra level of protection
when you are shooting, and I will often order the filter when I order the
camera. Some photographers question the
value of placing an additional piece of glass in front of your lovely expensive
lens, but for me, this simple protection has avoided disaster on numerousoccasions. It is shocking how expensive
these simple filters can be, but I never skimp on my filters. Don’t put a piece of cheap plastic in front
of your beautiful multi-coated, multi-element glass.
Before I take my new camera out into the nasty, dusty, environment, I always take measures to protect my lens. Sure, new cameras always come with a lens cap, but it has been my experience that you can’t capture many pictures with the cap on. A simple clear, or UV filter, can provide an extra level of protection
 |
| Disaster Avoided |
While we are
discussing filters, you might as well add a polarizing filter to your
order. It is THE one essential filter especially for landscape
photographers.
You can choose to get a piece of plastic or glass to protect the LCD from scratches and cracks. Just make sure that your touch screen will work through the added layer, and that the screen is clean before you apply the protector. I never took this precaution on my Mark2 and, after seven years, I do have a few scratches and even one small crack, but nothing that has affected the camera’s function.
· Struggle with the Camera Strap:
Anything you can do to reduce the risk of dropping your precious baby is definitely worth the effort. I like to replace the corporate strap with one that is more comfortable, functional and that doesn’t scream to the world that I am packing an expensive, mugger attracting, camera.
Anything you can do to reduce the risk of dropping your precious baby is definitely worth the effort. I like to replace the corporate strap with one that is more comfortable, functional and that doesn’t scream to the world that I am packing an expensive, mugger attracting, camera.
· Camera Bag:
Do I need to say that you should protect your gear in a camera bag that is comfortable
to carry and provides easy access to your camera. I belong to a bag support group which helps
me deal with my pile of thirteen bags! Again it is a good Idea to look for a camera
bag that doesn’t LOOK like a camera bag.
 |
| Bagophilia, a Common Affliction |
· Add Your Camera to your Insurance
Whether you
have separate insurance for your photography business or add your camera
equipment to a rider on your household policy, you should not waste any time
getting your new camera listed, including the value and serial number. Stuff happens!
-----------------------------------------------------------------------------
Ok. I suppose you actually want to take pictures
with your lovely magic maker. There is a
lot to consider as you become acquainted.
Here are just a few suggestions, but it all comes down to, practice,
practice, practice.
Practice,
Practice, Practice
Make Lots of
Mistakes, Learn from them
and
Read the Damn Manual
and
Read the Damn Manual

Most camera manuals have “QUICK START” section which should get you going in a couple of pages. Don’t expect to get through the full manual in one sitting. My manual for the Mark 4 is almost 700 pages long. Most of it is a reference, not a novel and it will be solving my insomnia for months to come.
The first,
and the most obvious, point to make is that practice is essential in becoming
familiar with your camera’s controls. Experiment
with all of the settings and carefully review the results. Don’t take a new, untried, camera on an
important shoot. You don’t want all the
pictures from that critical family gathering to be hopelessly overexposed and
out of focus.
Foot Photography
 I always
suggest that you settle onto the couch, enjoy a glass of wine and try all the
setting while shooting pictures of your foot.
Fortunately, with digital cameras, the results can be immediately
reviewed and corrections made. Learn how
to figure out what went wrong by examining the details from each shot, not only
by reviewing the LCD screen, but also by studying the image’s EXIF Data. The EXIF data is embedded in each image and includes
a mass of information, including the f-stop and shutter speed, ISO and file
type. Eventually, you may not want all
the image data to show up on the screen after each shot, but while learning, it
is essential to have that immediate and specific feedback.
I always
suggest that you settle onto the couch, enjoy a glass of wine and try all the
setting while shooting pictures of your foot.
Fortunately, with digital cameras, the results can be immediately
reviewed and corrections made. Learn how
to figure out what went wrong by examining the details from each shot, not only
by reviewing the LCD screen, but also by studying the image’s EXIF Data. The EXIF data is embedded in each image and includes
a mass of information, including the f-stop and shutter speed, ISO and file
type. Eventually, you may not want all
the image data to show up on the screen after each shot, but while learning, it
is essential to have that immediate and specific feedback.
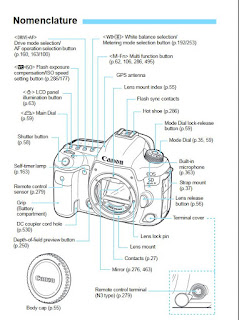
Start by understanding the location and function of the essential controls.
Find the
Essential Controls:
Discover what is familiar and what is different from your previous camera. Even cameras from different manufacturers tend to follow similar schemes. Find the labeled diagram with all the buttons and dials. Only a few will be needed to get you started. It all starts with the shutter.
Discover what is familiar and what is different from your previous camera. Even cameras from different manufacturers tend to follow similar schemes. Find the labeled diagram with all the buttons and dials. Only a few will be needed to get you started. It all starts with the shutter.

- Shutter(duh)
- Shooting modes (Aperture & Shutter priority, manual),
- ISO
- Exposure
Adjustment
- Auto Focus
- Image Types
Once you have found the essential controls it is time to start playing. Isolate the individual controls and experiment with them one at a time. Resist the urge to run out and shoot randomly. I know the feeling, but you will get there faster with a systematic approach.
Exposure
Control
 |
| Add caption |
Shooting modes, Aperture and Shutter Priority, Manual, and ISO, all have their effect on exposure, but they also have secondary effects. These include depth of field, motion capture, sharpness, and noise, that are important to understand during the early exploration of your camera’s features
Know the
Secondary Effect
Aperture Priority:
Depth of Field

In aperture priority exposure is determined by the size of the opening. That is simple enough, but you should explore the depth of field with various apertures. DOF is dependent on the size of the aperture, but it is also affected by the size sensor. For any f-stop, the DOF is much greater on the tiny sensor of an iPhone than from the ‘full” size sensor of many DSLRs.

In aperture priority exposure is determined by the size of the opening. That is simple enough, but you should explore the depth of field with various apertures. DOF is dependent on the size of the aperture, but it is also affected by the size sensor. For any f-stop, the DOF is much greater on the tiny sensor of an iPhone than from the ‘full” size sensor of many DSLRs.
Shutter Priority: Shake
 |
| Slow Shutter : Cotton Candy |
ISO: Noise
Modern
cameras have remarkably sensitive sensors that can, with high ISO levels, shoot
in low light situations, but, with increased ISO, noise inevitably becomes aproblem. Again systematic
experimentation is necessary to determine how high the ISO can be pushed before
the noise becomes unacceptable to your eye.
Larger sensors tend to have less noise at high ISOs, but every camera is
different.
 |
| ISO Noise Test |
Automatic Exposure
Schemes
Most camera
have an array of choices for evaluating the amount of light reaching the sensor
and adjusting the exposure in response.
 Different
exposure patterns can be selected, including center weighted, spot or various
evaluative modes. It takes practice to understand how to select between them,
and which works best in different lighting situations. Evaluative might work well for generally even
lighting, while a center weighted mode will be better to deal with the
challenges of strong back-lighting.
Different
exposure patterns can be selected, including center weighted, spot or various
evaluative modes. It takes practice to understand how to select between them,
and which works best in different lighting situations. Evaluative might work well for generally even
lighting, while a center weighted mode will be better to deal with the
challenges of strong back-lighting.
Auto Focus:
 |
| 9 point auto Focus : Canon 5D Mark II |
Sharp focus is an essential part of capturing a great image, but it is not only about seeing clearly. The location and depth of clear focus can direct the eye to the important parts of an image and de-emphasize the effect of distracting elements.
 |
| 63 focus points : canon 5D Mark IV |
 Learn how to
activate and hold auto-focus over the desired part of the image. Most cameras start with the “half press”
shutter approach to achieving focus, but you might eventually consider the
advantages of “back button focus”. This
typically requires a deep dive into the mysteries of your camera’s menus, but
you will find that it can be worth the effort.
Learn how to
activate and hold auto-focus over the desired part of the image. Most cameras start with the “half press”
shutter approach to achieving focus, but you might eventually consider the
advantages of “back button focus”. This
typically requires a deep dive into the mysteries of your camera’s menus, but
you will find that it can be worth the effort.
Image Types
 Images can
be recorded in a few different formats, typically Raw, JPG or both. If possible, RAW is generally the best choice
to capture the most amount of image data for eventual editing, but not all
camera can shoot in RAW.
Images can
be recorded in a few different formats, typically Raw, JPG or both. If possible, RAW is generally the best choice
to capture the most amount of image data for eventual editing, but not all
camera can shoot in RAW.
-----------------------------------------------------------------------------
Practice
That is a
very brief look at the first few pages of your massive manual. It should get you started on an exciting
exploration of the incredible capabilities of a modern digital camera. Don’t be intimidated. To paraphrase a
familiar quote, “ 99% of cameras are smarter than 10% of photographers”.
So just enjoy the journey, and take it page by page.
Jeff Newcomer, NEPG
partridgebrookreflections.com
603-363-8338
Jeff Newcomer, NEPG
partridgebrookreflections.com
603-363-8338
No comments:
Post a Comment