 |
| Old Stone Arch Bridge, Stoddard, NH Hand-Held, ISO 400, 1/15th Second Exposure |
Getting the Jitter Out of Hand-Holding
A couple of weeks ago I was out on a dark overcast afternoon looking for fall foliage scenes and tragically discovered that I had left my tripod in my wife's car. I managed to salvage a few pleasant images of the Old Stone Arch Bridge in Stoddard New Hampshire, but I couldn't get all I wanted out of the nicely flowing water. The situation impressed on me the importance of remembering my damn tripod but also of the value of good hand-held photographic technique. In my misspent youth, I had pride in my ability to steadily hand-hold my camera for exposures as long as 1/10th of a second without loosing sharpness. With advancing age and perhaps a heightened standard of sharpness, I realize that such feats are no longer possible. Thankfully the introduction of image stabilization and the practical availability of high ISO has kept hand-held low light photography literally within my grasp, but, even with these aids, it is important to reinforce the value of proper shooting technique to achieve the sharpest results.
 |
| Boston Skyline, Hand-Held |
stability such as trees and railings and the application of high ISO to allow shorter exposures. Regardless of the lighting conditions, however, adherence to a few simple rules can enhance the steadiness of your "photographic platform" and improve the sharpness of all of your images. It takes practice, but with persistence, good technique can become automatic, playing in your head like a photographic mantra before each shot.
Stance
 |
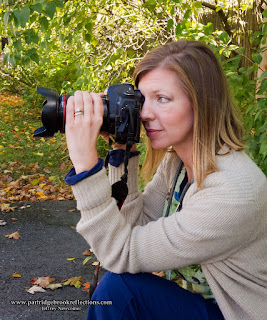
| Stable Katie |
Camera Hold
 I hold the camera with one hand on the shutter and the other cradling the lens. This becomes increasingly important with longer and heavier lens' which awkwardly shift the center of balance. I pull my arms in, pressing my elbows against my chest, to provide extra points of stability and just before pressing the shutter I draw the camera firmly against my face. Two elbows and one face provide my own corporeal tripod. I release my breath and hold it for the shutter release.
Shutter Release
No matter how stable my shooting platform, the act of pressing the
 |
| Susan's Lovely Finger Roll Technique |
awkward at first, but with practice, it can make a significant difference. I start by placing my index finger firmly just in front of, and barely touching, the button (see the illustration). Then, while maintaining the pressure, I roll my finger over the shutter. Give it a try. The result is a much smoother release, without the jolt of a downward stab. A couple of other tricks can help reduce the
 |
| 2 Second Delay |
This is my approach to steady camera technique. I would be
 | ||||||||||||
| North Branch River, Stoddard, NH ISO 400, 1/5 Second, f18, Leaning on the Bridge |
Of course, alternatively, I could have simply remembered to bring the damn tripod!
Don't forget to check out my new Blog Index
Jeffrey Newcomer
partridgebrookreflections.com

Digital photography is no longer a new thing. Digital photography has flourished of late and for good reason. Gone are the days when taking your holiday snaps required buying a film, taking pictures in the hope that at least half would develop and then tripping down top the processor after your holiday or sightseeing.
ReplyDeleteGreat Ideas, Jeff. Another option is if you go into the custom functions on the Canon Camera, they ususally will have a function that is called mirror lock up. What This does you press the shutter once which flips up the mirror but does take the shot, then steady yourself, assume the correct stance and take the shot again. This function has saved many of my low light handheld shots.
ReplyDeleteGreat suggestion Mark. I frequently use mirror lock up when I have the scene fixed with a tripod. I find it unsettling to suddenly loose sight of the subject just before I hit the shutter, but live view accomplishes the same mirror lock with the ability to keep your eye on the scene.
DeleteThanks for bring this out.
very good post and some nice photo works. Low light photography is fun and creative but you have to follow some rules to get it perfect. I also have some useful tips.
ReplyDeleteTips for Low Light Photography
Hope this will help you a lot.