

This week I would like to share a short bit of Photoshop technique that I use to cope with a problem in the sky when using polarizing filters on broad landscapes. Hopefully this will be a quick one since I'm still working my way through the images from the Fields of Lupine Festival last weekend in Sugar Hill New Hampshire. The Festival was a lot of fun and provided one of the best chances I have experienced to find so many spectacular photographic opportunities in such a short period of time and in such a small area. While working through the images, however, I face a number of situations in which the polarized sky effect became a problem.
I love using polarizing filters. Depending on the direction of the light they can work wonders on the depth and brilliance of colors in my landscapes. On sunny days they block the light reflections that often dull the color of flowers and foliage. Many photographs also use a polarizer to darken blue sky and this is were we can get into trouble. The effect of a polarizing filter is directly related to the direction of the sun, being at its maximum when the light is coming from 90 degrees to the side. 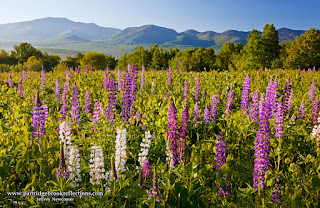 There is almost no effect when the light is coming from directly behind or into the camera. As we have all seen, when photographing a wide panorama the angle of the light varies across the scene and the polarizing effect varies as well. In the original of this panoramic view of Franconia Notch the sky varied from deep blue on the right to a pale blue-gray on the left. I'm getting better at anticipating this problem and will often limit it by dialing back on the polarizer, but in this situation I wanted to get the full polarizing effect to bring out the varied colors of the Lupines. This called for a solution in post.
Correcting this problem is really not difficult in Photoshop and similar approaches may work in other photo editing programs. The Goal here is to provide progressive, selective darkening to the left side of the sky without affecting the rest of the image. As is always true in Photoshop, there are a number of ways to achieve this. I prefer to make a curves adjustment to the sky and then drop the curve layer into a group onto which I can add a gradient mask to apply the adjustment in a gradual way across the image. Simple huh! ... Ok here are the steps. There is almost no effect when the light is coming from directly behind or into the camera. As we have all seen, when photographing a wide panorama the angle of the light varies across the scene and the polarizing effect varies as well. In the original of this panoramic view of Franconia Notch the sky varied from deep blue on the right to a pale blue-gray on the left. I'm getting better at anticipating this problem and will often limit it by dialing back on the polarizer, but in this situation I wanted to get the full polarizing effect to bring out the varied colors of the Lupines. This called for a solution in post.
 First I do a careful selection of the sky. This is by far the most time-consuming part of the procedure, although newer versions of photoshop have some magical tools that make this job MUCH easier. That could be the subject of a whole series of blogs
 |
| Sky Selection |

Next I usually open a curves adjustment layer with the sky mask applied. If you open the adjustment layer with the selection active, the mask is created automatically. Then, looking at the lighter side, I darken the sky to match what the darker side had been. I don't worry that the dark side gets even darker at the same time. I will fix that next. It's also not important to get the curve adjustment perfect since it can be fine-tuned later.
I then open a layer Group (red dot) and move my Curves Layer into the Group.
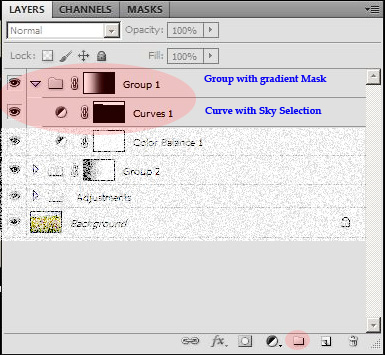
There are other approaches to essentially double mask an image or adjustment layer. It is possible to intersect two different masks on a single layer, but I prefer the control that this technique affords, allowing the independent adjustment of both the sky selection and the gradient mask.
 |
| Final Image: Franconia Notch Fields of Lupine Festival 2011 |
I apologize if these steps seem too technical. Photoshop's learning curve is infinite, but, come back the next time you are faced with this problem. It all may make more sense. The greatest enjoyment comes from playing around until you find your own solution. In the end you will be able to use your polarizer in a more controlled and powerful way.
No comments:
Post a Comment