|
| Wilton Reservoir Falls |
In recent years the speed and accuracy of the auto-focus in
 digital cameras has greatly improved. I still use manual focus for precise adjustments especially on stationary subjects (love those trees !), but considering my dimming elderly vision, I depend more and more on auto-focus, especially when shooting on the fly. I have previously discussed techniques for getting the most from your camera's auto-focus capabilities, but every camera uses a different array of sensors and different controls. The only way to develop a smooth and reliable technique is to read your manual and then practice, practice, practice.
 Half Press
 As different as various cameras can be, they nearly all share the same default procedure for initiating auto-focus, the half press. Using whatever focus spot that has been selected, The shutter is pressed half way down to trigger focusing. As long as the shutter button remains pressed the focus point will be maintained until the button is pushed all the way to trigger the exposure. Once focus is locked, the scene can recomposed without changing the focus point. It is an efficient approach and one I used for many years. That is until I discovered "Back Button Auto-Focus".
Iguanas and Back-Button Focus
 On a trip to the Galapagos Islands in 2010, I was discussing with a National Geographic Photographer, my frustration with the use of "half press" auto-focus. I was annoyed with the requirement to re-focus every time I pressed the shutter. That small delay was often long enough to miss the shot especially when I was trying to capture the remarkable wildlife in motion in this unique location. He suggested that I try back button auto-focusing to separate the shutter release from the auto-focus. If I got nothing else from Galapagos trip, and of course I got infinitely more, it would have been worth it to learn this great technique. I will never go back to half-press. The trick was to discover how to reset my camera.
The Quest
 Many modern cameras allow a change in the auto-focus button. As is true for many, my Canon 5D Mark II hides the adjustment deep in several layers of menus and the terminology can be confusing, but it is worth finding it. This what your manual was written for. I had to descend to Custom Function IV and then to "Shutter button / AF-On button" and then to #3 "AE lock / Metering + AF Start" to move my auto-focus to the AE Lock button on the back of the camera. As I said each camera may have a different path to this control, but if you have problems interpreting your manual, you can go perform a Google to find a video showing the steps for almost every camera.
  |
| Michael Moore, Chesterfield Gorge, Chesterfield, NH |
Here are the steps required on just a few Canon Cameras:
- EOS Rebel T3: C.Fn 7 (option 1 or 3)
- EOS Rebel T3i: C.Fn 9 (option 1 or 3)
- EOS 50D: C.Fn IV-1 (option 2 or 3)
- EOS 60D: C.Fn IV-1 (option 1, 2, 3, or 4)
- EOS 7D: C.Fn IV-1 (Custom Controls — Shutter, AF-ON, AEL buttons)
- EOS 5D Mark II: C.Fn IV-1 (option 2 or 3)
- EOS-1Ds Mark III: C.Fn IV-1 (option 2 or 3)
- EOS-1D Mark IV: C.Fn IV-1 (option 2 or 3)
Back Button Technique
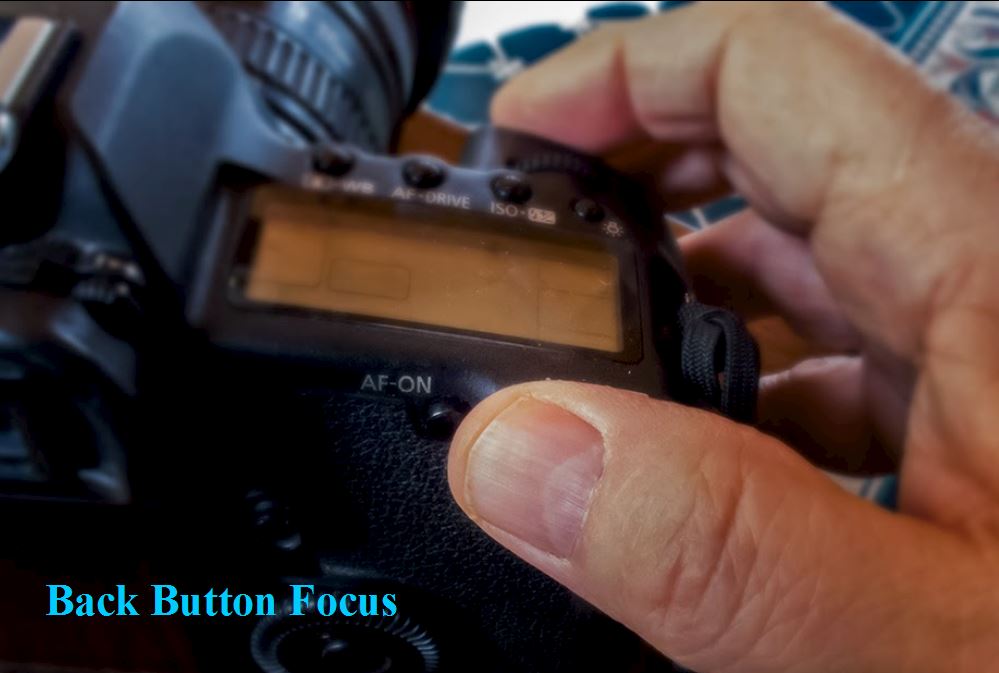 To use back Button focusing, I hold the camera with my index finger on the shutter and my thumb over the AE Button (*) to independently control focus. It took a little practice, but now I work the separate controls without any pause or confusion. I can set the focus at any time and it remains fixed until I press again, no matter how often I reframe or how many times I hit the shutter. And I don't have to wait to refocus for every shot. When using follow focus ("AI Servo on my Canon), I just press and hold the AE Lock button to continuously hold focus on my target.
 So why would you want to use back button focusing? Half press works well in many situations, but there are a number of important advantages to making the switch.
- Easier Timing

Dancing Lady
As I mentioned, with back button AF it is easier to catch the critical moment, not having to delay the shot while waiting for the half press auto-focus to jump into place. Alternatively you could hold the shutter half pressed as you wait for the "moment", but this gets tiring very quickly and focus must be re-acquired after each shot. - Easier to Lock the focus.

Oscar at Johnny D's
The classic example is when you are shooting multiple images of a subject in the foreground but want to recompose with the subject to the side, away from the central focus spot. With the half-press, you must re-focus and re-compose between each shot, but with the back button technique you can fix the focus and then shoot as many shots as you want. - Easier to Manually Adjust Focus

On cameras that allow full time manual focus, back button AF permits you to touch-up focus manually without the focus resetting as soon as the shutter is pressed. On my camera I can manually adjust exposure in the Half-Press mode but only if I keep the shutter button pressed and as soon as I try to take a second shoot, the focus pops out of the manually set position. - Easier Macro Focus
 With Macro photography I find that it is often easier to use the back button to fix my focus close to the subject and then move subtly back and worth to bring the target into sharp focus. With half press AF the camera fights this technique by trying to re-focusing on every shot.
 - Momentary Distractions
When shooting action using follow focus, the focus will not be thrown off if something momentarily moves across the frame, with half press you must stop and refocus, but with back button you can momentarily remove your finger from the button while keeping the focus at its last setting.


 |
| Abby to the Finish, Keene NH |
 These are just a few of my favorite advantages to back button AF. I have yet to meet a photographer who, once trying it, has ever gone back to the half press technique as their primary mode of triggering auto-focus. It may take some effort to find how to make the switch, and not all cameras have the option, but once you get used to the procedure you will surprised how it will enhance the power of your camera's auto-focus.
Jeffrey Newcomer
Partridgebrookreflections.com