About Me

My photo
Spofford, New Hampshire, United States
Jeff Newcomer had been a physician practicing in New Hampshire and Vermont for over 30 years. Over that time, as a member of the Conservation Commission in his home of Chesterfield New Hampshire, he has used his photography to promote the protection and appreciation of the town's wild lands. In recent years he has been transitioning his focus from medicine to photography, writing and teaching. Jeff enjoys photographing throughout New England, but has concentrated on the Monadnock Region and southern Vermont and has had a long term artistic relationship with Mount Monadnock. He is a featured artist in a number of local galleries and his work is often seen in regional print, web publications and in business installations throughout the country. For years Jeff has published a calendar celebrating the beauty of The New England country-side in all seasons. All of the proceeds from his New England Reflections Calendar have gone to support the Pulmonary Rehabilitation Program at the Cheshire Medical Center. Jeff has a strong commitment to sharing his excitement about the special beauty of our region and publishes a blog about photography in New England.
Showing posts with label ISO. Show all posts

Sunday, November 23, 2014

Exposure - The Basics Part II


Everything in Balance

In my first exposure article I discussed how aperture, shutter speed and light sensitivity of the sensor work individually to affect 
proper exposure, but I 

Exposure Control with the Histogram
never explored what proper exposure actually is or how it is evaluated.  A simple definition might be that proper exposure is achieved when the recorded image matches the appearance of the original scene in brightness and tonal range. Simple enough, but no photographic media can fully reach this goal.  Pictures are always a compromise, but with the tools available in modern digital cameras, there is no longer any excuse for poor exposure. The challenge comes from the choices you make to get there.  

In previous articles I've talked about the use of the histogram to monitor  and  adjust exposure.  There is an infinite number of ways in which the three factors controlling exposure can be balanced to achieve an acceptable result, and although all can  appear the same on the histogram, the real challenge is to find the best balance among the secondary effects of these adjustments, so that the depth of field, motion control and image noise all conspire to achieve your vision.  This week I will suggest one, step by step,  approach to the balance of exposure control.


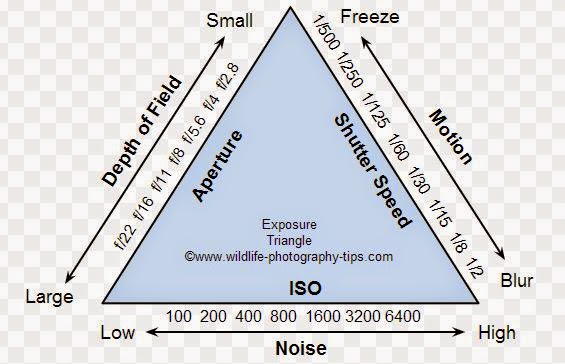
To briefly review from Part I, the camera controls of exposure include two which govern the amount of light and one which controls the sensor's sensitivity to the light which falls upon it. As the exposure triangle showed, each adjustment has a secondary effect that must be consider as the 3 factors are balanced.


Amount of Light:
1) Aperture: Effects Depth of Field
2) Shutter Speed:
Effects the Ability to Stop Motion

Sensor Sensitivity
3) ISO: Increased Sensitivity Increases Image Noise

Taken Individually, the effects of these basic controls are easy to understand, but the challenge and the real art of photography comes from how these adjustments are balanced in different situations of light, composition, action and the purpose of the image.


A Matter of Priorities
 Ok, you are standing in front of the perfect vista. A glance at the Exposure Triangle would suggest that proper exposure is achieved through the simultaneous consideration of the effects of all three factors, aperture, shutter speed and ISO, but it can be unnecessarily complicated and confusing to try to balance the three components of exposure at the same time. Happily, most photographic situations inherently dictate which of these factors is most important and the resulting prioritization can provide a more reasonable step-wise approach to finding the best compromise among the factors contributing to exposure. The first step is to decide whether the control of aperture or shutter speed is the most important for the specific photographic situation.

This is usually referred to a Aperture or Shutter "Priority".  Happily most cameras provide modes that allow you to lock in your priority.

"Priority" Settings

Aperture & Shutter Priority
http://www.101-learn-dslr-photography-basics.com/
Most cameras have settings for aperture or shutter priority. In "Aperture Priority" the aperture is fixed and adjustments in exposure compensation affect only the shutter speed. In "Shutter Priority" it is the shutter speed which is fixed. Of course these same adjustments can be done in Manual mode, but in manual, the exposure does not automatically change when the meter detects a change in light. The Manual setting is great when you are learning about the functions on your camera, but many photographers shoot on Aperture or Shutter priority based on the requirements of the subject. On Canon cameras Aperture Priority is marked as "Av" and Shutter Priority "Tv" on Nikons it is "A" and "S".  
------------------------------------------------------------------------------

Baby Steps: A Systematic Approach
Ok, we start by considering the effects that changes in the aperture and shutter have on the final image, then step one is to study the scene and :


  • 1) Decide whether aperture or shutter speed is most important to control for the desired effect.


Aperture Priority and Depth of Field

 
Broad Depth of Field
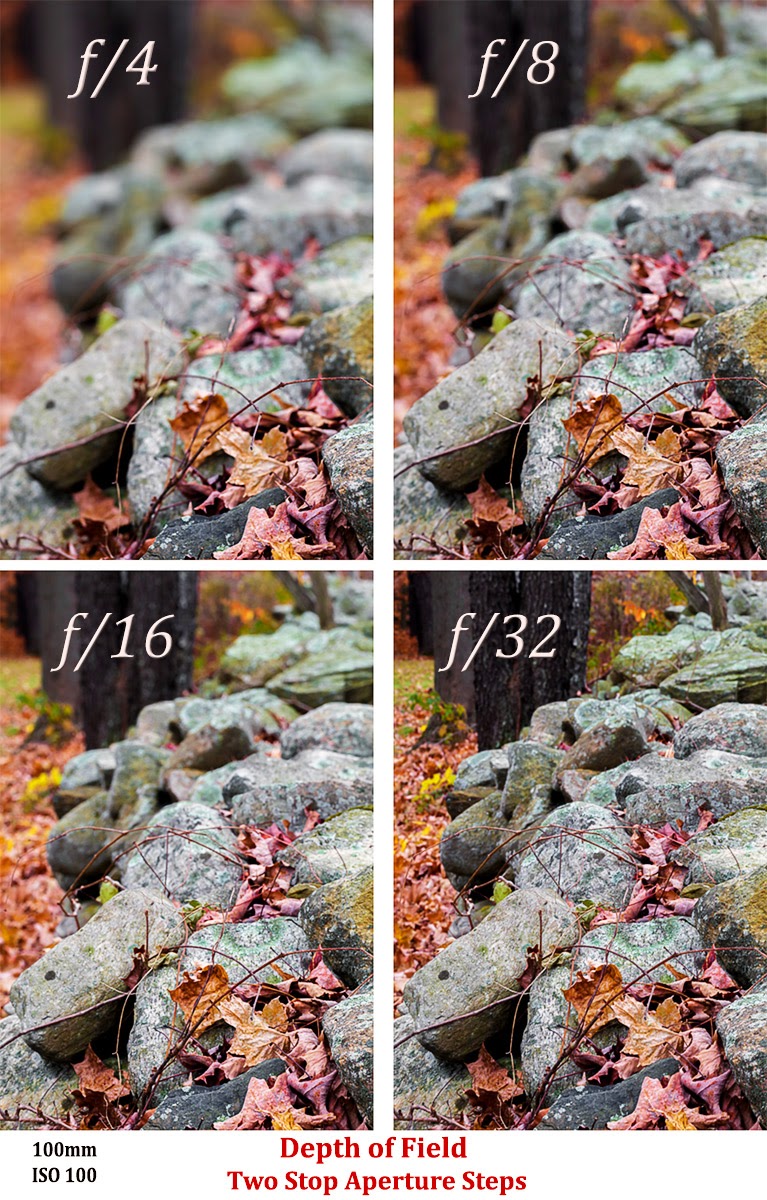
As I discussed in my first article on exposure, the camera aperture affects exposure based on the size of the opening allowing light to strike the sensor. I went into an involved discussion of why increasing aperture numbers (f/stops) resulted in smaller openings and less light. Happily, the aperture's secondary effect on depth of field follows a more intuitive progression with larger numbers resulting in larger bands of sharp focus. Small apertures with high f/stops, such as f/ 22 or f/32, lead to broad depth of field which is often preferred in landscape photography where sharp focus from
foreground to infinity is needed. With wide apertures, such as f/2 or
Shallow Depth of Field
f/4, the narrow depth of field can help to isolate and draw attention to a subject, de-emphasizing distracting elements in the foreground and/or background. Traditionally, narrow depth works well in portrait photography where the attention is usually centered on the eyes, but it can also be effective in many other situation to mute distractions such as in macro or wildlife photography. 


In these situations, control of the depth of field may be the most important factor and therefore the "priority". You can set your desired aperture in "aperture priority" mode and then achieve optimal exposure with changes in the shutter speed.  As predominately a landscape photographer I stay in aperture priority for about 90% of the time.


Stopping the Jump


Shutter Priority and Motion


Shutter speed controls exposure by governing the length of time that the sensor is exposed to the light and the shutter's secondary effect is on the ability to freeze motion. When capturing athletic events, running animals or birds in flight a fast shutter speed can keep the subject from becoming blurred, and in these situations the shutter speed adjustment may be the primary priority with the aperture allowed to drift to maintain the overall exposure. On occasions a
Slow Shutter
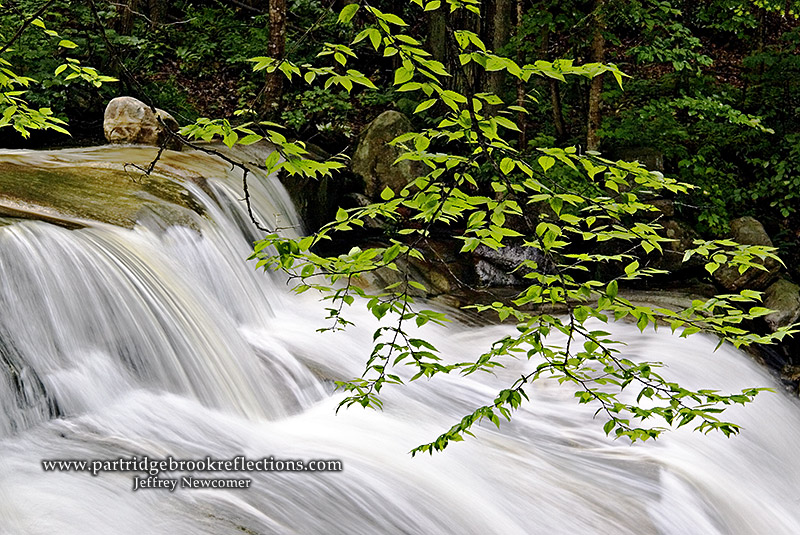
slow shutter speed might be preferred, such as when capturing a soft image of flowing water or when a blurring of motion can be used to imply movement. In many of these situations the specific depth of field may not be critical and setting the camera on Shutter Priority would be the best first step.


Considering the Side Effects
As we've seen
, for any ISO, the Aperture and Shutter Speed settings are locked together to generate the exposure. Once aperture is fixed there is only one shutter speed which will result in proper exposure and the same fixed relationship is true when shutter speed is set as the fixed priority. In other words, once the priority setting is fixed the other  "secondary" factor, whether aperture or shutter is strictly dependent. So step two is :

  • 2) Whether it is Aperture or Shutter that is the "Non-Priority" or dependent setting, you must decide whether the effect of that setting on the image is acceptable.


Deep Depth of Field
Consider an example that I frequently experience. I'm shooting a grand landscape and I want to get the maximum possible depth of field to record both the foreground flowers and the distant
mountains in sharp detail. I set my camera to aperture priority and stop down to a small fixed aperture of f/22.  Great, everything from foreground to background looks sharp, but when I take the picture I find that the shutter speed that was required to maintain the desired exposure for that small fixed aperture had drifted to 1/4 second and, what seemed like a gentle breeze, had been enough to smear my beautiful flowers into a messy abstract blur. I could wait for a, usually nonexistent, lull in the wind or I could consider focus stacking (beyond the scope of our current discussion), but it is at this point that an ISO adjustment could save the day.

  • 3) Apply the ISO Fudge Factor if Needed

As in my example, it often happens that the optimal adjustment of your priority setting leads to unacceptable side effects from the resulting secondary or dependent factor. In my landscape scenario I might be able to get by with a wider aperture, perhaps f/16 or f/18, which would allow a faster shutter, but these "compromises" too often yield unsatisfactory results in both DOF and shutter. A change in ISO is often a better solution. Adjustments in sensor sensitivity or "ISO" shift rather than break the aperture/shutter connection. In my example an increase of ISO from 100 to 800 (3 stops) will allow an increase of shutter speed to 1/30th of a second which may be fast enough to freeze the flowers without affecting my exposure, aperture or depth of field.


Adjustments in ISO is the new third control on exposure which digital photography has made practical. ISO has no effect on the
amount of light hitting the sensor, but by managing the chip's sensitivity it can make possible a selection of aperture and shutter that does not force a compromise in either depth of field or control of motion. Of course the magic of ISO Adjustment is balanced by the effect of increasing ISO on the amount of digital noise in the image. As I discussed in Part One, digital noise can be muted in post processing, but in the end it must be balanced against all the factors that contribute to the quality of the final image.


Consider one more example. Assume you are set up to capture a

Pick-Off
baseball player streaking down the line to beat out a base hit. You set a fast shutter speed of 1/1000th of a second, in shutter priority, to freeze the motion. Your ISO is set to 100 and the resulting f/stop is at f/4. This wide aperture and resultant narrow DOF works well to isolate the runner against the blurred grandstands. A great choice, but if you want to see the faces of the screaming fans in the background you could increase the ISO to 1600 causing the f/stop to shift 4 stops to f/16. Both the runner and the fans would then be in dramatically sharp focus. The only question would be whether the increased image noise at ISO 1600 is acceptable.

I would love to show you an picture to fully illustrate this scenario, but, give me a break!, I'm a landscape photographer. Use your imagination! The best thing I could do was to show Youk (Kevin Youkilis, for non-Red Sox or, ick, Yankee fans) diving for first.

Light Modification


There are many schemes and techniques which work to control exposure by modifying the light.  Natural changes in light happen all the time, just wait for the sun to come out from behind that cloud, move from bright sunlight to the shadow of a tree or just come back when the light is better.  Natural light can also be modified with  filters, diffusers or reflectors and artificial light can be added with flash. These can all be effective, but the basic relationships between aperture, shutter and sensor sensitivity are always there and a system for balancing these fundamental adjustments makes achieving the perfect exposure much easier and sensible.


So to summarize this approach:

No triangle, but maybe a flow a diagram will help

1) Decide whether aperture or shutter speed is most important 
to control for the desired visual effect. It is usually easiest to use the Aperture or Shutter Priority setting on your camera to fix your desired priority.

2) Whether it is Aperture or Shutter that is the "Non-Priority" or dependent setting, your next step is to decide whether the effect of that setting on the image is acceptable.

3) If the resulting depth of field or motion effect is not what you want, it is time to consider applying the ISO Fudge Factor to shift the Aperture/Shutter relationship into a range that controls all of the important issues. Hopefully without an unacceptable level of noise in the image.


Simple !?

There are many other systemic approaches to achieving perfect exposure. The important thing is to pick one and start using it regularly. Happily
with digital photography we get immediate feedback on the LCD screen, making the learning much easier. I hope that you will, quite quickly, find that the considerations, that I have so painfully presented, will become second nature.  Your camera will feel comfortable in your hands, like a familiar hammer. So go out and pound some nails.


Other Articles About Exposure


Jeffrey Newcomer
Partridgebrookreflections.com


Sunday, November 9, 2014

Exposure, the Basics & More


Shallow Depth : f/2.8
 One of the fundamental topics, key to the understanding of photography, is the  interaction of the factors which affect exposure. It is a short list, aperture, shutter speed and ISO, but it is in how these adjustments combine to control exposure and the effect that each has on the qualities of the image that is frequently the source of much confusion.

Easy for You to Say
Simply stated aperture and shutter speed control the amount of light that reaches the sensor and ISO controls the level of sensitivity of the sensor to the light falling upon it. In this article I want to discuss the nature of each of these adjustments, how they affect exposure and their impact on other aspects of the final image. In a future article I will suggest my approach to finding the optimal balance of these adjustments based on the special requirements of each photographic situation.

The relationship between aperture, shutter speed and ISO is often illustrated with the "exposure triangle". I have never felt that a triangle works geometrically to illustrate the interaction between these factors, but it does provide a structure to present the impact of each of these adjustments. So if you need a triangle, here you go:


Exposure Triangle : wildlife-photography-tips.com


Now lets talk.

Finding the perfect Exposure

 
Aperture


Deep DOF, f/22, 1/15", ISO 100


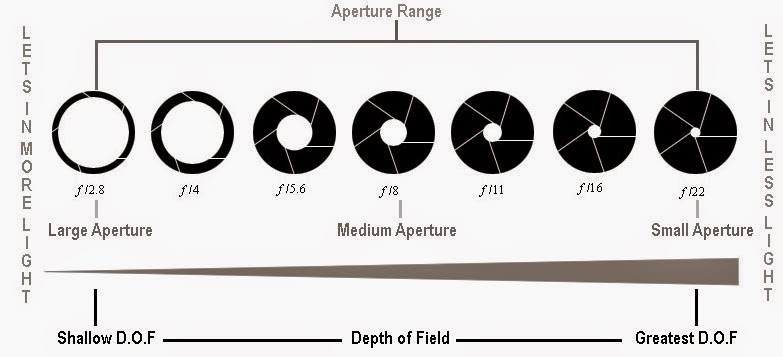
The aperture is the size of the opening through which light the passes to the sensor. The larger the opening, the more light gets through to expose the sensor and the brighter will be the image. Simple, but a stumbling block to understanding aperture has always been the apparently random and counter intuitive "f" numbers or "f stops" used to measure the size of the opening. The problem is two fold. First the numbers do not seem to follow any recognizable pattern and secondly, as the numbers increase in size the aperture opening actually gets smaller.


The standard progression of f stops, is:
1, 1.4, 2, 2.8, 4, 5.6, 8, 11, 16, 22, 32 .......


Although it is rare to find a lens that can go this wide, F/1 would be the widest aperture in this sequence, letting the most amount of light to the sensor, and f/32 would be smallest. Each step increase in the f/stop is calculated to represent a halving of the size of the aperture and therefore a halving of the amount of light hitting the sensor.  These steps are referred to as "stops".  Of course there are f numbers which represent changes of  fractions of a stop, but for our discussion it is easier to focus on the one stop increments.  Great, but how does it make sense that f/5.6 admits twice the amount of light as f/8.? 


Shut Up.  It Just does! It's a Mystery!


Abby  f/3.5, Shallow DOF for Portraiture
At this point you have a choice. You can decide to happily agree to accept these numbers, not worry about where they come from, and go on to a joyful and worry-free exploration of the wonders of photography, or the annoying trouble-makers among you can insist on a needless dive into the source of the f/stops. I warn you. It involves math, but with a little effort it actually does make sense. The prudent will blissfully continue on to the discussion of the effects of changing aperture, but if you want to dive into the numbers, you can find my explanation neatly hidden at the bottom of this article. You have been warned!


Back to the Mystical f/stop
The aperture setting or f/stop controls the intensity of the light
hitting the sensor by regulating the size of the aperture. As the f/stop gets smaller more light is admitted and we can shoot in darker locales, but nothing comes free in photography. As the aperture widens the depth of field is reduced. Depth of field (DOF) is the distance between the closet and farthest points that are in sharp focus  and that range is much larger at f/32 than at f/4. Varying the  DOF can be used in creative ways. Sharp focus from foreground to infinity is often preferred in landscape photography, but a narrow DOF, with a soft background can work well with portraits. When shooting in low light it can be difficult to use an aperture which is small enough to get the desired deep depth of field and that is when compensation with longer shutter speeds can be important.


So Aperture's primary effect is on exposure and its secondary effect is on the depth of field.


Shutter Speed

Catsbane Falls:
0.5 seconds, f/20, ISO 100


Shutter speed is the second of the two adjustments that control the amount of light hitting the sensor. After our struggle with the seemingly nonsensical number of f/stops, it is a pleasure to discuss shutter speed. No complicated math, but here again the standard intervals represent steps which double or halve the amount of light and therefore match or offset the effects of changes in the aperture. Of course, as with aperture adjustments we aren't restricted to full stop intervals, but for simplicity it is helpful to know that the standard, one stop, steps of shutter speed are:


... 2", 1", 1/2", 1/4", 1/8", 1/15", 1/30", 1/60", 1/125", 1/250", 1/500", 1/1000" ...


If you ventured to my f/stop explanation below you will be happy to note that there are no Pi or Squares, just straight ahead, good old non-metric, American doublings! With each doubling of the shutter time the exposure doubles. Now we can see how the aperture and shutter speed are locked together but can be shifted to produce a balance that can work the best for the perfect exposure in most photographic situations. Perhaps an example will help.

Example:
Assume that a scene is properly exposed with a relatively wide aperture of f/4 and a shutter speed of 1/125".  The wide aperture would lead to a shallow depth of field, but I could expand the depth of field by increasing the f/stop to f/16.  Since I would be reducing the light by 4 stops the image would be quite dark unless I offset this change by increasing the shutter duration by the same 4 stops to 1/8". The result would be the same exposure but a much wider depth of field.


But There is a Problem

Red Tail: 1/800th Second, f/9, ISO 400
Slower shutter speeds can allow for smaller apertures and wider DOF, but this is where shutter speed's secondary effect becomes important. Subjects that are in motion can become blurred with the longer shutter times. At 1/8" running animals or blowing leaves may not be sharply captured. On the other hand, fast shutter speeds are great for stopping action in sports or wildlife photography, but can require wider apertures resulting in a shallow depth of field. Nothing comes free in photography and that's where the compromises come into play.

Sprint : 1/13th Second, f/5.6, ISO 100


So Shutter Speed's primary effect is on exposure, but its secondary effect is on the ability to freeze motion.


ISO

A Bit of History / OK, I'm Old
With film photography, aperture and shutter speed were usually the only two adjustments available to balance exposure. For any amount of light, a specific aperture had only one shutter speed to which it was irrevocably linked to achieve proper exposure. Using
film with a different sensitivity to light (ASA) could shift that link, but It was extremely awkward, to switch film.  I did it a few times. I had to carefully roll the film back into the canister trying to stop before the leader got disastrously sucked into the can. When it was time to put the original film back in the camera I had to remember how many pictures had been exposed and, to avoid double exposures, advance the roll beyond that point, wasting a few pictures in the process. It was a colossal pain, and was never a practical way to add media light sensitivity as a third adjustment for the control of exposure.

 
With digital photography that has all changed. Now sensor light sensitivity can be changed from shot to shot with the press of a button or the twist of a dial. On digital sensors, the light sensitivity is described by a scale established by the "International Standardization Organization", located in Geneva Switzerland,  hence "ISO Numbers".  Fortunately, ISO settings, like shutter speed, follow simple doublings to adjust exposure by one stop increments and higher numbers reflect greater sensitivity. God bless the Swiss!  A typical IS0 range, in one stop increments, might be :

... 50, 100, 200, 400, 800, 1600, 3200, 6400 ....
Many newer cameras go well beyond this range

Example
In the same example from above, Suppose I require a shutter speed of 1/8 " to get my desired DOF with f/16 at an ISO of 100. I left my tripod at home and my shaky old hands could never hold the camera still for the 1/8" exposure, but now I can break the chains connecting the aperture to a specific shutter speed and use what I like to call the ISO Fudge Factor. By increasing the ISO by three stops to 800, I can shift the aperture/shutter relationship to a more manageable speed of 1/60" while keeping the f stop and its resultant deep depth of field unchanged.


ISO Noise Test
As with both aperture and shutter speed, increase in ISO has its own disadvantage or secondary effect. With increasing ISO the trade-off comes from increased noise in the image. Newer cameras are getting better in terms of their image quality at higher ISO's and noise reduction protocols in post processing programs such as Lightroom and Photoshop do an amazing job, but image noise still has to be considered as we balance all the factors that contribute to perfect exposure. In a previous blog I discussed doing a test to see how your camera handles higher ISO noise. In the end your own acceptable maximum ISO will depend on the intended use of the image and your own taste. 
Digital Noise increases with increased ISO


Juggling Three Balls
That is really all there is to exposure control. Three adjustments, two which control the amount of light and one which controls the sensitivity of the sensor. As the exposure triangle shows each adjustment has a secondary effect that must be consider as the 3 factors are balanced.


Amount of Light:

1) Aperture : Affects Depth of Field
2) Shutter Speed: Affects the Ability to Stop Motion

Sensor Sensitivity
3) ISO : Increased Sensitivity Increases Image Noise

Simple, especially if you don't wander any further into the abyss below, but how do you decide what is the best balance of these controls for any particular photographic situation. It all depends on the light, the intended composition and the eventual use of image. There is no single right answer, but I will save that discussion for another article. A hint? It doesn't involve a triangle. 


--------------------------------------------------- 
The Source and Sense of F/stop Numbers :
 
"Here There Be Dragons"


Here Goes,
If I have this wrong, keep it to yourself!

F number Ratio
The "f" in the term "f stop" comes from the fact that the number is a unit-less ratio (or fraction) where the

F number = Focal Length of the lens (mm) / Diameter of the Aperture (mm).

Rearranging the equation:
Diameter of the Aperture = focal length / f number

So a 50mm lens set at f/2 will have an aperture opening of 50/2 = 25mm, and
the aperture of a 100mm lens will be 50mm.


The key point is that, at any f/stop, the size of the opening is not the same on different lens, but varies based on the focal length.


Why Are Different Aperture Sizes Necessary
Longer lens' collect less light at any fixed aperture size and therefore they require larger openings than in shorter lens' to bring the same amount of light to the sensor. The f number ratio allows a particular f stop to provide the same amount of light to the sensor regardless of the focal length of the lens. At f/5.6 the camera sensor sees the same amount of light through a 400mm telephoto lens as it does through a 16mm wide angle, simply because the aperture on the 400mm lens is 25x larger than on the 16mm. This explains why fast telephoto lens' are so gigantic and expensive. The aperture of a f/2 400mm lens would have to be 200mm in diameter (400/2) and this requires much larger, heavier and expensive glass. As I discussed above, the large apertures on telephoto lens' also result in a shallower depth of field for any f/stop than at the same setting on a shorter lens.


Ok, so that explains where the f numbers come from and why they get larger as the openings get smaller.  The f number is inversely related to the aperture size and therefore to the amount of light striking the sensor.  As the standard f/stop numbers increase they reflect progressive halvings of the amount of light admitted to the sensor. Each time the exposure is doubled or halved we refer to the change as representing a one stop difference, but why these numbers?


1, 1.4, 2, 2.8, 4, 5.6, 8, 11, 16, 22, 32 .......


The simple Answer:  They Work
If we consider a 100mm lens, at f/2 the aperture will be 50mm in diameter (25mm radius). The amount of light passing through the aperture is related to the area of the opening and high school geometry tells us that:


So, for our 100mm Lens
At f/2 the radius = 25mm
3.1416 x (25) ^2 =1963 mm^2

At the next stop smaller, f/2.8 : the radius = 17.86mm
3.1416 x (17.786)^2 = 1002mm^2

The aperture at f/2.8 is effectively half of that at f/2
It works!

Empiricism not enough for you? 

 
Give me a break ! This is photography, not higher math ! But if you must .....

Ok , what follows is mostly for me since I know, if I don't write it down, I will have no clue about the explanation tomorrow. The next time some dweeb asks me, it will be much easier to say, "Go read the blog". This is how I can understand it.  First remember that each stop represents a halving of the light on the sensor.  You MUST have that by now!


The Power of the Square
 Going back to the f/stop ratio :

Diameter = focal length / f number

It can be seen that doubling the f number will halve the diameter and therefore also halve the radius. Since the aperture area is  proportional to the radius squared, each doubling of the f number will actually reduce the aperture area by one quarter or two full stops.

If we go back to the f/stop numbers they no longer appear random, and it all comes back to simple doublings.

 1, 1.4, 2, 2.8, 4, 5.6, 8, 11, 16, 22, 32 .......

Starting with f/1, doubling to f/2 will drop the exposure by two stops. Then by successive doublings we drop by two stops for each step through f/4, f/8, f/16, and f/32. Great, but What about the single stops between the numbers in this f/1 sequence?

We can calculate that f/1.4 results in an aperture one half the size of that at f/1, and twice the area of f/2. That is f/1.4 is one stop smaller than f/1. Now all we need to do is follow the same doubling procedure to generate the f numbers that fill the single stop gaps between the numbers in the f/1 sequence.
 The f/1.4 sequence is : f/1.4, f/2.8, f/5.6, f/11(close enough), f/22 .....

By alternately doubling the numbers starting from f/1 and f/1.4 we get those previously mysterious numbers which are etched on your lens.

1, 1.4, 2, 2.8, 4, 5.6, 8, 11, 16, 22, 32 .......

There you go. There are more complex formulas to describe these numbers, but this works for me and I'm more than ready to get back to actual photography.

---------------------------------------------------

West River, Jamaica, Vermont


Jeffrey Newcomer
Partridgebrookreflections.com


Sunday, June 17, 2012

Freezing the Foliage : ISO Stacking


Getting ISO Right in the Digital Camera II


I know that I’m in trouble when I insist at the beginning of a blog that “This will be a short one”. It usually means that it will go on for pages, but this time, I am committed. I have a talk to prepare for the Worcester Camera Club and I have much more to do. I could always dust off one of my old talks, but my plan has been to do a new presentation covering a lot of the “Getting It Right in the Digital Camera” articles that I have been publishing of late. So, HONESTLY, this will be a brief extension of my recent “ISO Control” article. 


ISO 100 Moving Foliage
Two week ago I discussed the use of the expanded ISO range in many of our newer digital cameras and the benefits of being able to control ISO with the turn of a dial. The capability to adjust ISO as shooting situations change has provided an important new control over exposure. I have talked previously about the benefits of bracketing photos including both exposure and focus. ISO can also be bracketed in some challenging situations.


 ISO Stacking
In my landscape photography, I am often faced with trying to get broad depth of field in situations where the wind is moving the foliage.When I stop down to expand the depth of field the resulting long exposure usually leaves the foliage a blurry mess, especially in the foreground.

ISO 100, 1.3 Seconds
Detail


ISO 1600. 1/8 Seconds
Detail
One approach, which I have discussed before, is to focus bracket or stack, using
Stacked Image with Foliage Motion
"Painted out"
multiple images with a wider aperture to allow faster shutter speeds, but sometimes this isn’t enough to freeze the gyrating greenery and the shallow depth of field of each image may not fully overlap leaving gaps of soft focus. Another strategy is to capture an image with the aperture and shutter adjusted to freeze the motion with acceptable depth of field and then adjust the ISO to balance the exposure. This may only be required in the foreground image(s) where the motion is most noticeable. Greater noise reduction may be required for these slices, but they can then be stacked with the images taken at lower ISO to construct a complete picture with full DOF and sharp leaves, horses or whatever else was moving.  
 
 
Example:
For my example I am using the same image that illustrated my first ISO Control article.  The picture taken at ISO 100 and 1.3 seconds had the best image quality, but with blurred foliage, both on the foreground tree and in the background.  ISO 1600 gave me a shutter speed of 1/8 second which was sufficiently fast to freeze the movement and had good DOF at f20.   I simply stacked the ISO 1600 above the ISO 100, aligned the two with Auto-Align and then painted a mask to reveal the sharp foliage over the areas of blur.  With the use of noise reduction and the application of the high ISO image only where needed the final picture retained high image quality.

That’s IT. I told you this would be short. In this case the "best image from the camera" was actually two images at different ISOs.  Give it a try and let me know how it comes out.


OK, I can’t resist. Just one more point while we are talking about moving foliage. Another technique I use occasionally to freeze motion is based on the fact moving foliage does not all move at the same time. If you take a number of images at the same focal length you can often combine parts of each to isolate times when each region is relatively still. This is inevitably a tedious process of selective masking, but the results can be quite effective.

That’s it, I promise. Now off to Powerpoint.

Monday, June 4, 2012

ISO Control


Bradley Hill Spring, Chesterfield, NH


Getting It Right in the Digital Camera
My father handed down my first 35mm SLR at a time when
everyone was taking snap-shots with Instamatics. I know, I'm older than dirt, but I just got a $10 lifetime National Park Pass, so suck it!
Song in a Dark Czech Bar  : ISO 6400
Anyway, when I got the camera, I had to decide which speed of Kodachrome to use. I made the radical decision to forsake the time-honored ASA 25 and go with the new, lightening fast, ASA 64. My father worried that I was a communist, but that extra stop felt liberating. As film improved faster speeds became available, always with the trade-off of coarser grain. The increased sensitivity was great, but If you wanted to change film speed in the middle of a roll, you had to wind the old film back into the canister while trying to stop before the lead got sucked in all the way. I know what it feels like to open the camera and find that the lead is gone, and with it, the remaining exposures on the roll. The whole process was complicated, time consuming and wasteful. The result was that changing film to adjust speed for varying conditions was not a routine consideration. Exposure was almost always adjusted through the manipulation of just two variables; aperture and shutter speed and these two factors were unbreakably linked. For any specific aperture there is only one shutter speed that will result in the desired exposure, but the ease of adjustment of ISO in digital cameras has broken the chains of that strict inverse relationship.

With digital photography the adjustment of sensor sensitivity is achieved through the turn of a dial or tap of a button, making ISO the important third variable in controlling exposure. Through the adjustment of ISO, there is now a range of shutter speeds that can be used with a fixed aperture while keeping the exposure constant.

Nazca Boobie, Galapagos Ecuador;: ISO 1600

Conversely, when a fast shutter speed is needed to capture action, adequate depth of field can be preserved by stopping down on the aperture and compensating by increasing the ISO. The combination of easily adjustable ISO and the ridiculously high sensitivity of modern digital sensors has remarkably expanded our flexibility in controlling exposure. But this flexibiliy comes at a cost and that cost is noise.

Sensor Noise
As is true with film, higher ISO's lead to increased image noise. Newer sensors have greatly improved low light response making it possible to get quite serviceable images with surprisingly high ISO settings, but different cameras have varying abilities to handle noise. Even as it is essential to know how shutter and aperture affect exposure and image quality, it is also important to know how adjustments of ISO affect image noise and sharpness on your camera. The physics of shutter and aperture are essentially the same for all cameras, but digital sensors vary greatly and the only way to understand how your camera handles high ISO is to test it. I have to admit that, until recently, I have used the" shoot and pray" approach to high ISO, but after testing my Canon 5D Mark 2, I feel much more comfortable pushing the ISO when needed. The result has been better low light images and sharper action shots.

The Test

ISO Test Imag
1) First start with a scene that has a wide range of brightness. Dark areas are especially important since noise is most noticeable in these regions. If you wonder why this is true, check out my recent "Exposing to the Right" article.

2) Shoot a series of images using your full range of ISOs. Aperture preferred mode works best since it keeps the depth of field constant. The scene should be well illuminated to avoid long exposure noise from contaminating the images taken at low ISO. If possible, shoot in RAW for maximum flexibility.

3) In my test I first I brought each image through Adobe Camera Raw with identical settings for optimal exposure, but without any sharpening or noise reduction. Zooming in on a small segment of the image, it is easy to see how noise increased with higher ISO. To my eye, results were quite good up to about ISO 800, but then progressively deteriorated up to the max of 6400. 


Image Detail, No Noise reduction


4) I then went back to the images and used Camera Raw's excellent noise reduction function to clean up the images. The noise reduction function in the new Lightroom 4 has also been improved. There are many other good software solutions for noise reduction, but in all of them the best final result is a compromise between noise reduction and the inevitable softening of detail. In my test, noise reduction expanded the acceptable ISO range by a step or two. 


Noise Reduction in Camera

A test like this can be a helpful guide, but the impact of high ISO on any specific image will vary depending on its brightness, the importance of shaddow detail and the final destination of the image. A large fine art print will have a narrower range of acceptable ISOs than a picture destined to be a small, low resolution jpg on Flickr.

As is always true, photography is defined by the compromises you make. The control and expansion of ISO made possible by digital photography, provides a great new creative variable to the complicated equation that makes up each image. The art is in how you balance the competing factors to achieve your own solution to the equation. It is just one part of getting it right in the digital camera.