About Me

My photo
Spofford, New Hampshire, United States
Jeff Newcomer had been a physician practicing in New Hampshire and Vermont for over 30 years. Over that time, as a member of the Conservation Commission in his home of Chesterfield New Hampshire, he has used his photography to promote the protection and appreciation of the town's wild lands. In recent years he has been transitioning his focus from medicine to photography, writing and teaching. Jeff enjoys photographing throughout New England, but has concentrated on the Monadnock Region and southern Vermont and has had a long term artistic relationship with Mount Monadnock. He is a featured artist in a number of local galleries and his work is often seen in regional print, web publications and in business installations throughout the country. For years Jeff has published a calendar celebrating the beauty of The New England country-side in all seasons. All of the proceeds from his New England Reflections Calendar have gone to support the Pulmonary Rehabilitation Program at the Cheshire Medical Center. Jeff has a strong commitment to sharing his excitement about the special beauty of our region and publishes a blog about photography in New England.
Showing posts with label Trans-Illumination. Show all posts

Sunday, June 18, 2017

Five More Photographic Secrets


Dummerston Sunset
A few months ago I discussed 10 of my Favorite Secrets of Photography. These were just a few of the “take-away” points that have come from several of my, over 350, blog articles.  As I assembled that list, I realized that I had come up with many more than just 10 “secrets”, so here, in no particular order, are 5 more.  I’m sure that these won’t be the last.   


These tips are short and sweet, but I have included links to more detailed discussions found elsewhere in my blog.


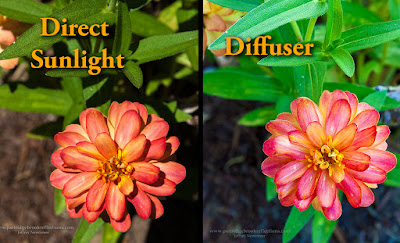
11) Diffuser should be held as close as possible to the subject.

A diffuser can block the harsh contrasts created by bright light and prevent stark reflections that tend to mute underlying colors. It is just one of the ways to deal with the challenges of bright midday sun.  Diffusers are available in many sizes.  Bigger is better, but regardless of size, they work best when held as close as possible to the subject, without intruding on the frame.  When positioned close, the light tends to be softer and more diffuse, seeming to wrap around the subject.  When locating the diffuser care should also be taken to avoid hot spots in the background created by areas not shielded from the sun.


12) Rainbows are seen when you turn your back to the sun and look at the receding edge of a rain storm.

 
It’s simple physics.  Rainbows form when the droplets in a storm cloud are illuminated by direct sunlight. The reflection and refraction of light within each drop divides the beam into its spectrum of colors.   Given the general flow of our storms from west to east, this means that, as  late afternoon fronts pass by,  the setting sun can shine on the clouds predictably creating a rainbow. 


Rye Beach Rainbow

It isn’t Leprechaun magic, given the right conditions, it will happen every time.  To see the strongest colors all you need to do is stand with your back to the sun and look into the dark receding rain-filled clouds.   The only other requirement is that the sun must be below 42 degrees, otherwise the colors will be reflected into the ground.  This means that Today (June18th), in my corner of southwestern New Hampshire, regardless of all the other conditions, I can’t expect to see a rainbow until after about 4:30PM.   


13) Get under a roof to avoid the snow blotches.
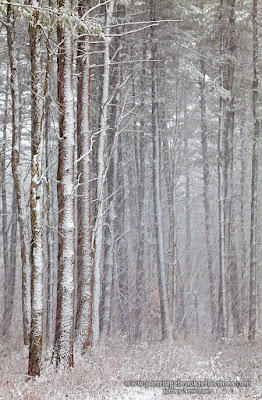


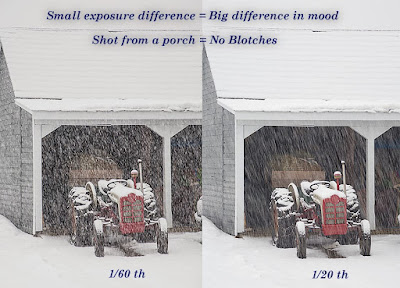
There is no other condition that so dramatically demonstrates weather conditions in photographs as does images of falling snow. Snow makes precipitation vividly palpable, and its appearance can be dramatically altered by both natural factors, and how the flakes are captured in the camera. The size of the flakes, as well as the density and rate of the fall are important, and changes in the shutter speed can make a gentle flurry look like a raging blizzard.


The Blotches

Another issue is “the blotches” which is the bane of my falling snow images.  You have undoubtedly seen beautiful atmospheric images of snow storms, but here and there are big blotches of white that seem out of place.  These white smudges come from the snowflakes that are close to the lens when the image is captured.  They are invariably out of focus and, to me at least, extremely annoying.  Happily, there are. number of ways to eliminate the blotch.  


Blotches can be removed in post processing, but this can be a time-consuming chore. In the field, they can be minimized by shooting with wider apertures and focusing on distant objects, but they are most effectively eliminated by shading the lens from nearby flakes.  In the tractor comparison, I shot from under a porch roof.  Magically, no blotches.  When a roof is not at hand, an umbrella or a piece of card board can also help.  Just keep your shade out of the frame.


14) Under harsh, bright midday sun, trans-illuminate the foliage.

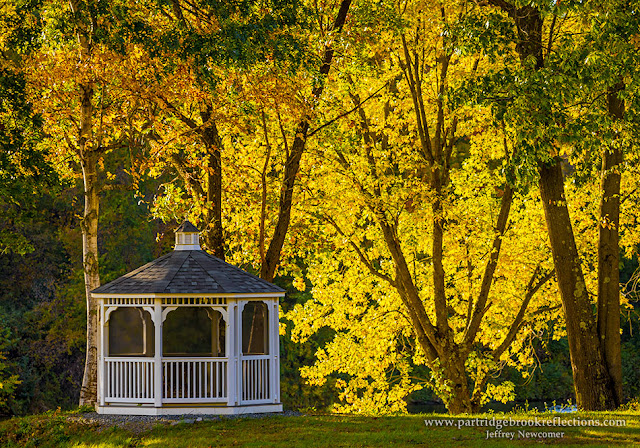
Ashuelot Park Bridge, Keene NH

Bright sunlight can be terrible for capturing the full color of foliage and flowers.  This light results in high contrast between brights and darks, and causes reflections that mute the colors.  As discussed above, there are various techniques to block or diffuse the bright illumination, but another solution is to use the light to trans-illuminate the foliage.  Light shining through foliage or flowers can intensify their color, creating an electric brilliance.  This technique can be a lifesaver for the midday sun, but it is equally effective during the “Golden Hours”, when the sun is low in the sky.


15) During the Golden Hour, turn your back to the sun and make images using the warm light.
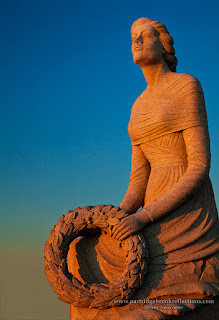
The “Golden Hours” are notable for the opportunity to capture the audaciously brilliant colors of sunsets or sunrises, but, while you are busy being enchanted, take a moment to turn away from the spectacle and notice the lovely effect that the warm light creates on everything behind you.  


Sally Lightfoot at Sunset, Galapagos Islands

 Even ordinary subjects can take on a magical glow and these often contrast nicely with the deep blues of the evening sky.  So, as the sun rises or drops toward the horizon, go ahead and capture the garish colors smeared across the sky, but that’s the easy part.  Then turn away and explore all that can be done with the soft warm light.

Point Judith Moonrise


That makes 15 quick tips.  Stay tuned for more.


Jeffrey Newcomer
partridgebrookreflections.com
603-363-8338


Sunday, August 9, 2015

Working With the Light (Part 1)


Glorious "Context" - Nubble Light at Dawn


I'm beginning to panic. This fall I'm scheduled to teach a class on digital photography for our local community education program and I have to get serious about putting together the materials. I have done plenty of talks for regional groups including camera clubs, Rotaries, Audubon Societies, and retired teacher groups, but I've never tried to assemble a reasonably coherent curriculum. Over the last year I have written several blogs about the basics of photography with the idea of covering topics that I could use in an introductory photography course, but now I have to get focused on putting it all together.My biggest worry is that I have no way of gauging the knowledge and experience of those who will sign up for the classes. I tried to aim my course description toward folks with an interest in learning about controlling exposure, focus and composition in landscape photography, but I could end up with some who are only interested in using their cell phones to take snapshots of their lunch. Its a crap-shoot, but I plan to combine classroom discussion with photo shoots and critique, it should be fun.

This week's blog is intended as another prep for the course. I plan to talk about how to approach a photographic situation and the first step is to recognize the quality of the light. Each type of light provides its own challenges and opportunities and working within those bounds can result in great images in any situation. So lets briefly consider a few kinds of light.

 Also check out Part 2 of "Working with the Light" discussing some of my favorite "lights", overcast, fog, mist and extremes of weather

Golden Hour : Sunrise Sunset

One Gull Short of Pretty, but BORING?
I begin with what many photographers consider the gold standard of light, the "Golden Hour". The light around sunset and sunrise shines in beautiful warm hues of red, yellow, orange and gold. It may seem almost impossible to take a bad picture, all you have to do is snap a glowing sunset and the likes and favorites come rolling in to Facebook. The problem is that all that golden light can make you lazy. The same rules of composition and context apply and, to me, without those elements a sunset can be just a boring splash of color smeared across the frame. 


Context

 As is true in all landscape photography, the key is context and interest. When facing a spectacular morning or evening sky your first thoughts should be devoted to finding interesting stuff to put in front of all that color. Look for interesting foregrounds, reflections and framing to provide a sense of place and story. It is also helpful to show some detail in the silhouetted shadows. Expose to the right or consider a multiple image HDR rendering. Remember to keep the horizon line straight and away from the DEADLY, dead center of the image. It all comes down to the difference between a snapshot of some color and an image that allows the viewer to lean against that tree and fully experience the glorious moment. But there is much more to the golden hour than a crimson sky.


Framing


Turn Your Back On the Sun
Even mundane subjects can come alive when illuminated by the warm light of the golden hours. Don't forget to turn your back on that brilliant disc and  take advantage of the soft glow which often contrasts beautifully with the deepening blue of the evening sky.


The Blue Hour
  

 Unfortunately, many photographers arrive just at sunrise or retreat right after the sun dips below the horizon. The golden hour is lovely, but often the best light comes in the few minutes just before sunrise and after sunset. The "blue hour" is a great time to capture soft images without the harsh contrasts created by the unfiltered sun. 


Blue Hour Lights


It is also one of the best times for night photography. A little light in the sky allows foreground detail to shine through and the blue sky is the best background for evening lights and the rising moon. The difference in feel between blue and golden hours could not to more striking and it is what makes sunrise and sunset such a rich time for a broad range of images.


----------------------------------------------------------------------------------------


Bright Sunlight -  The Lead Hours


Stop Whining and Start Shooting!
After reveling in the glorious Golden Hours it is time to go from best to worst. Bright midday sun is universally considered the worst condition for landscape photography. Unfiltered overhead light creates harsh shadows, with impossibly stark contrasts and the rich colors of flowers and foliage are obscured by brilliant reflections. Perhaps the best approach is to take a nap until the sun begins to set. After all you did get up at 3AM to catch that heroic sunrise, but if you can stay awake, all is not lost.

A Beautiful Sunny Day
Midday sun is unquestionably the most challenging light, but non-photographers are always saying, "What a beautiful sunny day. You must have gotten some great pictures." We want to laugh, but there must be something these unschooled rubes are seeing that we smug photographers are missing. The truth is that the beauty is there, but the problem is in the limitations of our photographic tools to capture it.

Taming the Contrast

 Bright sunlight produces harsh contrasts that were impossible to capture with the narrow dynamic range of convention film photography. Without the use of supplemental illumination such as reflectors or fill flash, the decision always had to be made between recording the highlights or the shadows, but things have changed with digital photography. The dynamic range of digital sensors is improving, but they still struggle with high contrast. The difference is in the ability to bring a precisely exposed images into powerful software which, almost miraculously, can protect highlights while salvaging detail in the shadows, and the blending of variably exposed images and the use of sophisticated HDR software has further expanded our ability to record the midday light. To me the greatest attraction of bright sunny illumination is the cool shade that it inescapably creates and now our images can languish under the tress without being oppressed by a surrounding curtain of blown out highlights.


There Must Be Sun for Shade           


It is the contrasts between light and dark that give "bright sunny days" their special attraction.  Our job as photographers is to stop whining about the "terrible light" and start finding ways to push beyond the limitations of our medium, and capture the midday glory thiat is so apparent to everyone else.


Filling the Shadows
A Touch Of Fill Flash
For Portrait or Macro photography, shadows can be illuminated with light from a reflectors or fill flash. Happily color balance with artificial flash is not a challenge since the strobes are generally set to match sunlight. The key to reflectors is to go big and close. The larger and closer to the subject the more the light will wrap around and appear soft. I have a couple of reflector disks of different sizes but the light bouncing off the large brightly lite wall can work as well. The advantage of a wall is you don't have to struggle with with folding it up after you're done.


Taming the Reflections

The rich colors of flowers and foliage are blunted or obscured by the reflection created by unfiltered sunshine, and sadly there is no perfect solution within current editing software. Midday is not the best time to capture macro images of flowers or the full glory of an autumn hillside, but, if you must, there are a couple of techniques that can help.


Polarizers
 

Given the right angle of the sun a polarizing filter can cut deeply into reflections and unveil the underlying color. Direct sunlight reflecting off most surfaces becomes polarized to a specific angle which can be filtered by rotating the polarizing filter to block that angle. 


Colors Revealed


The degree to which a polarizer can filter out the glare is related to the direction of the light, being most effective when it is at 90 degrees to the subject. On the other hand, when the light comes directly from in front of the subject the effect is essentially nonexistent. Polarizers are often used on sunny days to darken the blue sky and highlight the clouds, but its real magic comes from its ability to penetrate the glare and when the light is right colors can explode in your images.


Shade
Tulip Tree Flower in the Shade
The other approach to both reflections and high contrast is to retreat to the shade. Shielded from the sun's glare, the sky acts like a gigantic soft box which can wrap light around your macro images and portraits. 


Full Shade


With the mix of light from the blue sky and the green of trans-illuminated foliage, color balance can be a challenge, but when shooting in RAW the color balance can be finely tuned. The sun can also be filtered or blocked with the use of a diffuser or your own shadow. Once again, the key is to get the diffuser as close as possible to the subject and to watch for distracting hot spots of bright light around the edges.


Trans-Illumination
- Glory in the Brilliance
 

When all else fails, the bright sunlight can be used as a source of trans-illumination. Even the dullest foliage flowers come alive when strongly lite from behind and the back-light can create a shimmering rim light around the edges.


YUK
Yesterday, I stopped by Madame Sherri's Castle in Chesterfield to explore my old favorite in the "miserable" brilliant midday light.  The direct view was predictably horrible. but then I circled around to the back.  The light was lovely as it illuminated the insides of the arches with a golden glow and the thick summer foliage came alive with the shimmering back-lighting.  180 degrees and I found a treasure.  The secret is not to give up on the light and adapt to what nature provides.


The Arches revealed


So the next time we are plagued with bright midday sun, avoid the nap, accept the challenge and find out why everyone else thinks clear skies and bright sun is so inexplicable beautiful


I've tried to suggest how our photography can accommodate what may be seen as the extremes of light, the glorious golden hour and the harsh midday sun, but the key to shooting in any light is to recognize what nature is providing and to modify our subjects and approach to get the most from the conditions.
Sometime the Context Can Be As Simple As a Wave
Kiawah Island Sunrise, South Carolina


Next week I will discuss a few more of my favorite "lights', including, overcast, fog, and extremes of weather. Hopefully this exercise will make it easier to face that room of students this fall and allow them to capture better iPhone images of their ham sandwiches. 
 

Check out Part 2 of "Working with the Light" discussing some of my favorite "lights", overcast, fog, mist and extremes of weather.


Jeffrey Newcomer
Partridgebrookreflections.com

Sunday, May 17, 2015

Favorite Light for Spring Foliage


A Short Word on Spring Light 
 
Hilltop Farm, Guilford Vt


Every time it begins the same way, as I settle in to start writing my weekly digital photography blog. From who know where, I've come up with a topic and I promise myself, "Well this is going to be a quick one". I've been doing this for well over six years and I've NEVER figured out how to do a "quick one", but maybe this will be a first? I think I have just a couple of brief things to say about the best light for the wonderful spring foliage. Let's see how it goes.


My Favorite "Season"

 
Trans-Illuminated, Guilford Vt
There is little doubt that the early spring foliage season is my favorite time of year. The colors are not as brilliant as the fall display, but they are every bit as varied and have the vibrancy of new life, which I find more exciting than the desperate splashes of color which proceed the inevitable death & drop of autumn. Of course it doesn't hurt that spring represents blessed relief from the long cold winter, while autumn only leads, unavoidably, to the dismal "stick season". The fresh foliage of the early spring lasts for only a week or two, and so it is especially important to catch the subtle greens on the few days when the light is at its best. For me there are two kinds of light which show the foliage to best advantage and these are soft diffused light and, my favorite, brilliant trans-illumination.


-----------------------------------------------------------------------------------------------------------------


The Softness of Spring

Soft Light, Westmoreland, NH

  
We haven't seen many rainy or even cloudy days this spring, but I love the richness and variety of the spring foliage which glows from the hillsides when the light is soft, and especially the depth of the scene is accentuated by layers of mist. Diffused light reduces the reflection off the leaves allowing their subtle colors to shine through and even without bright directional light, a polarizing filter can further enhance the richness of the color. Photographers love to get out when the weather is bad and this works especially well for the new green.


--------------------------------------------------------------------------------------------------------------------------------------------------------------------

The Problem with Bright Light

Flat Mid-Day Light

Walpole Academy, Walpole, NH
Spring foliage is beautiful in any conditions, but it is shown to least advantage under direct bright illumination. The challenges of the brilliant midday sun are evident in every season, but the light pastels of early spring are especially vulnerable to being washed away by the reflected sunshine. So what is a photographer to do when cursed with beautiful sunny weather - shoot into the sun. It is true throughout the year, but especially in the spring, the color of the foliage turns electric when trans-illuminated. It is an entirely different feel from the soft subtle

One of my Favorite Places
Spofford, NH
tones brought out by overcast light, and shooting trans-illuminated foliage gives us something great to do between golden hours. The low lying sun in the morning and evening makes it easier to find strong trans-illumination, but I'm not a fan of shooting spring foliage close to sunrise or sunset. Spring colors are delicate and easily washed away by strongly golden or blue illumination. For me, neutral light works best to appreciate the sense of spring's new life.


Golden Corner, Guilford Vt

We are getting to the end of the brief spring foliage season and the leaves are beginning to settle into their darker, maximally photosynthetic, hues, but, while there are a few more moments of magic, get out, take a deep breath of the sweet air, and capture the color of fresh new life.


You might also want to check out some of last year's spring color:
"Zooming in on Spring Leafscapes"

That's about as short as I can get. I'm trying to let the images tell the story. If well received, I may do more of these short articles. It appeals to my ingrained laziness.


Jeff Newcomer
partridgebrookreflections.com