About Me

My photo
Spofford, New Hampshire, United States
Jeff Newcomer had been a physician practicing in New Hampshire and Vermont for over 30 years. Over that time, as a member of the Conservation Commission in his home of Chesterfield New Hampshire, he has used his photography to promote the protection and appreciation of the town's wild lands. In recent years he has been transitioning his focus from medicine to photography, writing and teaching. Jeff enjoys photographing throughout New England, but has concentrated on the Monadnock Region and southern Vermont and has had a long term artistic relationship with Mount Monadnock. He is a featured artist in a number of local galleries and his work is often seen in regional print, web publications and in business installations throughout the country. For years Jeff has published a calendar celebrating the beauty of The New England country-side in all seasons. All of the proceeds from his New England Reflections Calendar have gone to support the Pulmonary Rehabilitation Program at the Cheshire Medical Center. Jeff has a strong commitment to sharing his excitement about the special beauty of our region and publishes a blog about photography in New England.
Showing posts with label fence. Show all posts

Sunday, November 1, 2015

Hand Bracketing Your Brackets


 Sometimes there is just no practical way to embellish a simple photography tip to make it worthy of my usual rambling blogs. Even after completing some of my longest articles, I still find myself hoping that readers will be able to salvage just one or two valuable "take-a ways" from all of the confusing verbiage, but with limited time to write this week,  I really have only one extremely simple tip which requires no complex discussion. It has to do with bracketing your brackets.


A Return to the Coast
Sunrise Coastal Drive, Newport RI
I have been away most of this week visiting Newport Rhode Island. Another trip to coast allowed me to catch a dawn against the rocky shore of the Coastal Drive, a full moon rise against Point Judith Lighthouse and a few images around the amazingly excessive opulence of the Vanderbilt's Breakers Mansion. We spent one day helping our son set up his new apartment in Manhattan and then limped home through a late night gale along Routes 95 and 91. I'm sure I will share picture from this lovely and productive trip, but for now, here is something that might actually be useful.


Focus Stacking

Minnewawa Autumn, 7 Image Stack
I recently expanded on my previous discussions about the use of focus bracketing to achieve impossible depth of field. Specifically I have been impressed with how an increase in the number of variously focused layers leads to improvement in the results from Photoshop's Auto-Blending Tool. I have been routinely capturing 5-7 layers to align and blend and have found that the amount of correction required on the results is significantly reduced, but one problem is determining which images are included in the focus stack. For any scene, I usually capture a few images to establish the best framing and exposure and then start my series of variably focused images for stacking. In Lightroom it is often difficult to identify the limits of the stack. 


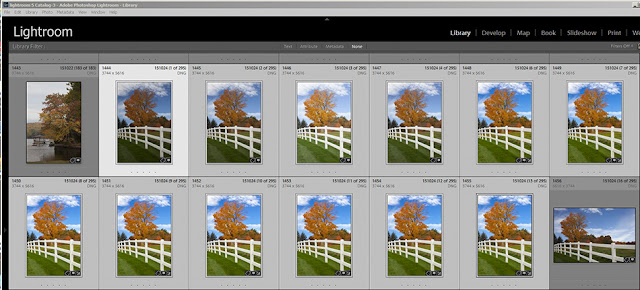
Bracketing the Fence

Finding the Focus Stack Series
Bracketed Stack
A simple way to define the focus stack is to create open and close brackets with your hands in front of the lens. In my images of the
white fence in Chesterfield New Hampshire,  I used my hands to mark the focus stack for global editing and blending. Once selected I could discard the other images, but, of course, I hardly ever discard anything. 


Focus Stacking


Hand bracketing can also be used to define other series' of related images such as bracketed exposures, star trail images or time-lapses. The process involves wasting two images, but in the digital world, who cares. The only challenge is to remember to get your hand in front of the lens before and after the series, but if you forget the open bracket you can always put up the close bracket and indicate the number of exposures by the number of fingers you hold up. 


Magic Hands


Simple. I promised just one "take-away",  but hand bracketing can save a lot of time and aggravation as you wade through those long series' of images in post-processing.

496 words.  That must be a record!


Jeffrey Newcomer
Partridgebrookreflections.com


Sunday, February 23, 2014

Hand-Held Focus Stacking


Snow Peak, Mount Monadnock, Marlborough, NH
Using Auto-Focus Points to Hold the Frame

This week I wanted to share a simple technique to obtain multiple (or at least two) images for focus stacking while hand-holding the camera.


Focus Stacking
I have previously discuss in considerable detail the technique of focus stacking to achieve deep depth of field.  This approach

requires multiple images focused at different planes of the scene which are then combined in post processing to achieve sharpness throughout.  A key requirement of the technique is that the images all be framed to match when aligned in the computer.  With sophisticated software, such as Photoshop, the match does not have to be perfect, but typically this is best achieved with the camera locked down on a tripod.  It can be quite challenging to manually vary focus while trying to hand-hold the framing perfectly constant.  This is where my camera's auto focus points can come to the rescue.

I have never been a big fan of auto-focus for my landscape
Hibernation, Pomfret, Vt.  Two focus planes.
photography.  Even as the technology has improved, I tend to prefer to assure sharpness by manually focusing, often on a tripod and, in poor light frequently, using the Live View Screen.  But when I am faced with a scene which contains a discrete foreground and distant background,  I can often get good results with a two image stack, one focused on the foreground detail and the other on the background.  This is the situation where auto-focus can save me the chore of getting out my tripod, if I have it on hand.


Mount Monadnock
Most photographers are familiar with the technique of holding the shutter down half-way to lock focus on a part of the scene and then
recomposing for the final shot.  This is most frequently used when focusing a subject that is off center, but the same technique can be used to grab a couple of images for a simple focus stack.  In the example of Mount Monadnock shot from Marlborough, New Hampshire, I locked focus on the detail of the fence and then re framed to include the distant mountain.  The first image caught the fence in clear focus and then without moving the camera I locked focus on mighty Monadnock and shot again.  As I shot the first image I carefully noted the position of the central focus point square to assist in close alignment of the second image.  In more complicated situations, fully sharp focus stacking can require more than two images, but in bright light, when I can stop down, two are often enough to get good results, especially when there are just two discrete planes of interest. 

Canon 5D Mark II Focus points


Mill Ice, Harrisville, New Hampshire
My Canon 5D Mark II has 9 focus points displayed on the screen, but only the central square is a cross sensor, vertical and horizontal, and therefore the most accurate.  When possible I try to use the central point for focus stacking but there are many times when the central point aligns with neither the foreground or background in my desired composition.  Faced with this situation I can usually find one of the other focus points that will provide the coverage I need.  In my image of the frozen mill pond in Harrisville, New Hampshire, I angled the camera down to using the top focus point to lock in the sharpness of the foreground ice and then recomposed.  In my second image, the focus point was in perfect position to catch the iconic Harrisville Public Library. 


Mill Freeze


Using one of the 8 peripheral focus points can reduce the reliability of the auto-focus, especially in dim light or low contrast. To help, I have switched my focus lock from the shutter to a button on the back of the camera that doesn't require continuous pressure to maintain the focus.  In the mill pond image, I could lock the foreground focus with the central point and then switch to the upper point ready for when I refocused on the background.  Not all cameras can switch the focus button. The directions for mine were buried in an obscure corner of my manual, but, with practice, the ability to lock focus without having to hold the shutter down, works well for me in most situations.


Focus Button on Back of the Camera


Ashuelot River, Keene, NH,
Multiple Focus Planes


The trick with this technique is to hold the camera steady as you re-press the shutter and to learn how to move the focus point around the screen.  I have gotten good enough that I will occasionally try to move the focus point within the screen to catch more than just two images for stacking.  The more manipulations I try, the harder it is to maintain the frame, but Photoshop can do some amazing things with auto-alignment.  Still it is about at this time that I grab for the tripod.


The speed and accuracy of auto-focus in modern cameras is amazing and improving all the time.  I still like to use manual focus in many landscape situation but it is important to understand your camera's focusing capabilities and to use them when the time is right.

Jeffrey Newcomer
partridgebrookreflections.com