About Me

My photo
Spofford, New Hampshire, United States
Jeff Newcomer had been a physician practicing in New Hampshire and Vermont for over 30 years. Over that time, as a member of the Conservation Commission in his home of Chesterfield New Hampshire, he has used his photography to promote the protection and appreciation of the town's wild lands. In recent years he has been transitioning his focus from medicine to photography, writing and teaching. Jeff enjoys photographing throughout New England, but has concentrated on the Monadnock Region and southern Vermont and has had a long term artistic relationship with Mount Monadnock. He is a featured artist in a number of local galleries and his work is often seen in regional print, web publications and in business installations throughout the country. For years Jeff has published a calendar celebrating the beauty of The New England country-side in all seasons. All of the proceeds from his New England Reflections Calendar have gone to support the Pulmonary Rehabilitation Program at the Cheshire Medical Center. Jeff has a strong commitment to sharing his excitement about the special beauty of our region and publishes a blog about photography in New England.
Showing posts with label content Aware Fill. Show all posts

Sunday, June 10, 2018

Content Aware Fill , More Photoshop "Magic"


There is no question, learning Adobe’s Photoshop can be an intimidating endeavor.  The program is so imposing and powerful that many are frightened away before even trying.  It took me several books and courses before I felt that I could begin to use at a small part of this amazing tool.  The fact is that Photoshop is so deep that, I suspect that no one person can fully understand it all.
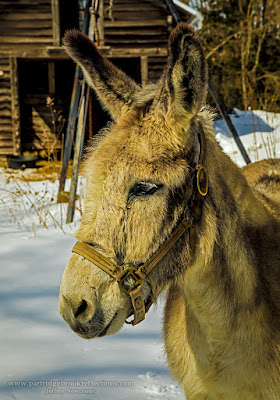

Chesterfield Donkey
My approach has always been to decide what I wanted to do for my images, and then discover how to use the parts of Photoshop which would help accomplish that goal.  I didn’t worry about everything that Photoshop can do, just those things that I can use.

Of course, when starting, there are a few basic tools that are important to understand.  Importing images, layers, selections and the basic image controls are essential, but what about all that other stuff.  You can go a long way without having to worry about, HDR, panoramic merging, and split toning, but it’s nice to know that all these tools are there just waiting for you to explore – when needed.

One of these tools, which is fairly new, is Content Aware Fill.  Like many of the new tools, Content Aware Fill (CAF) just provides an easier way to do something that you could do before.  It has always been possible to use the Cloning Tool to fill unwanted areas of an image with pixels taken from other parts of the image, or even from another image.  This can be arduous, as you try to find areas that blend seamlessly with the underlying content and texture.  The cloning brush is still an essential tool, but given the right situation, Content Aware Fill can use the amazing computational power of Photoshop to automate a large portion of the job.

Content Aware Fill

In the Edit drop-down menu, Photoshop provides a list of options to fill an area of an image.  A selection can be filled with the current foreground or background color, a pattern or any color you choose.  This is also where the content aware tool is found.  After creating a selection around an unwanted area of the image (eg my face), Content Aware Fill will attempt to fill the area with pixels from around the selection.  It works to blend the fill with the surroundings.  It doesn’t always work perfectly, but often the results are almost magical.  Typically, the filled area can benefit from a bit of touching up with the Cloning Brush or the Healing Brush. I thought of this as I was working on a picture of a pasture lane in Chesterfield.


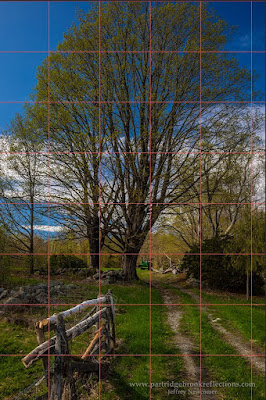
Pasture Lane
The Leaning Lane
Recently, I was visiting a friend’s farm down a backroad in Chesterfield New Hampshire.  In addition to becoming reacquainted with their semi-friendly donkey, I got a nice shot looking up the pasture lane which reminded me of the power of the Content Aware Tool.  The picture had all the essentials, beautiful light, a nice fence and road all leading to the border tree and even a distant tractor.  Great! But when I got home, I realized that all of my focus stacked images were significantly rotated clockwise. I could just hear the donkey laughing, but, hey, this is digital, all I had to do was rotate the image back to plumb.  A 5.5 deg counter-clockwise rotation brought everything back to normal, but the process left me with four triangular areas of vacant space at each of the corners.


Curing the Triangular Transparencies
My choices were simple, I could either crop out the areas of transparency, use cloning to fill the spaces or do some combination of the two.  I wanted to keep most of the full image, so cloning was the obvious solution.  All of this could be achieved with careful use of the cloning brush, but it was the perfect situation to start with Content Aware Fill.
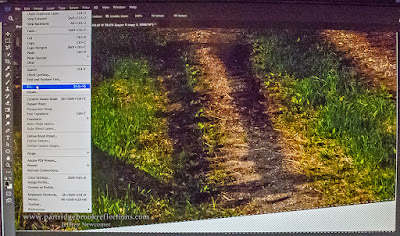


Fill Menu
I started working on a fresh pixel layer to preserve the original layer and then by selected one of the spaces.  On this picture, selection was easy to do.  On these geometric shapes, I find that the Polygonal Lasso Tool works well.  It is generally good to expand the selection slightly into the surrounding pixels.  I typically use “Modify” “Expand” adding about 5 to 15 Pixels, depending on the size of the selection.    I then pulled up the Content Aware Fill option under the Edit drop-down menu.  


Filled Triangle

The Content Aware Tool has a few options.  “Color Adaptation” should be checked to improve the color blending of the patch.  Since I was filling an area of transparency, the most important thing in this case is to leave the “Preserve Transparency” box unchecked.  Otherwise none of the area will be filled.   I hit “Ok” and waited for the magic. 
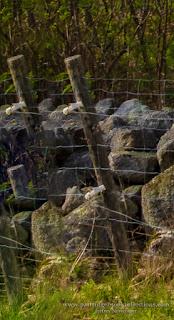
Duplicate Fence Post
 In this case the results were generally quite good requiring only a little cloning touch-ups, but the CAF tool works randomly each time and, if you don’t like the results you can always try again. 

As you review the results of the fill, it is important to look for areas where surrounding detail has been noticeably copied into the patch.  This can be seen in the upper left where a fence pole was clearly duplicated.  A little cloning easily removed the obvious defect, but sometime the duplications can be more subtle.  A careful examination is always a good idea.


Madame Sherri’s Hat

Madame Sherri at the Ball 1920s
Like most of Photoshop’s new “magic” tools CAF is not quite as magic as it is suggested in Adobe’s press releases.   CAF does not work in all situations and almost always requires some amount of clean-up to reach the best result.  An example of this can be seen in my article about repairing antique photographs.  The absent area of curtain was first filled with CAF, but the folds did not align with the rest of the material.  With the cloning brush I was able to smooth out the lines to make a more even match.  We can see that Madame Sherri really knew her hats!

Content Aware Fill - Poor Alignment

CAF and Cloned Touch-up

Parrish Shoes

The fictitious Parrish Shoes sign was painted on a wall in downtown Keene NH for the filming of the movie “Jumangi”.  Since then, the town has elected to keep, and regularly refresh, the sign as a local attraction. 


I recently shot the spot from the perspective of the shoes, but of course I couldn’t avoid at least one person waiting at the crosswalk. With the woman against the brick wall, CAF didn’t do a great job.  The brick kept bleeding into the patch.  I tried it a few times, but eventually found it easier to use the Cloning brush.


Bleeding with Content Aware Filll


That’s it.  One of the confusing things about Photoshop is that there is almost always more than one way to achieve the same result.  The challenge is to choose the right tool or tools for the situation.  As you use the CAF tool you will begin to recognize situations where it will work well and other where the surrounding detail may get blended uncomfortably with the result. In these situations, “Content Aware Patch” can provide a bit more control over the sampling area.  But that is a subject for another article and, of course, you can always go back to the good old Cloning Brush.


Jeffrey Newcomer


Sunday, July 24, 2016

Chasing Rainbows


With Thanks to Sir Isaac Newton

Summer is the season of rainbows.  They are a magical, improbable manifestations of nature, which often seem to appear without warning and disappear just as quickly.  It is no wonder that they have long been associated with mystical properties, including the fabled pot of gold at their base.  Last week I was reminded that, although they are beautiful, rainbows are actually just a simple manifestation of the prismatic effect of light bouncing through rain drops and that, given the right conditions,  their occurrence can often be predicted.


Raindrop Physics

About four years ago, I published a blog article about rainbow photography, and last week I was once again able to put to work what I learned from my own research.  I was at home when a strong summer downpour passed through my village of Spofford New Hampshire.  I was just getting ready to settle into our gazebo to for some writing, but instead I

Double Rainbow - Opposite Color Spectrum

decided to do a little rainbow chasing.  I knew that rainbows often form as lines of showers pass by.  The storm must also be followed by unobstructed sun shining through to catch the rain drops at a low enough angle to be reflected back and refracted, separating the light into its full visual spectrum.  The secret is to place the sun at your back and look into the rain clouds as they move away. 


Full Unobstructed Rainbows are Easier to Find on the Coast
Rye Beach, New Hampshire


First Find a Rainbow
On this day, I was a little late in recognizing the conditions. I had no rainbow in Spofford, but I had a reasonable idea where one might form.  I grabbed my camera bag, jumped into the car and headed west toward Keene in hopes of catching up to the receding edge of the storm.  I first reached  my rainbow on the outskirts of the city. 


Find a Foreground

Nice Color but Distractions along Route 12

The two key steps which lead to great rainbow images are first, find a rainbow.  The second is to find something interesting to put in front of the garishly colored arch.  I have seen innumerable pictures of dramatic rainbows spoiled by weak and distracting foregrounds.  Telephone poles, wires, housing projects, windshields and highway overpasses,  all may provide a sense of place, but they tend transform the magic into just an uninspiring smear of color across an ugly distracting foreground.  Once you find your rainbow your next thought should always be “where can I go to put something of interest in front of it, that is also close enough to get to before the rainbow fades”.


First Rainbow

As I moved into Keene, my choices for foregrounds  were limited.  I needed to get away from all the layers of development.  I careened  down a industrial park service road and drove beyond the buildings to be able to shoot down the dead end circle and into the trees of the an old Ash swamp.  Not a great foreground, but I got a reasonably good arching rainbow.  After capturing  the “fact” of the rainbow,  the next step was to try to get a more complete and balanced image. 


Chasing the Storm's Edge
Cemetery Gazebo
I headed out chasing the color, always angling west, to keep myself on the critical back edge of the storm with the unobstructed sun to my back.  Given the location of the rainbow and its direction of motion, I didn’t think I would get much from Keene and so I headed southwest on route 12.  A couple of times the colors seemed to be fading, but then I caught up with the storm. I had in mind a spot in Troy that I though would give me a long view, and some nice unobstructed perspectives.   My target was a cemetery just outside of the village, that sits on a knoll with a clear view to Mt Monadnock.  On this day the storm was obscuring the mountain, but  the color was still there, shining brightly against the receding dark clouds. 


Rain Drops

I first grabbed a couple of multi-image panoramas, to capture the full arc of the colors.   My first attempt was marred by multiple rain drops which caused smudges on my lens.  The problem with multi-image panoramas is that any dust or smudges repeat across each of the frames which are merged into the final image.  I cleaned the lens, but my second attempt, although clean, was not as dramatic. 


Content Aware Fill
Post Fill


 I ended up spending too much time in Photoshop using combinations of Content Aware Fill and the Healing Brush to remove all the drops, but the pain fades, and I am happy with the results.  The cemetery also has a nice Gazebo up on the hill.  I had used it in the past for a foreground and once again I was able to combine it with a vivid portion of the rainbow to construct an effective image.


Worth the Tedium


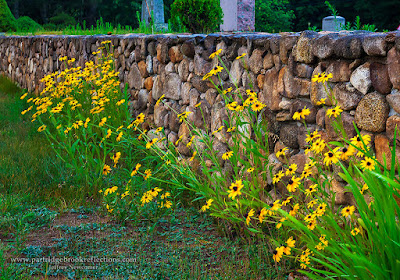
As the sun dipped into the clouds on the horizon, I was finally forced to give up the chase.  I was still able to catch some of the warm light on the Black Eyed Susan decorated cemetery wall and, later, the clear sky opened for a nice view of the craters of the moon.


Given that I left home with only the potential for a rainbow, I was happy with my results.  It just goes to prove that, with a little physics, we don’t have to depend on pure luck to capture one of nature’s most colorful shows.


Jeff Newcomer, NEPG
partridgebrookreflections.com
603-363-8338


Sunday, January 12, 2014

Photographing Falling Snow


And Getting Rid of the Blotches

It is a wonderful, but also occasionally painful fact that landscape photography is often at its best when the weather is at its worse.  This is certainly true when it comes to shooting the winter storms.  Whether gently settling or blown by ferocious winter gales, falling snow drops a lovely veil on any winter scene, but capturing the storm imposes a whole new set of opportunities and challenges.  These include both the practical difficulties of managing the cold and wet, and  also dealing with the fact that snow can appear completely differently depending on setting that are chosen in camera.

Practical Problems
 
The physical problems include keeping the camera, warm and dry and avoiding or removing the snow flakes that are inevitably attracted to the lens.  Simple preventive measures such as the use of a lens hood and avoiding aiming the camera directly into the flying snow can be very helpful, but in heavy snow I typically shroud my camera under a towel and only uncover the lens and viewfinder when I am ready to shoot.   Despite the best efforts, snow can attach to the lens.  It is important to check regularly and have dry lens cloths available to clear the view.  I have had the experience of taking a long series of images, only to discover that my lens had become blotched somewhere in the middle of the shoot. 

Basic Settings
Shooting falling snow requires a number of decisions about how you want the flakes to be portrayed.  Subtle differences in shutter, aperture and focal length can make a striking difference in the appearance and mood of the image. 

Shutter
Simply stated, long exposures, usually less that 1/100, will show

Central Square Storm 2 Seconds
the snow as streaks, while a quick shutter will catch the snow as individual flakes.  As longer exposures are used there is a point where the individual flakes disappear and what is left is a soft fog which intensifies with greater distance from the lens.  I saw this nicely displayed in my 2-3 second
exposures of the Christmas lights on Keene's Central Square.  The snow was coming down heavily but no falling flakes could be seen.  Of course the correct shutter will depend on how quickly the flakes are falling. often subtle differences in shutter can make a significant difference in the mood of the image.  Check out the tractor and barn comparison below.   Experimentation is always necessary. 


In the Storm, 1/90th

In the Storm, 1/250th


F13, 1/90th
Aperture
A small aperture, with a large depth of field, will include a greater depth of sharp flakes, which will tend to make the storm appear more intense.  A wide aperture will focus attention on a smaller, more intimate selection of flakes and the shallow depth of field can allow the snow to stand out better against the background's soft Bokeh. 


f20, 1/100th


1/250, 340mm
Focal Length
The foreshortening effects of telephoto lens' tend to compress deeper selections of snow again giving a more intense feel.  Wide angle lens' give a broader sense of the surrounding but may need heavier snow to capture the full power of the storm. 


Enhance Storm Intensity:Long Shutter, Small Aperture & Long Lens
1/6 th, f 16, 105mm


Crank the ISO
Of course in tough weather conditions compromises need to be
made. As always, the appropriate setting for each of these parameters is affected by the others.  In the dark of a storm there may not be enough light to combine a fast shutter with a small aperture.  Fortunately we now have the option to crank up the ISO.  Higher  ISO levels invariably result in more noise, but the good news is that there may be very few situations in which high ISO noise is less noticeable than in a blizzard.


Flash
Snow flake will stand out better, especially at night, if they are
Stone Bridge, Flash with Blotches
illuminated by a focused light source, such as a street light or car headlights, but here is probably no better way to stop falling snow dead in its track than to use flash.  Regardless of the  shutter speed the short duration of an electronic flash will freeze any nearby motion.  This effect will dissipate by the inverse square law as distance from the flash increases.  The problem with flash is that it most prominently lights the nearest flake, which are inevitably large and distracting.  With removal of the grotesque blotches (see below) the remaining flakes are more naturally highlighted  The combination of flash and natural light leads to a complex mixture of exposure and color temperature.  Again experimentation is in order.


Large Blotches Removed (See Below)


Ok, that is some of the basics.  Now let me finish with one of my pet peeves about falling snow images.  The Blotch.


Curing the Blotches
Blotched Storm
 

 For me "blotches" are the bane of my falling snow images.  You have undoubtedly seen beautiful atmospheric images of snow storms, but here and there are big blotches of white that seem out of place.  These white smudges come from the snow flakes that are close to the lens when the image is captured.  They are invariably out of focus and to me at least, extremely annoying.  Happily there are. number of ways to eliminate the blotch. 

Shade the Lens

 The simplest solution is to shade the lens from nearby flakes.  In the tractor by the barn comparison,  I shot from under a porch roof at Roads End Farm.  Magically, no blotches.  When a roof is not at hand an umbrella or a piece of card board can also help.  Just keep your shade out of the frame.


Central Square, 1/50th
Slow Shutter
The blotches are generally most noticeable at faster shutter speeds. With longer exposures the flakes are streaked and the smudged nearby flakes become less defined. Again the appropriate shutter will be dictated by the speed of snow fall and the size of the flakes.


Cloning and  Healing Brush
You knew we would have to get to Photoshop eventually.  Given the random complexity of the snow images, it is comparatively easy to use Cloning or the Healing Brush to replace the blotches.  In newer versions of Photoshop, the Content Aware Fill tool can also correct the scars. The automatic techniques, such as the Healing Brush usually do an amazing job, but occasionally I will use cloning to find a good source that matches the original background.


Multiple Image Layers 
My favorite approach to the blotch is to use multiple images.  Since the location of the blotches vary from image to image, I can use one image to patch another.  I pick the best of a series of images and then add the second best in a layer above the first.  After aligning the two images, I mask out the top layer.  I then scan the image and wherever a blotch appears I simply paint with white on the upper layer mask.  This nearly always brings up a section without the blotch. To me this is the most elegant solution, since the uncovered background tends to match that of the lower image. The blotches on the Stone Bridge above were cleaned with this technique.

The great thing about falling snow is that it provides a treasure chest of creative opportunities all within the easy reach to your camera's basic settings.  Now if we can get some snow out of this miserably cold weather, we will be set to go.  Get out there and experiment.