About Me

My photo
Spofford, New Hampshire, United States
Jeff Newcomer had been a physician practicing in New Hampshire and Vermont for over 30 years. Over that time, as a member of the Conservation Commission in his home of Chesterfield New Hampshire, he has used his photography to promote the protection and appreciation of the town's wild lands. In recent years he has been transitioning his focus from medicine to photography, writing and teaching. Jeff enjoys photographing throughout New England, but has concentrated on the Monadnock Region and southern Vermont and has had a long term artistic relationship with Mount Monadnock. He is a featured artist in a number of local galleries and his work is often seen in regional print, web publications and in business installations throughout the country. For years Jeff has published a calendar celebrating the beauty of The New England country-side in all seasons. All of the proceeds from his New England Reflections Calendar have gone to support the Pulmonary Rehabilitation Program at the Cheshire Medical Center. Jeff has a strong commitment to sharing his excitement about the special beauty of our region and publishes a blog about photography in New England.
Showing posts with label cloning. Show all posts

Sunday, July 24, 2016

Chasing Rainbows


With Thanks to Sir Isaac Newton

Summer is the season of rainbows.  They are a magical, improbable manifestations of nature, which often seem to appear without warning and disappear just as quickly.  It is no wonder that they have long been associated with mystical properties, including the fabled pot of gold at their base.  Last week I was reminded that, although they are beautiful, rainbows are actually just a simple manifestation of the prismatic effect of light bouncing through rain drops and that, given the right conditions,  their occurrence can often be predicted.


Raindrop Physics

About four years ago, I published a blog article about rainbow photography, and last week I was once again able to put to work what I learned from my own research.  I was at home when a strong summer downpour passed through my village of Spofford New Hampshire.  I was just getting ready to settle into our gazebo to for some writing, but instead I

Double Rainbow - Opposite Color Spectrum

decided to do a little rainbow chasing.  I knew that rainbows often form as lines of showers pass by.  The storm must also be followed by unobstructed sun shining through to catch the rain drops at a low enough angle to be reflected back and refracted, separating the light into its full visual spectrum.  The secret is to place the sun at your back and look into the rain clouds as they move away. 


Full Unobstructed Rainbows are Easier to Find on the Coast
Rye Beach, New Hampshire


First Find a Rainbow
On this day, I was a little late in recognizing the conditions. I had no rainbow in Spofford, but I had a reasonable idea where one might form.  I grabbed my camera bag, jumped into the car and headed west toward Keene in hopes of catching up to the receding edge of the storm.  I first reached  my rainbow on the outskirts of the city. 


Find a Foreground

Nice Color but Distractions along Route 12

The two key steps which lead to great rainbow images are first, find a rainbow.  The second is to find something interesting to put in front of the garishly colored arch.  I have seen innumerable pictures of dramatic rainbows spoiled by weak and distracting foregrounds.  Telephone poles, wires, housing projects, windshields and highway overpasses,  all may provide a sense of place, but they tend transform the magic into just an uninspiring smear of color across an ugly distracting foreground.  Once you find your rainbow your next thought should always be “where can I go to put something of interest in front of it, that is also close enough to get to before the rainbow fades”.


First Rainbow

As I moved into Keene, my choices for foregrounds  were limited.  I needed to get away from all the layers of development.  I careened  down a industrial park service road and drove beyond the buildings to be able to shoot down the dead end circle and into the trees of the an old Ash swamp.  Not a great foreground, but I got a reasonably good arching rainbow.  After capturing  the “fact” of the rainbow,  the next step was to try to get a more complete and balanced image. 


Chasing the Storm's Edge
Cemetery Gazebo
I headed out chasing the color, always angling west, to keep myself on the critical back edge of the storm with the unobstructed sun to my back.  Given the location of the rainbow and its direction of motion, I didn’t think I would get much from Keene and so I headed southwest on route 12.  A couple of times the colors seemed to be fading, but then I caught up with the storm. I had in mind a spot in Troy that I though would give me a long view, and some nice unobstructed perspectives.   My target was a cemetery just outside of the village, that sits on a knoll with a clear view to Mt Monadnock.  On this day the storm was obscuring the mountain, but  the color was still there, shining brightly against the receding dark clouds. 


Rain Drops

I first grabbed a couple of multi-image panoramas, to capture the full arc of the colors.   My first attempt was marred by multiple rain drops which caused smudges on my lens.  The problem with multi-image panoramas is that any dust or smudges repeat across each of the frames which are merged into the final image.  I cleaned the lens, but my second attempt, although clean, was not as dramatic. 


Content Aware Fill
Post Fill


 I ended up spending too much time in Photoshop using combinations of Content Aware Fill and the Healing Brush to remove all the drops, but the pain fades, and I am happy with the results.  The cemetery also has a nice Gazebo up on the hill.  I had used it in the past for a foreground and once again I was able to combine it with a vivid portion of the rainbow to construct an effective image.


Worth the Tedium


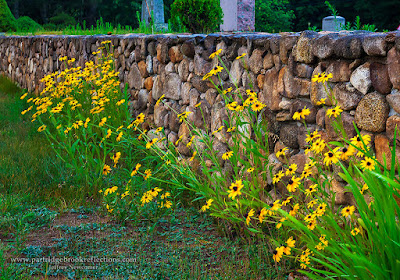
As the sun dipped into the clouds on the horizon, I was finally forced to give up the chase.  I was still able to catch some of the warm light on the Black Eyed Susan decorated cemetery wall and, later, the clear sky opened for a nice view of the craters of the moon.


Given that I left home with only the potential for a rainbow, I was happy with my results.  It just goes to prove that, with a little physics, we don’t have to depend on pure luck to capture one of nature’s most colorful shows.


Jeff Newcomer, NEPG
partridgebrookreflections.com
603-363-8338


Sunday, November 29, 2015

Sensor Dust


Dealing with the Dust

Do I need to say anything more. Anyone with a DSLR knows the frustration of dealing with the blotches on their images created by tiny of pieces of dust, pollen and hair which inevitably settle on the sensor and require long periods of painstaking editing to remove from the final images.


Dust Detected

Lightroom Ready for Spot Detection


Newport Sunrise : Cleaned


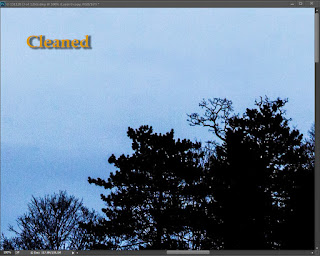
First I should point out that dust usually does not actually contaminate the sensor, instead it lands on the overlying glass anti-aliasing filter.  Although not as expensive as the sensor this piece of glass is liable to scratching and is not cheap to replace. We live in a dusty world and there is no way to fully avoid the problem of sensor contamination. Given that there is no completely satisfactory  cure for the problem, I have only a few incomplete thoughts on the subject of dealing with the dust.


Dust Avoidance.

Since prevention is always the best approach how can sensor dust be reduced or avoided. I can suggest only one absolutely reliable preventive measure, use a fixed lens camera or never change your lens. 


Canon SX50 HS
Dust almost always enters the camera at the time of lens changes and if the lens is never removed the sensor should remain pristine. In especially dusty environments, I will occasionally restrict myself to my fixed lens cameras. Actually dust can come from the shutter enclosed within fixed lens cameras, but modern cameras are designed to avoid this problem and the images from my Canon G11 or my SX50 have never shown dust spots. If I must use my DSLR in these situations I try to restrict my camera to one all-purpose lens and only consider changing the lens if I can find a protected area.


DON'T Changes Lens'


If lens changing is unavoidable I try, although not always successfully, to follow a careful lens switching technique. I start by getting my replacement lens ready for the switch. To reduce the time of exposure, I keep it close at hand. Since much of the dust comes from the internal element of the lens, I use my pocket rocket to blow away any contamination and I try to keep the internal lens cap clean. To keep gravity working for me, I try to keep both the open camera body and the lens pointing down. It is also important to be sure that the camera is turned off during lens changes. Power flowing to the sensor creates an electrical charge that can attract the dust particles.


Reducing the Dust Effect
 
Dusty Sky
You have been fanatic about following good "lens hygiene" and yet dust inevitably can match your efforts with an equal or greater fanatic attraction for the cozy environs of your sensor. Before we talk about approaches to dust removal there are a couple of steps that can help reduce the impact of the contamination.


The visibility of sensor dust on an image is closely related to the
Jaffrey Center Sky : Aperture Effect
camera aperture and since the dust actually lies on the filter overlying the sensor, the apparent sharpness of the dust particles is also related to the distance between the sensor and the anti-aliasing filter. The particles are much more obvious at small apertures. You can demonstrate this relationship by comparing images of a clear sky take at high and low f stops. In my example the dust is seen sharply at f22, but is only a vague smudge at f4. Obviously there are many factors that contribute to the decision to use a specific aperture, but if all else is equal a wide aperture can reduce the need for intense editing when you get home.


What You Can't See

Cut Out the Sky
Sensor dust is primarily a problem in bright homogeneous areas containing little detail. In other words it is mostly an issue in the sky. Reducing the impact of dust is just another reason why you may decide to minimize the amount of uninteresting sky in your images. I still scan all of my images for dust, including areas of high detail, but dust hidden among the forest greenery is much less likely to require cloning than the flecks seen overlying the clear sky.


Getting Rid of the Dust
There is a long list of techniques to physically remove sensor dust and as might be expected the most effective approaches are also those most likely to cause sensor damage, but let's start with the noninvasive techniques.


In-Camera Dust Removal

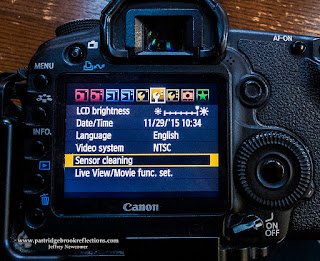
 Many cameras have built-in sensor cleaning functions. Automatic dust removal generally works by generating an ultrasonic vibration in the overlying anti-aliasing filter to dislodge the dust and allow it to fall to a dust collection area below the sensor. This works well for loose particles but sticky contamination such as pollen may not be removed.


Blowers
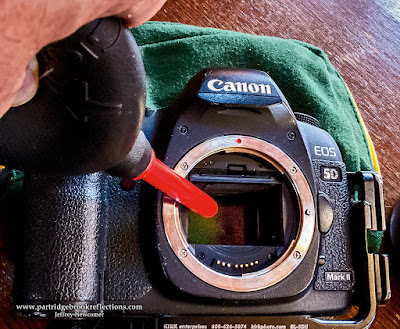
My next step is to use a blower. I use my Giotto Rocket blower to clean the lens elements as well as the sensor. My Canon 5d has a lens cleaning function which locks the mirror up to expose the sensor. I insert the blower right over the sensor and apply several vigorous squirts of air. I generally do this with the camera aimed down in hopes that the dust will fall away. This procedure should not be done with canned compressed air since the jets may be contaminated with oils or other solvents. The use of a blower is a reasonably safe procedure, but it is not totally risk free. The danger is that if the power shuts off during cleaning, the mirror and shutter will close potentially leading to severe damage. Ideally the camera should be attached to an external power source or at least have a fully charged battery.


Touchy-Feely
If after I have applied a vigorous blow there is still substantial amounts of dust on the sensor, I am faced with a dilemma. The next steps in cleaning are more vigorous, involve touching the anti-aliasing filter and can cause scratches or leave residues. I am very reluctant to risk damage to the sensor and I have to consider very carefully weather physically removing the remaining dust is worth the risk. I have only rarely resorted to the use of brushes and swabs and have never suffered a disaster, but I don't like pressing my luck. Most often I have decided to accept the requirement to remove dust splotches in post processing. Dust removal tools in Lightroom, Photoshop and other editing programs have improved to the point that there is less need to risk your sensor, but, if you are an adventurous sort, the internet contains many excellent reviews of the more invasive dust removal techniques.


An Plan of Action

Use Levels Adjustment to Reveal Dust
My general approach is to do all I can to reduce the exposure to dust and minimize its effect. I use the automatic sensor cleaning and when necessary I carefully blast away with blower. In general I can manage the remaining dust with the use of Photoshop's Healing and Cloning brushes. 


Remove with Healing Brush
 
I usually use a Levels adjustment to darken the image, which reveals even the more subtleblotches. Dust spot removal is just part of my routine detailed inspection of my images and does not add significantly to my processing time. Both Lightroom and Photoshop have specialized spot removal tools, but I usually still stick to my careful manual approach.  I find that I have better control over the size of the brush and the source of the healing pixels.

Five Barns, Putney, Vermont : Cleaned Sky


Lightroom Spot Removal


More Foreground, Less Sky
Don't get me wrong, I still get annoyed by all those blemishes and when they get too prominent and refractory to ordinary cleaning methods, it is probably a good time to send the camera to the manufacturer for a thorough cleaning. It means having to fall back on my smaller "pocket" cameras, but it can be nice to be liberated for a couple of weeks from my massive beast. And, when the monster returns, it is nice to have a spanking clean camera with that lovely, new camera smell and no dust.


Jeffrey Newcomer
Partridgebrookreflections.com


Sunday, January 12, 2014

Photographing Falling Snow


And Getting Rid of the Blotches

It is a wonderful, but also occasionally painful fact that landscape photography is often at its best when the weather is at its worse.  This is certainly true when it comes to shooting the winter storms.  Whether gently settling or blown by ferocious winter gales, falling snow drops a lovely veil on any winter scene, but capturing the storm imposes a whole new set of opportunities and challenges.  These include both the practical difficulties of managing the cold and wet, and  also dealing with the fact that snow can appear completely differently depending on setting that are chosen in camera.

Practical Problems
 
The physical problems include keeping the camera, warm and dry and avoiding or removing the snow flakes that are inevitably attracted to the lens.  Simple preventive measures such as the use of a lens hood and avoiding aiming the camera directly into the flying snow can be very helpful, but in heavy snow I typically shroud my camera under a towel and only uncover the lens and viewfinder when I am ready to shoot.   Despite the best efforts, snow can attach to the lens.  It is important to check regularly and have dry lens cloths available to clear the view.  I have had the experience of taking a long series of images, only to discover that my lens had become blotched somewhere in the middle of the shoot. 

Basic Settings
Shooting falling snow requires a number of decisions about how you want the flakes to be portrayed.  Subtle differences in shutter, aperture and focal length can make a striking difference in the appearance and mood of the image. 

Shutter
Simply stated, long exposures, usually less that 1/100, will show

Central Square Storm 2 Seconds
the snow as streaks, while a quick shutter will catch the snow as individual flakes.  As longer exposures are used there is a point where the individual flakes disappear and what is left is a soft fog which intensifies with greater distance from the lens.  I saw this nicely displayed in my 2-3 second
exposures of the Christmas lights on Keene's Central Square.  The snow was coming down heavily but no falling flakes could be seen.  Of course the correct shutter will depend on how quickly the flakes are falling. often subtle differences in shutter can make a significant difference in the mood of the image.  Check out the tractor and barn comparison below.   Experimentation is always necessary. 


In the Storm, 1/90th

In the Storm, 1/250th


F13, 1/90th
Aperture
A small aperture, with a large depth of field, will include a greater depth of sharp flakes, which will tend to make the storm appear more intense.  A wide aperture will focus attention on a smaller, more intimate selection of flakes and the shallow depth of field can allow the snow to stand out better against the background's soft Bokeh. 


f20, 1/100th


1/250, 340mm
Focal Length
The foreshortening effects of telephoto lens' tend to compress deeper selections of snow again giving a more intense feel.  Wide angle lens' give a broader sense of the surrounding but may need heavier snow to capture the full power of the storm. 


Enhance Storm Intensity:Long Shutter, Small Aperture & Long Lens
1/6 th, f 16, 105mm


Crank the ISO
Of course in tough weather conditions compromises need to be
made. As always, the appropriate setting for each of these parameters is affected by the others.  In the dark of a storm there may not be enough light to combine a fast shutter with a small aperture.  Fortunately we now have the option to crank up the ISO.  Higher  ISO levels invariably result in more noise, but the good news is that there may be very few situations in which high ISO noise is less noticeable than in a blizzard.


Flash
Snow flake will stand out better, especially at night, if they are
Stone Bridge, Flash with Blotches
illuminated by a focused light source, such as a street light or car headlights, but here is probably no better way to stop falling snow dead in its track than to use flash.  Regardless of the  shutter speed the short duration of an electronic flash will freeze any nearby motion.  This effect will dissipate by the inverse square law as distance from the flash increases.  The problem with flash is that it most prominently lights the nearest flake, which are inevitably large and distracting.  With removal of the grotesque blotches (see below) the remaining flakes are more naturally highlighted  The combination of flash and natural light leads to a complex mixture of exposure and color temperature.  Again experimentation is in order.


Large Blotches Removed (See Below)


Ok, that is some of the basics.  Now let me finish with one of my pet peeves about falling snow images.  The Blotch.


Curing the Blotches
Blotched Storm
 

 For me "blotches" are the bane of my falling snow images.  You have undoubtedly seen beautiful atmospheric images of snow storms, but here and there are big blotches of white that seem out of place.  These white smudges come from the snow flakes that are close to the lens when the image is captured.  They are invariably out of focus and to me at least, extremely annoying.  Happily there are. number of ways to eliminate the blotch. 

Shade the Lens

 The simplest solution is to shade the lens from nearby flakes.  In the tractor by the barn comparison,  I shot from under a porch roof at Roads End Farm.  Magically, no blotches.  When a roof is not at hand an umbrella or a piece of card board can also help.  Just keep your shade out of the frame.


Central Square, 1/50th
Slow Shutter
The blotches are generally most noticeable at faster shutter speeds. With longer exposures the flakes are streaked and the smudged nearby flakes become less defined. Again the appropriate shutter will be dictated by the speed of snow fall and the size of the flakes.


Cloning and  Healing Brush
You knew we would have to get to Photoshop eventually.  Given the random complexity of the snow images, it is comparatively easy to use Cloning or the Healing Brush to replace the blotches.  In newer versions of Photoshop, the Content Aware Fill tool can also correct the scars. The automatic techniques, such as the Healing Brush usually do an amazing job, but occasionally I will use cloning to find a good source that matches the original background.


Multiple Image Layers 
My favorite approach to the blotch is to use multiple images.  Since the location of the blotches vary from image to image, I can use one image to patch another.  I pick the best of a series of images and then add the second best in a layer above the first.  After aligning the two images, I mask out the top layer.  I then scan the image and wherever a blotch appears I simply paint with white on the upper layer mask.  This nearly always brings up a section without the blotch. To me this is the most elegant solution, since the uncovered background tends to match that of the lower image. The blotches on the Stone Bridge above were cleaned with this technique.

The great thing about falling snow is that it provides a treasure chest of creative opportunities all within the easy reach to your camera's basic settings.  Now if we can get some snow out of this miserably cold weather, we will be set to go.  Get out there and experiment.