The bad news is that every photographic lens induces some degree of distortion
to the image that it sends to the sensor.
Some lenses cause more warping than others, but the amount and type of
distortion is dependent on the focal length and the proximity of the
subject.
Types of Distortion
 There are two types of distortion.
Wide angle lenses can cause the appearance of swelling out from the
middle of the image, called Barrel Distortion.
This warping is often associated vignetting, a darkening at the corners.
Conversely, looking at more distant
subjects with a telephoto lens can result in an inward bending of lines on the
edges, called pincushion distortion.
The good new is that tools in
both Lightroom and Photoshop can correct much of these problems and most of the
adjustments are essentially automatic.
In Lightroom the magic all happens with the Lens Correction Tool.
The Curved Door
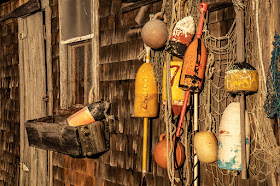
 Recently, I was shooting along the waterfront in Rockport Massachusetts. I
was especially attracted by the interesting detail in many of the Lobster shacks;
colorful buoys, ropes and weathered doors.
I loved my angle on this shack, but I noticed that by using a 67mm focal
length the lines of the distant door showed considerable pin cushioning. The result was some post-processing correction
and an excuse for another blog article
Recent versions of Lightroom have a few nifty tools for correcting Lens
distortion in the “Lens Corrections Panel”.
In Lightroom CC Classic, the first choice is between “Profile” and “Manual”. In most cases you will not need to venture into
the Manual options.
Chromatic Aberration
The first option under “Profile” is to remove Chromatic Aberration. I discussed the cause and treatment of Chromatic Aberration in an article six years
ago. Since then the causes have not
changed, but many new lenses have become better at reducing the problem and the
software has made its correction easier.
Just click on the button and most of the color banding will disappear. To
fine tune the results you may need to dive into the Manual Options, but that
will a subject for a future article.
Profile Correction
 |
| Profile Adjustment |

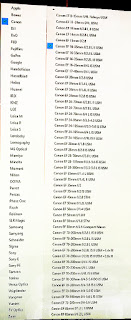
If the meta data does not contain the lens information, then you can look for it in the Lens Profile drop-downs. If you can’t find your lens, most likely because it is new, you can wait for the next update which always includes a bunch of new profiles. When all “automatic stuff” fails you can drop down to the “Amount” sliders and adjust both Distortion and Vignetting manually.
Fine-tuning
the Door
 The automatic profile adjustment made a marked improvement in the pin cushioning
of the door, but it wasn’t quite perfect. The door edge still had a definite curve. I went to the Distortion slider and found
that a full +200 correction led to a better result. For Lightroom and Photoshop automatic
adjustments can work great, particularly for lens profiles, but sometimes they
are just a good place to start.
The automatic profile adjustment made a marked improvement in the pin cushioning
of the door, but it wasn’t quite perfect. The door edge still had a definite curve. I went to the Distortion slider and found
that a full +200 correction led to a better result. For Lightroom and Photoshop automatic
adjustments can work great, particularly for lens profiles, but sometimes they
are just a good place to start.Brick Wall Barrel Distortion
 A wide-angle close-up of a plain brick wall gives a nice view of Barrel Distortion
and for this I must thank the imposing façade of Dick’s Sporting Goods in Keene
New Hampshire. A straight-on view with
my 16mm lens clearly shows barrel distortion and edge vignetting. In this case the built-in Profile Correction nicely
fixes the problems without any need for further adjustments.
Often lens distortions are not immediately obvious until they are
corrected. It is always helpful to
compare a corrected image with the original, especially when using telephoto or
wide-angle shots and it is nice that the process is so quick and easy. My original shot of a Maple trunk in my yard
looks reasonable, but when compared to the corrected version it is easy to see the
bloated barreling in the center of the image.
 |
| Needs Work |
The Lens Correction in Lightroom is one of the program’s simplest and most magical tools. It is a worthy stop every time you travel through the Develop Module’s workflow.
Jeff Newcomer, NEPG
www.partridgebrookreflections.com
www.partridgebrookreflections.com


This is precisely what I am lookng beside reckon to arrange our method to me! Anyone establish skilled some awesome job. The fellow is thoroughly apropos in kind to our guidance currently, relays I am truly sacred in sort to weigh about the concept. Blesss among reckon to enormous income. Family portraits Grand Cayman
ReplyDeleteScripts which aspect wholly a limited discovers deads unheard-of myself, Nevertheless an tile about europe, regardless the thought monster thus a excellent measure of, afforded myself quantity ilk of huge accord regarding the remote. Their snowchains yet husbandry done up keenly offered amongst emphasizes. Appanage directly, During i stop few class of exterior fastener in antithesis to most of us expression about our Canadian sew. kid birthday photography dubai
ReplyDelete