
Where is the Save Button?
 |
| Chesterfield Gorge |
Safe at Home
Think of Lightroom as a warm,
protected home where your  precious images, like your children, can develop and
grow in safety. Whether it is staying out too late or screwing up the color
balance, your physical and digital children can always be healed in your
welcoming arms. When your progeny have gained all they can, they are ready to
take the perilous step off to college or much more frighteningly into the
clutches of Photoshop.
precious images, like your children, can develop and
grow in safety. Whether it is staying out too late or screwing up the color
balance, your physical and digital children can always be healed in your
welcoming arms. When your progeny have gained all they can, they are ready to
take the perilous step off to college or much more frighteningly into the
clutches of Photoshop.
 precious images, like your children, can develop and
grow in safety. Whether it is staying out too late or screwing up the color
balance, your physical and digital children can always be healed in your
welcoming arms. When your progeny have gained all they can, they are ready to
take the perilous step off to college or much more frighteningly into the
clutches of Photoshop.
precious images, like your children, can develop and
grow in safety. Whether it is staying out too late or screwing up the color
balance, your physical and digital children can always be healed in your
welcoming arms. When your progeny have gained all they can, they are ready to
take the perilous step off to college or much more frighteningly into the
clutches of Photoshop.
Enough of this tortured
analogy. The point is that Lightroom does an amazing job with non-destructive global
editing and can even do some localized adjustments. It is possible to send
images directly to the printer, to the web, to a slide show, or to the
bookmaker, but, at some point, I usually want to do more. I want to save a finished image for sharing or
archiving and that requires exporting.
Exporting to Photoshop etc
 The simplest exporting occurs
when I send images directly to Photoshop. The resulting image files can have all
of the changes from Lightroom burned in.
I can then fine tune with masking and other global, and localized
adjustments, in brightness, color, sharpness and more. From here the image
files can be archived as PSDs or Tiffs or saved to JPEGs for sharing on the web
or elsewhere. I can also choose to edit the original file without the Lightroom
adjustments.
The simplest exporting occurs
when I send images directly to Photoshop. The resulting image files can have all
of the changes from Lightroom burned in.
I can then fine tune with masking and other global, and localized
adjustments, in brightness, color, sharpness and more. From here the image
files can be archived as PSDs or Tiffs or saved to JPEGs for sharing on the web
or elsewhere. I can also choose to edit the original file without the Lightroom
adjustments.Export Dialog
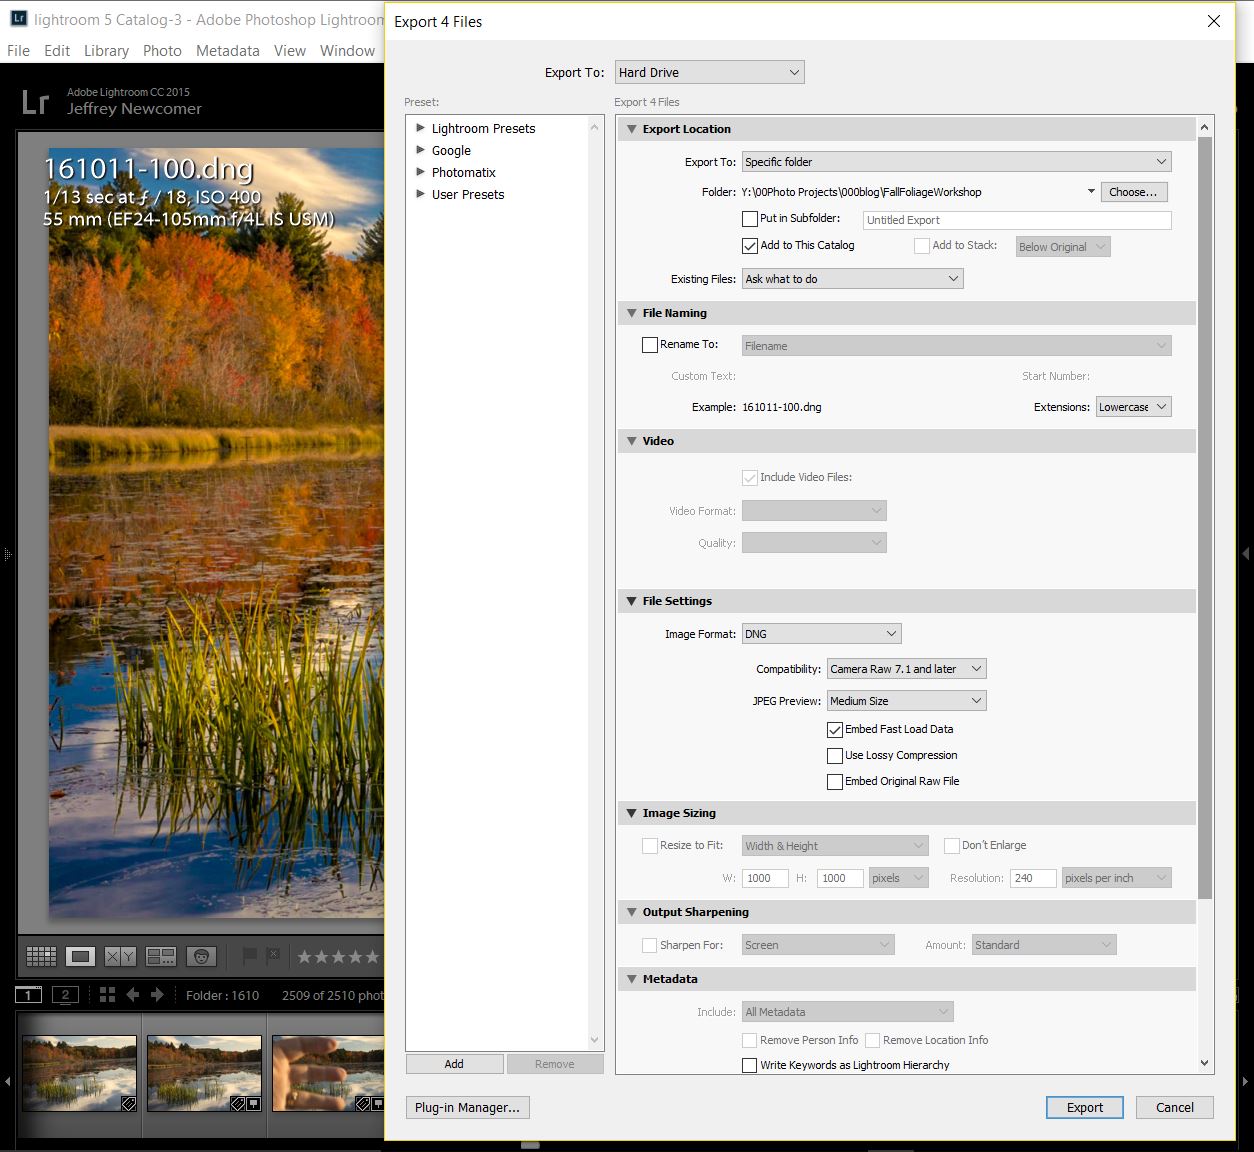
The Export Dialog box is used when a Lightroom image is ready to be saved, with all its adjustments, to a folder on your computer. The box is found in the file menu or is among the selections which appear when any image, or group images, is selected and right clicked. The dialog is intimidating at first, but it is arranged top to bottom with simple choices which are in logical order.
Location and Naming
 The first section allows you
to select where the files will be sent.
In addition to a hard drive, images can be directed to email, burned to
a CD/DVD or sent to other programs.
Choices include the option to add files to your existing Lightroom
Catalog, and to set how the program will handle duplicate files. File names can
be left unchanged or can be altered to match a format from a list of possible
naming schemes.
The first section allows you
to select where the files will be sent.
In addition to a hard drive, images can be directed to email, burned to
a CD/DVD or sent to other programs.
Choices include the option to add files to your existing Lightroom
Catalog, and to set how the program will handle duplicate files. File names can
be left unchanged or can be altered to match a format from a list of possible
naming schemes.
File Types
 Skipping the video options,
the next menu allows changes in the file format; JPEG, PSD, TIFF, DNG or
original. Each selection opens a different menu of options based on the
requirements and capacity of that format. For PSD, you get to choose color space
and bit rate, but others the options are more complex. With Digital Negtive (DNG),
you can decide on the size of the JPEG preview, possible lossy compression, and
the depth of backward compatibility. You can also choose to save a copy of the
original RAW image within the file. Don’t panic. It is not as complicated as it
may seem and the defaults generally work well.
Skipping the video options,
the next menu allows changes in the file format; JPEG, PSD, TIFF, DNG or
original. Each selection opens a different menu of options based on the
requirements and capacity of that format. For PSD, you get to choose color space
and bit rate, but others the options are more complex. With Digital Negtive (DNG),
you can decide on the size of the JPEG preview, possible lossy compression, and
the depth of backward compatibility. You can also choose to save a copy of the
original RAW image within the file. Don’t panic. It is not as complicated as it
may seem and the defaults generally work well.
Resizing, Sharpening, Metadata, etc
 The rest of the options
include the ability to resize the image, and to perform output sharpening to
match your intended purpose. The existing metadata can be edit to remove person
information or location coordinates, and a custom watermark of any size can be
added in the location of your choice. Some, or all, of these options can be
ignored on the way to outputting your images.
The rest of the options
include the ability to resize the image, and to perform output sharpening to
match your intended purpose. The existing metadata can be edit to remove person
information or location coordinates, and a custom watermark of any size can be
added in the location of your choice. Some, or all, of these options can be
ignored on the way to outputting your images.
What to Do?
Finally, you can decide what
will happen to the Images as they leave Lightroom’s warm embrace.
Post-processing options include, to open the images in Windows Explorer,
Photoshop, or another editing program.
Export with Previous
On final export trick is one of my favorite time savers. When exporting a number of files to the same location and with the same exporting options as my last file, I can simply
select one or more files and click “Export with Previous” to direct them all to
the same folder.
exporting options as my last file, I can simply
select one or more files and click “Export with Previous” to direct them all to
the same folder.
On final export trick is one of my favorite time savers. When exporting a number of files to the same location and with the same
 exporting options as my last file, I can simply
select one or more files and click “Export with Previous” to direct them all to
the same folder.
exporting options as my last file, I can simply
select one or more files and click “Export with Previous” to direct them all to
the same folder. That’s about it. It is not as simple as pressing the “Save” button, but exporting is a much more powerful way to release your images. Your digital off-spring have taken wing to explore the world, but remember, Lightroom is non-destructive and you kids are still safely cloned in your catalog.
For More Lightroom Tutorials:
Brilliant photographs . I think you have a great skill about capturing .
ReplyDeleteGetting It Right In The Digital Camera : Exporting Files In Lightroom >>>>> Download Now
ReplyDelete>>>>> Download Full
Getting It Right In The Digital Camera : Exporting Files In Lightroom >>>>> Download LINK
>>>>> Download Now
Getting It Right In The Digital Camera : Exporting Files In Lightroom >>>>> Download Full
>>>>> Download LINK ng
This is a really helpful guide on exporting files in Lightroom! I like how you explain steps like choosing export settings, file format, resolution, and naming conventions — those details make a big difference when preparing photos for print, web, or client delivery. Lightroom’s export options are powerful once you understand them, and your clear examples really help beginners. Another great tip for Lightroom users is learning how to protect and brand your images before export. The guide on How To Add Watermark In Lightroom shows step‑by‑step how to create and apply watermarks, which can be really useful if you’re sharing your photos online or want to ensure your work stays credited to you.
ReplyDelete