 |
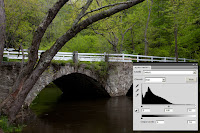
| Old Stone Bridge, Ashuelot River, Keene New Hampshire |
Getting Exposure Right in the Digital Camera
Last week I began the discussion of exposure control in digital photography and more specifically about the use of the histogram to nail the optimal exposure every time. Much of that discussion focused on the importance of adjusting exposure to avoid the extremes. To avoid overexposure, positioning the histogram against the right side and clipping the highlights or underexposure, pushing the histogram against the left side and loosing detail in the shadows, but there is more to optimal exposure than avoiding the extremes.Technically if the histogram is safely enclosed within the graph without piling up on the right or left then you might expect that the Goldilocks Rule would apply, since it is neither too bright or too dark and all tonal levels are recorded. But unlike Goldilocks, every position within the graph is not “just right”. It is here that the “Expose To The Right” (ETTR) rule applies.
ETTR
Exposing to the right is an approach designed to get the most from the digital sensor in terms of tonal range, noise reduction and color quality. In practice it means slightly overexposing images, shifting the histogram to the right where digital light sensors work more efficiently.
The Physics
Digital image sensors are linear devices that translate the incident light into an electrical signal which is directly proportional to the intensity of the light. The greater the light, the greater is the portion of the sensor's tonal range that is dedicated to that part of the image.
 |
| Low Contrast : Histogram in the Middle |
Anytime I start talking about the interaction between linear and
 |
| Exposure Right Shifted, ETTR, Not Pretty |
An Example
 |
| Left Shifted Exposure |
 |
| Exposed toward Right |

As an example, here are two exposures taken of the classic old stone bridge in Keene New Hampshire. The first was underexposed, but looked better on the LCD screen. The dark tones are recorded on the far left of the histogram. The second was "exposed to the right",
 appearing overexposed and washed out on the screen, but the histogram showed that the dark tones were shifted to the right, on a more favorable portion of the scale, and that the highlights were not clipped. The two images looked very different on the LCD screen, but I then processed each in Camera Raw and Photoshop to get the best results. The two images were adjusted to look grossly the same, but examination of the detail, especially in the shadows, shows that the brighter image has smoother tonal range and less noise. ETTR does work!
 |
| Detail Comparis |
A Few Caveats for ETTR:
First, to get the tonal benefits from ETTR, images must be shot in RAW, with the proper brightness brought back in the RAW converter. In addition to having a much smaller native tonal range (only 256 at 8 bits), JPG images are processed in camera. Their tonal range is "baked in" before the picture ever reaches the computer, leaving little margin for salvaging the over exposed images.
Secondly , as you increase the exposure it is important to avoid going too far, clipping or blowing out the important highlight tones. As I discussed last week, you must trust the histogram and avoid piling up against the right side. Most cameras have an additional visual aid to help avoid clipping. The "blinkys", the flashing lights on the LCD image are there to identify areas of blown highlights. Annoying but very helpful.
Finally, although ETTR has become the conventional wisdom for digital exposure, there is still some controversy about it's value. No surprise, we are photographers, we must debate! Digital sensors are constantly changing and improving. Only experimentation will tell you how valuable this technique will be for you.
So give ETTR a try. The biggest hurtle is to get over the strong desire to make the LCD image look it's best, but here again, in the digital world, getting it right IN the camera means something different than getting it looking it's best directly FROM the camera.
Check out Part One of Getting Exposure Right in the Digital Camera
Very informative. Great article. Thanks Jeff.
ReplyDeleteThanks for this article. I was advised by an instructor/mentor to ETTR and have found it helpful.
ReplyDelete