 | |
| Nellie Beyond the Wall, Sort of |
I have said many times before, I live and die by Photoshop. This remarkable program rescued me from the my dank, fume infested wet darkroom and opened a new world of possibilities to bring my images to their best. There are many great books and tutorials about Photoshop but I want to talk briefly about a few of the essential elements of the program which make it such a revolutionary and essential part of my creative work. I have kept up with the latest versions of Photoshop including the cloud based Photoshop CC. The newest flashy features are always fun to play with, but the continuing strength of the program has much more to do with the long established tools that have been refined over the years, but in their simplest form remain the core of this magical window on photography. My goal is not to provide detailed tutorials, but to help those unfamiliar with the program to develop an appreciation of its power and to understand why it is worth the effort to incorporate it into their creative process. Full versions of Photoshop come with a substantial sticker shock, but most of what I will be discussing can be done in Photoshop Elements and a variety of other editing programs for a substantially reduced cost. So I must start this discussion with Layers.
Layers
Off all the tools in Photoshop, Layers is the most essential to my work and it was one of the most difficult to fully understand. The learning curve for Photoshop can be quite steep. It took me three passes at the program before it finally clicked. I started with a tutorial book and then a coarse at my local college - nothing! Finally I found a book by Ben Willmore that got me going and I haven't stopped learning since. This program is so broad and deep, that I am convince that no one can ever truly understand it all, but you don't need to be a master to reap much of Photoshop's amazing power. Layers is a key part of that power.
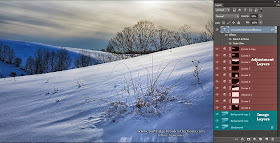
Layers are used in the editing process to add picture components or processing to the original background image. They are most often compared to placing a transparent sheet over a picture on which an images may be place to overlie a portion our a substantial amount of the original picture, or on which processing can be applied to affect the underlying image. These are referred respectively as Image Layers and Adjustment Layers.
 |
| Layer Stack. Adjustments only where they are needed |
Image Layers
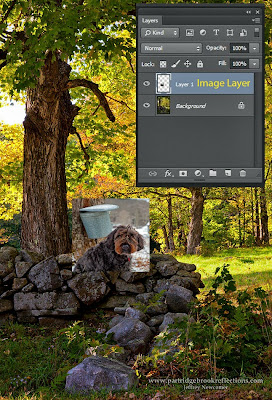
An Image Layer contains image material, actual pixels, which are laid down above the original image. Top layers are always seen as overlying and obscuring those below, and in regions where the image layer is blank, the underlying picture will show through.
Adjustment Layers
Adjustment layers work in the same way as Image Layers but they contain processing instructions rather than pixels. An Adjustment
 |
| Adjustment Layers |
Layer Masks
Layer Masks are not actual independent layers but are best thought of as a window placed over an Image or Adjustment Layer to control how it is seen. The basic rule is, "White reveals, Black conceals". When an Adjustment Layer is created you will see a
 |
| Windows on the Layers |
Enough! I promised that this would not be a detailed tutorial. Lets look at a quick example of the power of layers. I have concluded that my images have too few pictures of our dog Nellie, so why not add her in.
 |
| Background Layer : Marlborough, NH |
 |
| Nellie, Source Image |
Nellie Beyond the Wall, Compositing the Pooch.
 |
| Image Layer of Nellie |
would never do this in my work, but anything for my readers. I found a picture of her from a maple sugaring shoot I did a couple of years ago that I thought would work for this exercise. I adjusted the size and then moved a cropped version over to my background image. This automatically created an Image Layer overlying the background. Unlike Adjustment Layers, Image Layers do not have layer masks when they are created, but a mask is just one click away. I then removed all the extraneous parts of the image layer by painting the mask with black over everything that wasn't Nellie, and over the parts of her that belonged behind the wall.
 |
| Curves Adjustment Layer with Mask |
The Stack
 |
| Full Layer Stack |
This week I have been experimenting with video screen capture to augment some of my articles. Check out my first attempt which is a short video successively revealing the effect of the layers in my example. I've got a lot to learn with this, so let me know what you think.
Video Screen Capture also on YouTube
Anybody know how to make the thumbnails for other video disappear from the end of the my video?
Jeffrey Newcomer
Partridgebrookreflections.com
This comment has been removed by a blog administrator.
ReplyDeleteBy reading the blog I choose the comment most "My goal is not to provide detailed tutorials, but to help those unfamiliar with the program to develop an appreciation of its power and to understand why it is worth the effort to incorporate it into their creative process."
ReplyDeleteclipping path service
wow! really great job .it's interesting tutorial for adjestment photography by photoshop.thank you for shearing hlelpful post.
ReplyDeleteclipping path
the post forced me to read full of it.great job
ReplyDeletehope you would continue..
clipping path service
Thanks jeff for your effort!!
ReplyDeletenovice user bad in need of these kinds of tutorial.
clipping path
Thanks fort this best resources that you shared, this is a very good resources.
ReplyDeleteGreat reminder that so much of a good photo starts in-camera, not just in editing! Mastering the basics really saves time later. For post-editing perfection, I recommend Clipping Path Services by MyPixeler.
ReplyDeleteDigital Camera captures high-quality images and videos, allowing users to preserve moments with clarity and creativity. Exploring photography with a digital camera helps information about foxtpax software develop visual skills, composition awareness, and an appreciation for technology in imaging.
ReplyDelete