Sunday, April 29, 2018

Catsbane Brook


I often talk about grand locations, tall mountains, restless ocean shores, or classically appointed New England villages.  Certainly, New England offers an abundance of such attractions, but I live in a quieter slice of the region and I revel in the simple beauty of our “Currier and Ives” corner of New Hampshire and Vermont.     

Meandering Catsbane
The Monadnock region in southwestern New Hampshire and also the southeastern part of Vermont are my prime photographic territories.  It is a country of rolling hills, with sweet little villages nestled in its hollows, and featuring classic farms, looking and working much as they did 150 years ago.  We glory in Mount Monadnock, our one big mountain, but as the archetypal “Mountain that Stands Alone”, Mt Monadnock does not dominate the countryside.  Rather, it contrasts and compliments the surrounding hills and fields.  

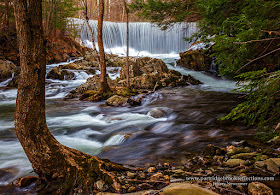
Catsbane Falls and Cascades

Gently flowing brooks punctuated by cascades and waterfalls are another feature of our region.  Spring is a great time to enjoy the flowing water and, since my second annual Spring Waterfall Workshop is coming up in a couple of weeks, I thought this would be an appropriate time to celebrate one lovely little brook in my home town of Chesterfield New Hampshire, the Catsbane Brook

Catsbane Brook winds its way through Chesterfield, meandering north and finally emptying into the Connecticut River in West Chesterfield.  It stretches though most of the town and is the longest brook within Chesterfield’s borders, but what is a Catsbane?

Catsbane Brook, What’s in a Name

 I have searched for a good definition of “Catsbane” and have found that it is a colloquial name for a variety of Orchid that may be especially toxic to felines, but why was this brook named after a poisonous flower?  A good question and, for an answer, I went to Audrey and Neil at the Chesterfield Historical Society.  These wonderful ladies possess a wealth of knowledge about our town, and very quickly, they were able to direct me to Oran Randall’s History of Chesterfield, published in 1882.  On page eleven I found a story from the town’s early history, in which two scouts rested along the brook for lunch.  When one lingered a bit too long to drink the water, his companion wished that the water was poisonous Catsbane, or perhaps “Rats-Bane” (Arsenic). Possibly just a dusty old folk-lore, but whether or not this story is true, it makes a nice tale.  You can read the story and decide for yourself.

Finding the Source


Beaver Pond , Catsbane Origin

My first goal was to find the point of origin of Brook.  Over its course, several streams contribute to the Catsbane’s flow, but its most notable origin is from a large beaver pond in the south of town. 


Beaver Dam


Beaver Dam Spring


The pond features an impressive system of well-maintained dams and the brook begins its travels as a modest stream, trickling under the logs. This week I explored the course of the brook and supplemented the many photographs that I have taken of the Catsbane over the years.


Hubbard Falls and Town Brook 
Hubbard Falls
Of the many contributors to the Catsbane’s flow, Hubbard Brook is likely the most significant.  My experience with the Hubbard Brook has primarily been of its dramatic waterfalls found before it crosses the Gulf Road and mingles in a substantial wetland.  With the addition of the waters of Town Brook, the brook eventually becomes the Catsbane before it crosses under Route Nine and flows into West Chesterfield.


Town Brook


Town Brook to the Catsbane

Through West Chesterfield
Pond Brook Falls

West Chesterfield is one of the villages making up the town of Chesterfield and it is here that the Catsbane Brook shows its most dramatic faces.  The Catsbane’s journey through West Chesterfield is marked by frequent waterfalls and cascades.  Early on, the brook is joined by Pond Brook with a lovely little waterfall.  


A number of other waterfalls can be found as the Catsbane drops though West Chesterfield’s little village, but the most dramatic no longer exists.  What I called the Catsbane’s “Little Niagara”Falls was formed as the brook passed over an old mill dam, but sadly, in the last couple of years, the dam has been by-passed.  For now there remains only a powerful jet of water feeding cascades, but I won’t object if some trees washed downstream to block the sluice way.


The Catsbane "Little Niagara"


Sluice Under the Dam


The Catsbane finishes it course meandering through flats to a broad opening into the Connecticut River.


Catsbane into the Connecticut River


For years I have enjoyed photographing the Catsbane’s beautiful features, but it was instructive to follow the water from its modest origins to the dramatic flow at it terminus.  It made me appreciate that towns throughout New England are cut by intricate webs of water, which generally go unnoticed, but are critical to the health of the ecosystem.  Take some time to explore the patterns of water in your own community, and maybe even take a picture or two.


Jeffrey Newcomer


Sunday, April 22, 2018

Aperture Size and Depth of Field, The Jesus Factor

Garwin Falls, Small Aperture / Deep Depth of Field

I often say that much of what I know about photography comes from teaching classes and writing my weekly blog.  That is particularly true when I get asked questions that I can't easily answer.

Whence Cometh f Numbers?


f numbers, Where Dragons Dwell
A few years ago, I was observing one of Steve Hooper’s great photography class sessions at Keene State College’s Cheshire Academy for Lifelong Learning.  A student came up to me after the class to ask a seemingly simple question, “Why do the f numbers form such an apparently random sequence, and why do they go in the wrong direction.  


Of course, I have always known the f stop sequence.  I understood that f/8 represented an aperture that is half the size of f/5.6, but I never felt that I needed to understand the origin of this, seemingly nonsensical progression.  


Suddenly, it bothered me that I had such a minimal understanding of this fundamental aspect of camera function.  The result of this revelation was a two-part search.  The first to understand the explanation myself, and secondly to find a way to explain it to future students.  It wasn’t easy, especially because the explanation involves MATH!, including inverse ratios and squares, but it was worth the effort.  Not only did it clarify the weird f stop sequence, but it also explained other mysteries of lens function.  You can check it out in my Exposure article from November 2014 (I hid my explanation at the bottom of the article!). 


It was a valuable process of exploration and discovery, all coming from a simple question, and a question that I never thought required an answer.  Just one example of how my need to explain photography to my students has led to my own education.  And, this week, it happened again.

Introduction to Digital Photography - The Question
Abby at f/3.5, Nice Shallow DOF
I am currently in the middle of my Introduction to Digital Photography course at Keene Community Ed.  This week’s class was all about Exposure.  I was explaining how aperture size impacts the amount of light reaching the sensor, and also affects depth of field.  You know the drill, wider apertures lead to brighter images but also result in shallower depth of field.  But then the question came, “Why does a wide aperture result in a small depth of field?”


Peggy's Cove Sunset, Nova Scotia
Small Aperture: Deep Depth of Field
I responded with my usual insightful answer that I use when I don’t know how to explain something, “Because if does!  Jesus made it that way!”  Surprisingly, that seemed to be a sufficient explanation for most of the class, but it is more likely that they just realized that they couldn’t expect any more enlightenment from me.


But the question was asked, and I knew that I couldn’t expect any sleep until I understood the answer sufficiently to explain it to my students.  Happily, the solution is straight forward and in no way related to a deity.  I thought I had a superficial understanding, but I  found a diagram from Wikipedia that I was able to modify to demonstrate the phenomena more clearly.  


The upper and lower figures show the imaging of three objects at different distance from the lens.  The top is seen through a wide aperture and the bottom through a smaller.  In both cases the lens is focused on the center dot (2) and dots 1 and 3 are further and nearer respectively.  For me the essential thing to note is that, regardless of aperture, all three dots are brought to a point of sharp focus (purple dot), but only 2 (blue) reaches that focus on the surface of the sensor.  The rays from Dot 1 (red), which is the most distant, converges on a point in front of the sensor. By the time the rays reach the sensor plane they have spread, and therefore the image does not appear sharp.  The focus point for the near dot (3) (green) is at an imaginary point converging at the back of the sensor, and therefore also leaves a blurred image.   


In the top figure, the wide aperture gathers more light, but the wider opening results in a more drastically splayed distribution of rays, leading  to a bigger area of blur.  These areas of blur are often referred to as “Zones of Confusion” (Green Bracket) and, when the zone is big enough, the subject will appear out of focus.

In the bottom figure the smaller aperture leads to a more columnated distribution of the rays.  This leads to a darker exposure, but also the most drastically splayed rays are blocked.  The focus point for each dot is the same but, because of the small aperture, the rays reach the sensor with a smaller area of blur, and the “Zone of Confusion” can be small enough that our eyes may see them as sharp.  Furthermore, with a small aperture, the subjects can be further from the point of perfect focus before the dot spread (the zone of confusion) is enough to appear blurry.

This is why a large aperture has a smaller depth of field.  
QED.  


Shifting Sensor Plane
Shifted Sensor for  Increased DOF
One more thing to notice from this diagram.  Because all of the dots reach a sharp focus point somewhere, it can be seen that the sensor can be angled so that all of the points can be captured in sharper focus ( see figure).  This is why view cameras and tilt-shift lenses can record greater depth of field, by shifting the back or, more often, the lens to intersect with a broader range of focus points. Nobody asked, but I’ll throw that one in for free.

I can’t wait to lay this stuff on the next meeting of my class!  That will teach them to ask questions I can’t answer!


Sunday, April 15, 2018

Venice a Photographic World Apart


The last stop on our Italian tour was Venice.  By that time, the kids had all spun off to various locations of their own choosing, Abby and Grayson to the Dolomites, and Jeremy and Gina to Gina’s Italian relatives in Naples.  After a short stay at Lake Como, we took the train from Milan to the floating City and it was an entirely unique experience.


A World Apart
From Venice’s’ modern train station, we took a brief boat ride across the Grand Canal to our hotel, and to a different world.  Of course, I knew about the canals, but I didn’t appreciate how completely Venice is frozen in time.  The narrow winding streets reminded me of the Boston’s meandering “cow path” roads and, except for the antennas, the city’s buildings have changed very little since the Renaissance.  Despite the crowds this is a place that seems to run at a slower, more relaxed, pace.  Venice’s streets feel much more like paths, especially since no vehicles are allowed, not even bicycles. 


A Photographer's Paradise

You Must Have a Gondola

Italy was a wonderful place for photography, but Venice provided, by far, the most beautiful and varied photographic opportunities.  As I have reviewed my images, it seemed clear that Venice is a city that can best be understood visually – the majestic Grand Canal, the many interconnecting narrower canals, the variety of boats and gondolas, busy Saint Mark’s Square and the quiet narrow streets that invited getting happily lost – thank God for my GPS.  It seemed that every turn provided a new vista.  The canals provided lines of view on the classic architecture and the changing light continually altered the feel of the scenery.  The opportunities for interesting compositions were endless. My greatest frustration was that we only had a couple of days to explore.


Church of  San Giorgio Maggiore


Waterfront Sunset


We chose to schedule our visit a little after the busiest season.  Many of the back streets were quiet but the main streets were still crowded with mid-day shoppers.  On the first evening we found our way to the waterfront for a simple diner and a spectacular sunset, only interrupted by the passage of one of the monstrous cruise ships. 


Quiet Morning Streets

No One on the Bridge

The next morning, I got out just after dawn and, for about an hour, I had the streets and canals mostly to myself.  The bridges were clear of gawkers and the canals were navigated only by delivery barges.  For a moment, it was dream-like and then the people arrived, first the natives heading for work or school and then the tourist signaling that it was time to find my back to my hotel and breakfast on the Grande Canal.  


Saint Mark's Square


The morning brought more wandering eventually leading to a tour of St. Mark’s Square, the Basilica and the Doge’s Palace.   Our evening stroll included lingering with the crowds on the Rialto Bridge, which arches over the Grand Canal.  I had to work my way to the edge, but the views down the Canal, especially at sunset were spectacular. 


Rialto Bridge Evening


Water Bus to Diner

 For diner we took a water bus to meet friends in another quarter of the city.  Once you figure out the routes the buses are a lovely and inexpensive way to get around.


Doge's Palace


Murano Glass


Blowing Murano Glass

The first half of our final full day in Venice was spent at the glass works on nearby Murano Island.  Murano glass is known the world over for its quality and artistic expression.  It was fascinating to watch the glass blowing and, of course we had to come away with a couple of lovely little pieces of art.  


Not the Murano Glass we Bought!


Rialto Taxi Dock


Back Street Cafes

The afternoon was spent with more walking, and of course, more eating at yet another picturesque cafĂ©.  The evening was spent on a food tour of best restaurants off the beaten track. We were reluctant to head back to our hotel since we knew that early in the morning we would be taking a water taxi to the airport and our flight home.


Foggy Morning Trip the the Airport


Festival Masks Everywhere

Did I mention that Venice was a photographer’s dream?  It was the ideal way to finish an amazing three weeks exploring beautiful Italy.  Given all the cold damp early New England spring weather, working my way through the glorious Venice pictures this week has been a perfect escape.  Now back to reality - But there will always be Italy :


 Jeff Newcomer
www.partridgebrookreflections.com
603-363-8338


Sunday, April 8, 2018

Digital Camera Sensors

Rhododendron Light, Spofford, NH

In many of my classes and articles I have referred to the sensor on a digital camera.  I have discussed its sensitivity, dynamic range and noise, all without much understanding of what goes on in that little chip of silicon behind the DSLR’s mirror.  Many of my blog articles have been trigger by my own desire to learn something new, and this week it is about discovering a little of how digital sensors actually capture the images that we spray upon their surfaces

.

CCDs and CMOS Sensors

At their essence, all camera sensors work the same way.  The two common sensor types, CCDs (charged coupled device) and CMOS (complementary metal-oxide-semiconductor) both translate light, in the form of photons, into electrons.   The electrons are amplified and create an electrical current which is constructed into an image by the camera’s software. That is an overly simplified description of a very complicated process.  CCDs and CMOS sensors differ as to how the electrons are collected and amplified, and these differences affect the quality and noise of the image, as well as the cost and speed of the sensor.

Photon Harvesting


Both CCD and CMOS sensors are made up of an array of silicon 
Monochrome Sensor Receive all Colors of Light
Cambridge in Color
based sensors which capture electrons generate by the interaction with photons of light.  On CDDs, the electrons move along a row and are sequentially amplified and sent on to the processor.  The process is slow but results in a high quality image with better  dynamic range and less noise.  On CMOS sensors, each pixel site has its own amplifier which makes the sensor faster and more efficient, requiring much 
less power.  They are also cheaper to manufacture, but because the amplifier on each pixel site takes up space on the sensor, the amount of light that can reach each photon sensing pixel is reduced.  This deficiency has been largely overcome by the use of microlenses in front of each photodiode, which focus light into the photodiode that would have otherwise hit the amplifier, and not been detected.  


Microlenses Focus light around obstructions


The new CMOS sensors are thought to perform as well our better than the conventional CCDs, but CCD sensors are still used in some video cameras and in situations where the highest quality is required such as in telescopes.  Nevertheless, the improved CMOS sensors are now the used in  most consumer and professional camera.  They are the standard in both Canon and Nikon Cameras.


Seeing Color


Filters Restrict colors Received by Pixel SitesCambridge in Color
Whether on a CCD or CMOS sensor, the individual pixel sites can only measure the intensity of the light and are blind to color.  Most often, color is recorded using an overlying array of color filters (red, green or blue) which allow only one color to penetrate to each pixel site.  Other colors are extrapolated from these primes by using complicated algorithms to combine the input from adjacent pixels. 


Bayer Array on Sensor Detail
wilipedia
Bayer Array


Most often a “Bayer” color filter array is used.  This has an arrangement which includes twice as many green filters as red and blue, since the human eye is more sensitive to green light.


Zoom in on a Leaf Edge


Raw Pixels show a full color range - All from just Red, Green and Blue


This is only a brief description of how digital sensors work.  The complexity of the digital algorithms required to translate the data coming from the sensor into a beautifully detailed image is truly mind numbing. 

Bigger is Better
Canon 5D Mark IV Full Frame Sensor
This superficial understanding of sensor function may be helpful in appreciating why larger sensors have advantages over the small sensors placed in compact and consumer cameras. The race to have high numbers of sensor mega pixels, has caused manufacturers to densely jam smaller pixel sites to fill the tiny sensors of smaller and less expensive cameras.  But all pixels are not alike, and despite the rush to market high megapixels, it is generally not the quantity but the quality of the pixels that is most important.  So why is a full frame (ie 35mm size) 20 megapixel sensor better than 20 megapixels jammed on a sensor less than half the size?  


Dynamic Range
Canon SX50 HS, Sensor 3% size of Full Frame
The major advantages of a large sensor are in superior dynamic range and lower noise.  Larger sensors can have larger pixel sites which can hold more electrons before they become saturated and can hold no more.  A pixel site with a full bucket of electrons appears blown-out, losing all detail in the highlights and limiting dynamic range.

Noise
All sensors have a certain amount of digital noise, but this is less apparent when the signal to noise ratio (s/n) is high.  Larger pixels “contain” more light “signal” and therefore the images are cleaner.   Finally, pixel sites that are small and jammed close together can be leak charge to neighboring sites, called “Blooming”.  Larger pixel sites can contain a greater tonal range without this becoming an issue.


5D Mark IV                                  SX50 HS


Small sensors have their own advantages.  The cameras can be smaller and less expensive, and cropping factors expand the effective focal length of lenses.  But for image quality, dynamic range and noise reduction, bigger and better pixels have clear advantages.

Sensor Mosaic
Modern digital cameras seem to produce wonderful images almost by magic.  It is fine to simply accept the wizardry, but I found that even a small appreciation of the what is going on underneath the hood can make the experience even more remarkable.   So, go out and harvest some photons.    


Jeff Newcomer
www.partridgebrookreflections.com